
What Is a Wiping System — and Why It Matters
There’s a small but crucial step that happens before every perfect print: the nozzle wipe.
Before your Bambu printer starts laying down layers, it briefly purges some filament, wipes the nozzle clean, and only then begins printing. This routine is handled by a part called the wiping system — a mix of simple mechanics and clever design that keeps each job neat and predictable.
The Hidden Step Before Every Print
Think of the nozzle as the tip of a paintbrush.
If you switch colors without cleaning it, the next stroke will look muddy.
3D printers face the same issue — leftover filament from the last print or color change can stick to the nozzle and smear onto your new model.
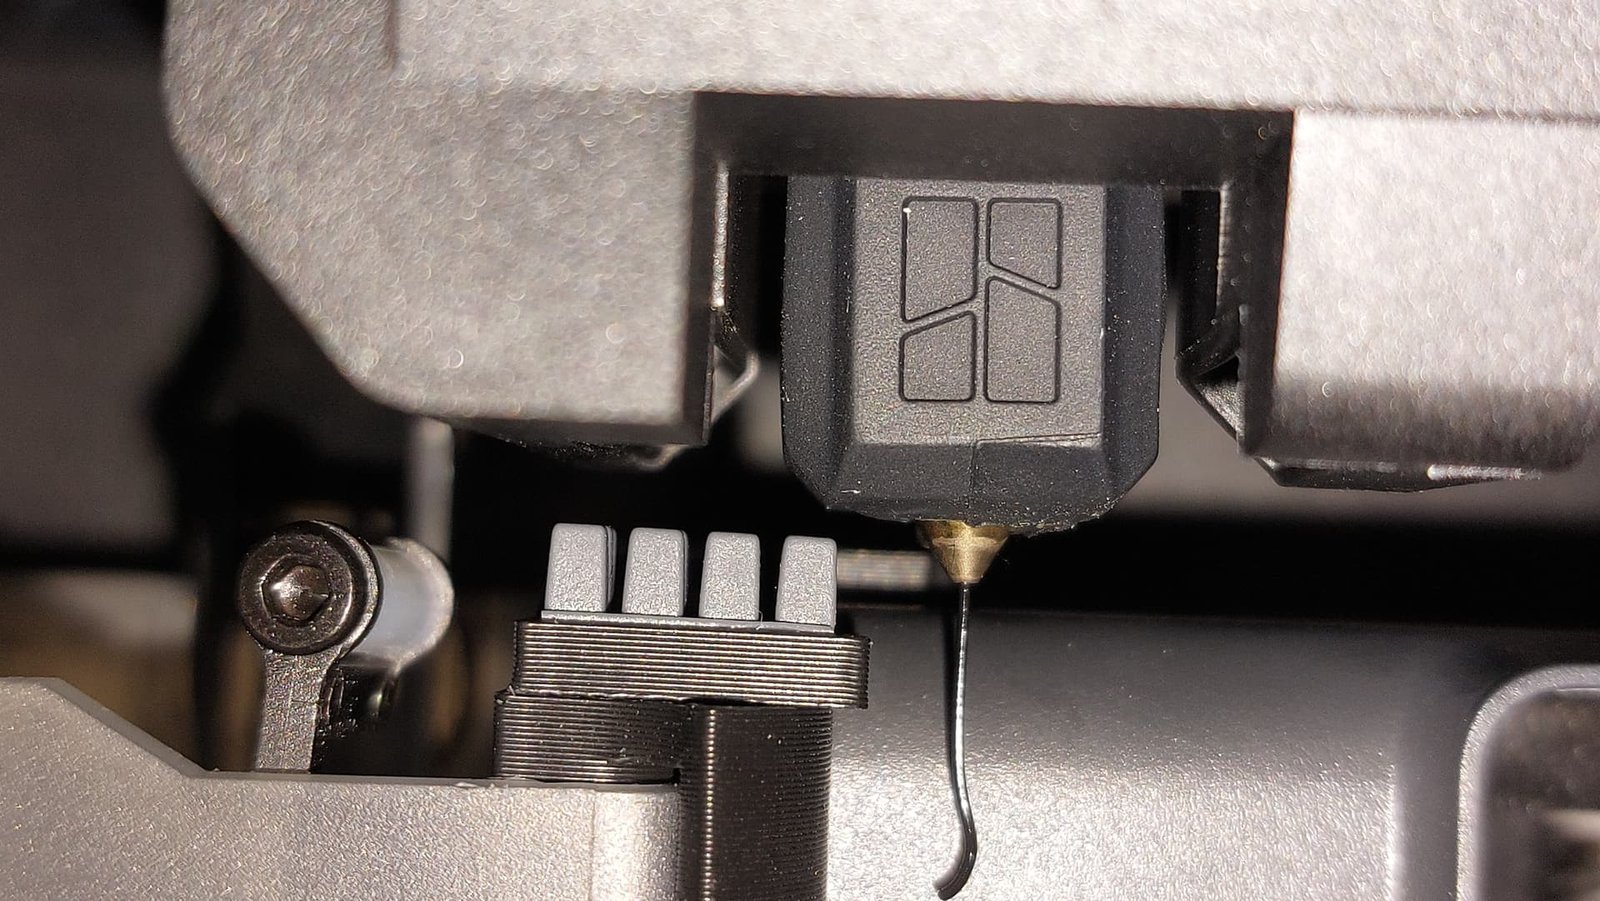
BambuLab printers prevent this by running a quick purge-and-wipe cycle: the nozzle heats up, extrudes a small string of filament (the purge line), then glides across a soft pad known as the wiper, which scrapes off any residue. The waste filament drops into a small purge chute, often nicknamed the poop chute by the community.
The whole motion takes just a few seconds, but it has a massive impact on print quality — it keeps the nozzle clean, prevents smudges, and ensures the first layer sticks exactly the way it should.
How the Wiper and Purge Chute Work Together
The wiping system has two simple but important components:
- Wiper: usually made of silicone or rubber, it physically cleans the nozzle surface.
- Purge chute: a small channel that catches the purged material so it doesn’t end up on your print bed.
These two parts work in sync. When the nozzle wipes across the pad, the leftover filament falls into the chute. If the wiper doesn’t clean properly or the chute clogs up, the nozzle might carry waste back to the model — leading to stringing, blobs, or dirty first layers.
In other words, the wiping system is your printer’s first line of defense against messy prints.
It doesn’t make your printer faster, but it makes every print cleaner, more consistent, and far less frustrating.
Common Problems Users Face
Even though BambuLab’s wiping system is well-designed, it’s far from perfect.
If you spend any time on Reddit or the Bambu community forum, you’ll quickly notice that topics like “poop chute clogging” or “wiper not cleaning” show up again and again.
These aren’t random complaints — they’re small issues that can quietly affect print quality and consistency over time.
Typical Pain Points on the P1 / X1 Series
1. Filament buildup and incomplete cleaning
One of the most common frustrations is that the waste filament doesn’t fully fall into the purge chute. Instead, it curls up or sticks to the edge, forming a little “pile” over time.
Eventually, those hardened bits can blow around the chamber or reattach to the nozzle during a print.
2. Stringing and drag marks
Right after wiping, the nozzle sometimes pulls out a thin filament string — like a spider web — as it moves back to the print area. It looks small, but it can ruin the first layer by dragging debris across your model’s base.
3. Clogged or poorly shaped purge chute
Some users report that the original chute design is too narrow. When printing high-temperature materials like ABS or PA-CF, the purged filament cools too quickly and gets stuck. Over time, that blockage keeps the new waste from dropping down properly.
4. Debris and airflow issues
Inside an enclosed printer, airflow matters.
If the fan blows directly toward the purge zone, light pieces of filament can scatter and end up sticking to the bed or walls. It’s a small thing, but it can leave random specks on an otherwise perfect print.
Why These Problems Happen
To understand why the wiping system fails sometimes, you need to know one simple truth: it’s not a smart system — it’s a mechanical one.
The nozzle moves along a fixed path, guided by software and physics.
If anything in that equation — the angle, the heat, the airflow — goes slightly off, cleaning efficiency drops fast.
- Design factors: The wiping angle and range are fixed. Even a 1–2 mm difference can reduce contact with the wiper.
- Material behavior: Every filament melts and cools differently. PLA breaks off cleanly, while ABS or PETG tend to stretch and form strings.
- Environmental effects: Chamber temperature and airflow can harden or soften the purged filament, affecting how easily it falls off.
That’s why two printers can behave completely differently — one stays spotless, while the other keeps leaving blobs behind.
And that’s also the question many new users end up asking:
“Why does my printer wipe, but the nozzle still looks dirty?”
Good news — the next section breaks down how makers have solved this, with real fixes tested and shared across the community.
Community-Tested Fixes and Practical Solutions
Over the past year, the Bambu user community has done what it always does best — experiment, fail, test again, and share what works.
When the wiping system started to show its quirks, makers around the world came up with dozens of clever fixes.
Most of them fall into three categories: hardware mods, software tweaks, and hybrid solutions.
1. Hardware Mods — Small Prints, Big Difference
The fastest and most visible improvement comes from physical upgrades.
You can 3D print new brackets, wider purge chutes, or even complete “poop box” enclosures that make filament drop more cleanly and reduce buildup.
Popular community mods include:
- Improved wiper brackets – adjust the angle or height so the nozzle makes better contact.
- Extended purge chutes – widen or deepen the outlet to prevent clogging.
- Integrated purge boxes – combine wiping and waste collection in one unit, keeping the chamber tidy.
You can find many of these on MakerWorld, Printables, or Thingiverse, often labeled with names like “P1/X1 Poop Chute Extended” or “Wiper Bracket v3.”
Most are free to download and easy to install — just print the new part, remove the old one, and bolt it in.
Pros:
- Instantly improves waste flow.
- Costs next to nothing to try.
Cons:
- Fit tolerance can vary between models.
- Poor alignment might scratch the nozzle if not adjusted properly.
💡 Pro Tip: After installing a new bracket, always re-run your Z-axis calibration to make sure the nozzle doesn’t press too hard on the pad.
2. Software Tweaks — Make the Printer “Wipe Smarter”
If you prefer to keep your printer stock, software can still work wonders.
A few lines of custom G-code can change how often or how carefully the printer wipes the nozzle.
Here are some tried-and-tested tweaks:
a. Add an extra pre-wipe routine
In OrcaSlicer, go to Printer Settings → Start G-code and insert:
G1 X-5 Y210 F12000 ; move to wipe zone
G1 E15 F300 ; extra purge
G1 X-10 Y210 F8000 ; gentle double wipe
This forces the nozzle to purge and wipe twice before printing starts — great for eliminating first-layer smudges.
b. Adjust purge line length or speed
Slower and slightly longer purge lines allow the filament to flow more steadily before the first layer begins.
c. Use Klipper macros (for advanced users)
Power users can add macros that automatically trigger wiping during material changes, pauses, or print resumes — making the whole system more dynamic.
Pros:
- No hardware needed.
- Fine control over wiping behavior.
Cons:
- Requires some understanding of G-code.
- Wrong coordinates could move the nozzle out of range.
💡 Pro Tip: Always test new G-code on an empty bed first to confirm the nozzle path is aligned with the wiper.
3. Hybrid Setup — The Best of Both Worlds
The most reliable setup combines both approaches:
upgrade the hardware and fine-tune the software.
For example:
- Install an improved wiper bracket for better nozzle contact.
- Use an extended chute to prevent blockage.
- Add a short G-code sequence for an extra wipe after filament changes.
Several Reddit users have reported excellent results with this combo:
“After the mod and G-code update, my nozzle stays spotless even after 10-hour prints. No more blobs or drag lines anywhere.”
When done right, the hybrid solution can boost wiping efficiency by 30–40% and nearly eliminate filament buildup inside the chute.
In short, the wiping system isn’t broken — it just needs tuning.
Once you balance airflow, wiping angle, and purge timing, you’ll realize that a clean nozzle equals a clean print — every single time.
Maintenance & Upkeep Tips
No matter how fancy your wiping setup is — whether it’s stock or fully modded — it still needs regular care.
Most print issues don’t come from bad design. They come from dust, residue, and tiny bits of old filament quietly building up over time.
Taking a few minutes to clean the system every now and then will save you hours of troubleshooting later.
Rule of thumb: Preventive cleaning is always easier than emergency fixing.
1. Regular Cleaning
How often: Every 20–30 hours of printing, or before any long, multi-hour job.
Simple cleaning routine:
- Power off the printer and let it cool down.
- Open the chamber door and use a soft brush or tweezers to remove debris around the wiper.
- Check the purge chute — make sure no cold filament is clogging the outlet.
- If the chute is blocked, gently remove the hardened waste. Avoid scraping with metal tools.
Important:
Do not use alcohol on silicone wipers — it can dry and crack the surface.
If it’s greasy, just use warm water and a lint-free cloth, then let it air-dry completely.
2. Preventive Care
Good maintenance habits make your printer quieter, cleaner, and more reliable.
Here’s what to keep an eye on:
- Watch the nozzle during preheat: If it hesitates or blobs, there may be pressure buildup or partial clogs.
- Keep the chute clear: Any blockage will cause the next purge to back up and mess up the wipe.
- Inspect the wiper pad: Replace it when it hardens, curls, or cracks — those signs mean it’s losing elasticity.
- Check airflow and fans: Too much airflow can blow debris back onto the bed.
💡 Quick tip: When changing filament or cleaning your build plate, take five seconds to glance at the wiper area. It’s a habit that prevents 90% of wiping issues.
3. Quick Troubleshooting Table
| Symptom | Possible Cause | Fix |
|---|---|---|
| Stringing or dirty first layer | Residue on the wiper | Clean or replace the wiper; add a pre-wipe G-code |
| Filament pile-up near the chute | Narrow or blocked outlet | Print an extended chute or manually clear debris |
| Nozzle drags material back | Wrong airflow or cold wipe | Reduce fan speed; delay nozzle travel slightly |
| Unstable first layer | Cold or partially blocked nozzle | Heat the nozzle and clean manually |
💡 Pro Tip: You can place a small piece of Kapton (high-temp) tape near the wipe zone — it prevents metal contact and makes cleaning easier later.
A clean wiping system extends nozzle life, keeps prints consistent, and maintains chamber hygiene.
When your nozzle stays spotless, your first layer locks better, color transitions look sharper, and long prints finish without a mess.
In short, maintaining the wiper means maintaining your print quality.
Results and Insights
After months of testing, tweaking, and countless community experiments, one thing is clear:
the wiping system can be transformed from a weak spot into a quiet strength.
Whether you printed a new bracket, extended the chute, or adjusted your G-code, the difference in daily printing is easy to see — and even easier to feel.
1. Before vs. After
With the stock setup, many users reported familiar issues:
- Fine strings dragging across the first layer.
- Little “poop piles” forming at the edge of the purge chute.
- Slight color contamination when switching filaments.
- Occasional debris showing up at the bottom of the chamber.
After applying both hardware and software fixes, most of these disappeared:
- Wiping became cleaner and more consistent.
- Stringing was reduced or completely gone.
- Color transitions looked smoother, without leftover streaks.
- The chamber floor stayed noticeably cleaner, even after long jobs.
One Reddit user summed it up perfectly:
“After the mod and G-code tweaks, my nozzle stays spotless even after ten-hour prints. I haven’t cleaned the chute in weeks — it just works.”
On average, makers report 30–40% better wiping efficiency and far less filament buildup, simply from combining small community mods and logic-based cleaning steps.
It’s not an official number, but it’s a consistent pattern seen across hundreds of shared experiences — and that’s the beauty of open testing.
2. Personal Takeaway
To me, the wiping system isn’t just about keeping the nozzle clean — it’s about discipline in design.
It’s a reminder that great printing doesn’t come from raw power; it comes from control.
At first glance, wiping feels like a minor step. But anyone who’s had a print ruined by a stray blob or a color streak knows how costly “minor” can be.
That little swipe before every job is what separates a messy print from a masterpiece.
BambuLab has done a solid job automating this, but the real power lies in user understanding.
When you learn how the system works — and how to tweak it — you’re no longer just using a printer; you’re mastering it.
This is what makes the Bambu community special: thousands of makers who don’t settle for “good enough.” They push for smoother, cleaner, smarter machines — and share the process openly.
3. In One Sentence
Upgrading your wiping system isn’t about making your printer fancier — it’s about making it reliable.
When the nozzle wipes cleanly, the print starts cleanly.
And that’s where every great print begins.
Final Thoughts — Keeping It Clean, the Smart Way
By now, you’ve probably realized the wiping system isn’t just a tiny mechanical part — it’s the quiet start of every great print.
Its real purpose isn’t only to remove waste, but to reset the printer back to its best condition before every job.
A clean nozzle means:
- smoother first layers,
- sharper multi-color transitions,
- better waste management,
- and fewer print interruptions.
In short, it’s not about luxury — it’s about reliability.
The Bigger Picture
Reliable printing isn’t about flashy features or top speed.
It’s about consistency — the ability for your machine to repeat the same perfect motion, over and over again.
And the wiping system is where that consistency begins.
“True efficiency isn’t printing faster — it’s printing smarter.”
Every time your nozzle glides across the wiper, it’s not just cleaning itself; it’s preparing to perform.
That small motion embodies what makes 3D printing special — precision, care, and a bit of quiet magic.
Over the past year, community-driven tweaks have turned the wiping system from an afterthought into a point of pride.
It’s now a perfect example of what happens when engineers build, users experiment, and the two worlds meet halfway.
So next time you hit Start, take a moment to watch that first gentle swipe.
That’s your printer doing what every good maker does before a project — starting clean.
Suggested Resources
Official Guides
- Bambu Wiki: Purge Chute & Wiper Maintenance
- BambuLab Community Forum: Technical discussions and service updates
Community Mods
- MakerWorld / Printables: Optimized wiper brackets and extended purge chutes
- Thingiverse: X1/P1 purge chute and wiper mod collections
Advanced Tweaks
- OrcaSlicer / Klipper: Custom G-code and wipe macros
- Reddit r/BambuLab: Long-term feedback from real users
Closing Note
Keeping your nozzle clean may seem like a small habit, but in 3D printing, small habits shape big results.
A clean nozzle means better adhesion, fewer errors, and more confidence every time you print.
It’s not just maintenance — it’s the maker’s version of mindfulness.
FAQ: Common Questions About Bambu’s Wiping System
Q1: Do I need to upgrade or replace the P1/X1 wiping system?
Not necessarily.
If your prints look clean, your nozzle wipes properly, and your first layers stick well, you don’t need to rush an upgrade.
However, if you see filament buildup, leftover strings, or color contamination after a material change, you might benefit from a printed mod or an extra wipe command in your G-code.
Q2: Will using third-party wipers or chutes void my warranty?
As long as you don’t modify the mainboard, sensors, or electrical parts, adding community-printed accessories won’t affect your warranty.
That said, physical damage caused by non-official parts might not be covered.
Keep your original pieces so you can reinstall them if needed.
Q3: How often should I clean or replace the wiper pad?
A light cleaning every 20–30 hours of printing is ideal.
If the pad hardens, curls, or shows cracks, replace it.
Heavy users can rotate two or three spare wipers to extend overall lifespan.
Q4: What’s different about the P2S wiping system?
The P2S introduces a slightly redesigned wiper and a refined airflow path that helps purged material fall more cleanly.
However, the working principle is the same as the P1S.
With a few community mods and a short G-code tweak, your P1S can perform nearly as cleanly as a P2S.
Q5: Can I fix stringing or dirty first layers with G-code?
Yes.
Adding a few extra wipe or purge commands in your Start G-code can drastically improve nozzle cleanliness.
For example:
G1 X-5 Y210 F12000 ; move to wipe zone
G1 E15 F300 ; extra purge
G1 X-10 Y210 F8000 ; gentle double wipe
This pre-wipe routine ensures a cleaner first layer and fewer stringing issues.
Q6: Why does my nozzle still look dirty even after wiping?
Possible causes include:
- The nozzle temperature is too low, so the filament doesn’t melt off fully.
- The wiper isn’t aligned properly.
- The chute is clogged with cooled filament.
Try raising the nozzle temperature by 5–10°C and checking the bracket position.
Q7: What should I do if the purge chute gets blocked?
Power down the printer, let it cool, and gently pull out the hardened waste with tweezers.
If it’s badly jammed, print a replacement chute — there are dozens of improved models on MakerWorld and Printables.
Some makers even line the chute with Kapton tape to make future cleaning easier.
Q8: Can the printer automatically wipe after every filament change?
Yes.
If you’re using AMS, you can set a short custom G-code to trigger a wipe each time materials switch.
This helps maintain color purity and prevents cross-contamination in multi-material prints.
Q9: Do I need to adjust wiping behavior for high-temp materials like ABS or PA-CF?
Yes.
High-temp filaments tend to string more, so add an extra wipe or increase nozzle contact time.
Also, avoid directing cool air onto the nozzle — it can harden filament prematurely and make cleaning harder.
Q10: How can I tell if my nozzle wiped properly?
Check the first purge line before printing.
If it’s smooth, even, and free of color mix or blobs, your wiping is on point.
If it looks uneven or dirty, your wipe zone might need recalibration or another cleaning pass.
