
Heads up — some of the links below are affiliate links. If you buy through them, I earn a small commission (at no extra cost to you), which helps cover the gear I test. Thanks!
You printed the little cube everyone told you to print. Now it’s sitting on your desk, and you have no idea what it’s telling you.
That’s the part most guides skip. They hand you a 3D printer calibration cube file, tell you to hit print, and stop there. But the cube was never the point. Reading it is. And here’s the truth nobody says up front: half of what people try to “fix” with a cube can’t actually be fixed with a cube at all.
A failed calibration cube is basically a rite of passage. Every new printer owner has a drawer of ugly ones. So don’t panic if yours looks rough.
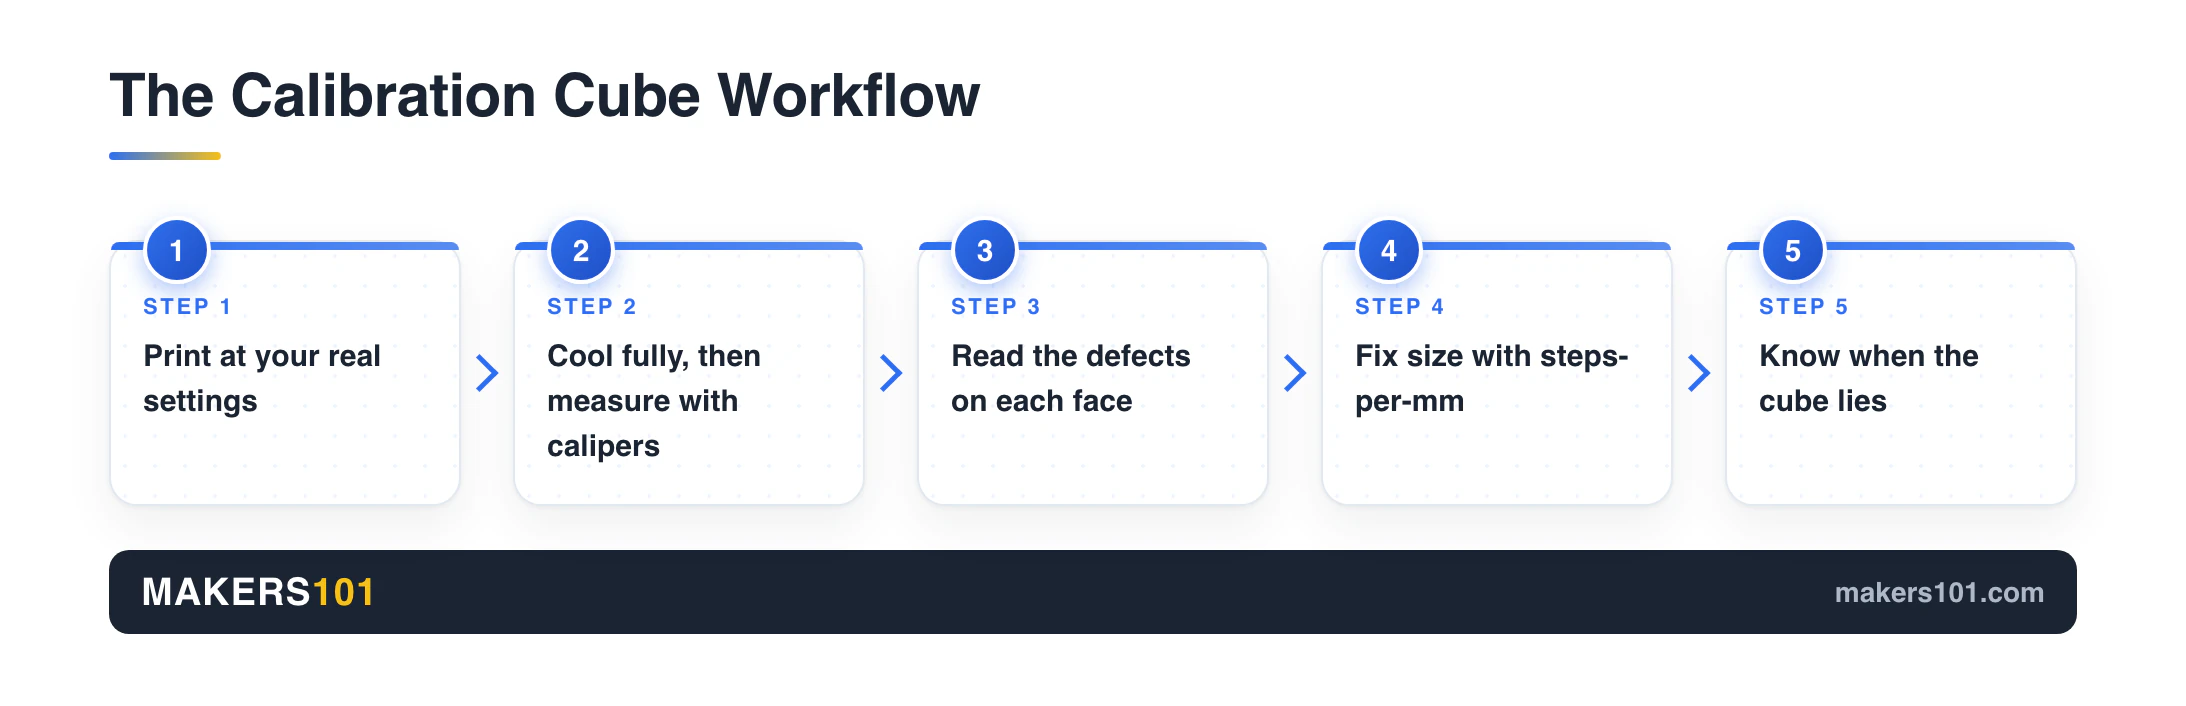
This guide walks you through the whole thing. How to print the cube properly, how to measure it, how to read every defect it reveals, how to fix the ones that are fixable, and (the part experts rarely explain to beginners) when to stop trusting the cube entirely.
- This little test print checks your printer’s dimensional accuracy and spots surface-quality problems like ringing, bulging corners, and elephant’s foot.
- Print it at your real, everyday settings and speed. A slow “pretty” print hides the exact problems you’re trying to find.
- Let it cool completely before you measure, and use calipers. Warm plastic reads wrong.
- The cube is excellent for spotting quality defects, but weak for absolute sizing. Most cubes measure “off” because of material shrinkage, not a broken machine.
- Fix wrong dimensions with steps-per-mm or a slicer scale factor. Fix shape and surface problems defect by defect.
Table of Contents
- What Is a 3D Printer Calibration Cube?
- Where to Get a Calibration Cube (Download or Make Your Own)
- How to Print Your Calibration Cube the Right Way
- How to Measure Your Calibration Cube Accurately
- How to Read Your Calibration Cube, Defect by Defect
- How to Fix Dimensional Accuracy (Steps Per mm)
- The Honest Truth: What a Calibration Cube Is (and Isn’t) Good For
- Frequently Asked Questions
What Is a 3D Printer Calibration Cube?
A calibration cube is a small test model, almost always 20mm on each side, that you print to check whether your printer is accurate and healthy. Print it, measure it, read its surface, and you get a fast snapshot of your machine.
Look closely and you’ll see a letter embossed on three faces: X, Y, Z. Those mark the three axes. The X face tells you about left-right movement, Y about front-back, and Z about layer height going up. When one side measures wrong, the letter tells you which axis to blame.
So what does the cube actually test? Two things. First, dimensional accuracy: are the sides really the right size? Second, a quick read on print quality: ringing, corner sharpness, and how clean the extrusion looks. The cube shows you ringing but won’t fix it. That part is tuning acceleration on an Ender 3.
Most cubes take roughly 20 to 40 minutes at a standard layer height. That’s short enough to run a few in an afternoon while you dial things in.
Where to Get a Calibration Cube (Download or Make Your Own)
You have three easy ways to get a cube, and none of them cost anything.
The fastest: check your slicer. Many modern machines include a calibration section right in the software, so you may already have one built in. Next easiest: download a free STL. The classic XYZ cubes on the big model sites (the widely mirrored iDig3D and Halit versions) are the community standard, and they include those axis markings.
There’s also a smarter option that pros use. Scale the cube up to 40mm before printing. A bigger part shrinks the impact of small measuring mistakes, so your reading is more trustworthy. More on why that matters later.
If you’re brand new to all of this, it helps to get comfortable with your material first, because filament choice changes your results. Our beginner’s guide to using filament covers that groundwork.
How to Print Your Calibration Cube the Right Way
Print the cube exactly the way you actually print everything else. This is the single rule beginners get wrong.
It’s tempting to slow the cube down and baby it so it comes out clean. Don’t. As tuning expert Vector 3D puts it, using special settings for calibration is pointless, because that’s not how your real designs get printed. A cube run at a gentle 30mm/s can look perfect and still hide the ringing and corner bulge that ruin your normal prints.
So use your everyday speed, your everyday acceleration, and the same filament and temperature you plan to use for real. A 0.2mm layer height and a single perimeter are plenty for a dimensional check. Material matters here too, and we’ll come back to why in a moment.
One thing worth doing before you even print: make sure your temperature and speed are sane for your filament. If you’re not sure where to start, the free Print Settings Finder gives you a solid baseline to work from. If you are still picking the software side, I broke down the best slicer choices by printer type.
How to Measure Your Calibration Cube Accurately
Your fix is only as good as your measurement, so slow down for this step.
Wait until the cube is completely cool before you touch a caliper to it. This trips up a lot of people. Warm plastic is still slightly expanded, and a part measured hot on the plate can read differently once it settles. Bambu tutorials specifically warn to let the cube cool fully on the build plate first, because early removal and warping skew the numbers.
Measure each axis with calipers. Digital ones make this far less painful and far more repeatable than a ruler. Measure across the middle of each face, not down at the very bottom. The base often bulges out slightly and will throw your reading off.
What counts as “good”? For most prints, anywhere from about 19.90mm to 20.10mm is perfectly fine. Chasing a perfect 20.000mm is a waste of an afternoon unless you print precision fit parts.

- Precise measurement: Measurement range: 0 – 6”/0 – 150 mm; Resolution: 0.01”/0.1 mm; Accuracy: +/- 0.2 mm/0.01”. Perfect and accurate caliper…
- 4 measuring modes: This digital caliper can be used to Measure inside and outside diameter, depth and step with two sets of jaws and a probe
- Inch/mm conversion: One button quick switch between two units: inch and millimeter, definitely save your time. The buttons are made of rugged plastic…
- Zero setting function: The smart design allows you to set zero with an easy touch of a button and start a new measurement at any point of the scale…
- Large LCD screen & auto off: The large and easy-to-read LCD display helps you get precise results quickly and easily, auto shutdown for saving battery…
How to Read Your Calibration Cube, Defect by Defect
Here’s where the cube earns its keep. Almost every common print problem leaves a visible signature on those six faces. Learn the signatures and the cube becomes a diagnostic tool, not a paperweight.
Use the table below as your quick reference, then read the details underneath for the fixes.
| What you see on the cube | Likely cause | Where to fix it |
|---|---|---|
| Sides not the right size | Steps-per-mm off, or material shrinkage | Steps/mm or slicer scale factor |
| Faint echo lines after corners (ringing) | Loose belts, speed too high | Belt tension, slow down, input shaping |
| Bulging, flared bottom edge (elephant’s foot) | Nozzle too low, bed too hot | Z-offset and first-layer tuning |
| Rounded or bulging corners | Pressure advance, flow, speed | Pressure advance / flow calibration |
| Stepped, shifted layers | Loose belt, printing too fast | Belt tension, reduce speed |
| Rough top, gaps, or blobs | Under or over-extrusion | Flow rate calibration |
Wrong Dimensions
If the sides just aren’t the right size, that’s a dimensional issue. It points to either your steps-per-mm being off or, more often than people think, plain material shrinkage. The next section covers the steps-per-mm fix in full.
Ghosting and Ringing
Ringing shows up as faint repeating echoes trailing each corner, like ripples. It usually means your belts are loose or you’re printing faster than your frame can handle. Slowing down helps immediately. But the real cure is tightening your belts and, on capable machines, enabling input shaping. Our guide on how to tighten belts and tackle ringing at the source walks through it step by step.
Elephant’s Foot (Bulging Bottom)
Elephant’s foot is that flared, squished bottom edge where the first layer spreads wider than the rest of the cube. It comes from the nozzle sitting too close to the bed, the bed running too hot, or too much first-layer squish. Raise your Z-offset slightly and tune the first layer. If your first layer is also struggling to stick, the same root causes are usually at play, and our fixes for when your first layer isn’t behaving apply directly.
Rounded or Bulging Corners
Sharp corners that come out soft, rounded, or bulged usually mean your pressure advance or flow needs work, or you’re simply moving too fast into the corners. This is an extrusion-timing problem, not a dimensional one. Calibrating pressure advance and flow rate sharpens those corners back up.
Layer Shift
A layer shift looks like the cube got sliced and nudged sideways partway up. One Reddit user with an Anycubic Kobra 2 Neo hit exactly this and blamed the SD card. It almost never is. A shift means a belt slipped or a motor skipped, usually from a loose belt or printing too aggressively. Check belt tension and dial your speed back.
Rough Tops, Gaps, or Blobs
Gaps, rough top surfaces, or little blobs point to extrusion problems: too little plastic (under-extrusion) or too much (over-extrusion). The fix is flow-rate calibration, which is also a prerequisite for trusting your dimensions, as you’ll see next. If the top is flat but just faintly ridged rather than gappy, that’s a finish job, not a flow job. Ironing in Cura is the fix there.
How to Fix Dimensional Accuracy (Steps Per mm)
Before you touch a single steps-per-mm value, calibrate your extruder’s E-steps and flow rate first. This order isn’t optional.
Here’s why. The steps-per-mm method works by measuring a printed part. If your extruder pushes out inconsistent plastic, that error gets baked straight into the cube, and you end up “correcting” your machine’s motion to compensate for an extrusion problem. It’s like building a house on a shaky foundation. As the channel Pushing Plastic warns, calibrating dimensional accuracy without setting E-steps and flow first will give you flawed results.
Once extrusion is solid, the fix itself is simple math:
New steps = current steps × (target size ÷ measured size)
Say your X axis reads 19.9mm on a 20mm cube, and your current X steps value is 128. Then 128 × (20 ÷ 19.9) gives about 128.6. In one real AnkerMake M5 calibration, that iterative process moved the axes from 128/128/400 to final values of 130/130/396, landing all three sides right on target.
Two firmware gotchas trip people up here. First, most firmware won’t accept decimals for steps, so round to the nearest whole number. Second, and this one hurts, you have to save your new values to the printer’s EEPROM. Skip the save and your careful work vanishes the moment you power off.
Expect to iterate. Print, measure, adjust, reprint. It’s normal to overshoot on the first correction. In one 40mm-cube calibration, the axes went from 40.37mm to an over-corrected 39.74mm before settling at a clean 40.06mm on the second pass. Two or three rounds usually gets you inside tolerance.
The Quick Version for Bambu and Klipper Users
Modern machines complicate this slightly. Bambu Lab printers, for example, auto-calibrate filament flow but ship with no built-in axis calibration at all. To fine-tune them, you add an M92 command in the machine G-code with your correction ratios.
One tip from Bambu tuners: enter these values per print rather than saving them permanently with M500. A permanent value affects every future print and every filament, which is rarely what you want. Treat axis tweaks as a per-project adjustment for the handful of parts that truly need sub-0.1mm fit.
The Honest Truth: What a Calibration Cube Is (and Isn’t) Good For
Here’s the reframe that will save you hours: when your cube measures “off,” the culprit is usually your material, not your machine.
That runs against the whole ritual of tweaking steps-per-mm until a cube hits its target size. But testing backs it up. On one printer, tuning expert CNC Kitchen measured shrinkage of about 0.35% for PLA, 0.4% for PETG, and 0.7% for ABS and ASA, with parts coming out undersized purely from the plastic cooling and contracting. Different materials, different shrink, same healthy printer. Because PLA and PETG shrink at different rates, the smarter fix is a per-material scale factor in your slicer, not a permanent change to your machine’s steps.
The cube has a second blind spot: its size. A 0.1mm measuring slip on a 20mm cube is a 0.5% error. That same slip on a 100mm part is only 0.1%. The small cube magnifies every tiny mistake in your caliper technique, which is exactly why scaling up to a larger test part gives you a more honest number.
And there’s one thing a cube physically cannot show you: skew. Skew is when your axes aren’t perfectly square to each other. It looks fine on a small cube but wrecks parts that must fit together. The math is unforgiving. A skew of just 0.2 degrees over a 300mm bed adds up to more than 1mm of error. When CNC Kitchen surveyed real printers, skew ranged from a near-perfect 0.1 degrees to a startling 0.55 degrees on one pre-production A1 Mini, enough to shift a full-bed part by 1.7mm.
So what’s the cube genuinely good for? Quality. It’s a fast, honest read on ringing, corner sharpness, elephant’s foot, layer shifts, and extrusion consistency. Use it that way and it’s one of the best diagnostic prints you can run.
When you need real dimensional accuracy for functional, fitting parts, graduate to a larger, purpose-built test. The CaliFlower, designed by Vector 3D and popularized by CNC Kitchen, measures inner and outer dimensions plus diagonals, so it catches the shrinkage and skew that a plain cube never will. Think of it as the cube’s grown-up sibling for when fit actually matters.
Frequently Asked Questions
What is a calibration cube in 3D printing?
It’s a small test print, usually 20mm per side with axis letters on its faces. You print and measure it to confirm your machine is sizing parts correctly and to spot common surface defects.
How long should a calibration cube take?
Expect roughly half an hour for a standard cube. The exact time depends on your layer height, speed, and printer, but it’s quick enough to run several in one session.
How do you read a 3D printer calibration cube?
Measure each side with calipers to check dimensional accuracy, then inspect the surfaces for defects. Faint echo lines mean ringing, a flared bottom means elephant’s foot, rounded corners point to pressure-advance or flow issues, and a stepped offset means a layer shift.
What is the best calibration cube to use?
For a quick health check, the standard free XYZ cube is perfect. For serious dimensional accuracy on functional parts, a larger dedicated model like the CaliFlower is far better, because it reads both inner and outer walls and detects axis skew that a small cube can’t.
Why is my calibration cube the wrong size?
Usually it’s the filament, not a fault in your machine. Different plastics contract by different amounts as they cool, so a slight undersize is normal. If it’s consistently off, check that your E-steps and flow are calibrated, then correct it with a steps-per-mm tweak or by scaling the model up slightly in the slicer.