
I earn a commission if you buy through links on this page, at no extra cost to you. As an Amazon Associate, I earn from qualifying purchases.
Something on your desk broke. A knob, a clip, a bracket that nobody sells anymore. You could model a replacement from scratch. Except CAD has beaten you before, and every tutorial starts with a scanner you don’t own.
Most guides answer that by telling you what to buy. That is the wrong first step. Your phone can already capture a physical object accurately enough to print a working replacement. Most first-timers sabotage the attempt by switching on the one sensor that hurts them.
This guide covers three routes and how to choose between them, the capture numbers that decide whether a scan resolves at all, and three traps that cost people an afternoon before they notice.
Prices and free-tier limits last updated 28 August 2026.
Table of Contents
- What a 3D Scan Actually Gives You
- Three Ways to Scan a Product, and How to Pick One
- Which Free Scanning App to Use, and the Export Trap to Check First
- What You’ll Need
- How to Make a 3D Scan of a Product: The Five-Step Walkthrough
- The Scale Problem Nobody Warns You About
- Objects That Will Fight You
- When a Free App Stops Being Enough
- Is It Legal to 3D Scan a Product You Bought?
- Frequently Asked Questions
What a 3D Scan Actually Gives You
A scan gives you a shell, not a design. The hardware measures thousands of points across the surface of your object, builds a point cloud, then wraps that cloud in a triangle mesh. You end up with geometry you can print. You do not end up with a CAD model that has editable dimensions.
Making for Motorsport, a channel built around scanning car parts, puts it about as bluntly as anyone: a 3D scanner is “just a really fancy tape measure.” It records what a surface looks like. It has no idea the hole in the middle is supposed to be a circle.
That distinction decides your whole workflow. Printing a copy needs nothing more than a clean mesh. Changing a dimension, thickening a wall, or bolting something new onto the part means more work ahead in CAD.
Three Ways to Scan a Product, and How to Pick One
Three routes exist, and object size plus end goal decide between them: free phone photogrammetry, free phone LiDAR, or a structured-light scanner starting a few hundred dollars used.
| Route | Cost | Best for | Main weakness |
|---|---|---|---|
| Phone photogrammetry | Free | Textured objects, 5 to 50 cm | No true scale |
| Phone LiDAR | Free (Pro iPhones) | Rooms, furniture, car bodies | Too coarse for small parts |
| Structured-light scanner | $300 to $1,000+ | Small parts, replacements | Still fights black and gloss |
The most upvoted answer in r/3DScanning’s getting-started thread recommends Polycam and then tells you to leave the LiDAR alone: “don’t use lidar, use the photogrammetry to take 100+ photos from all angles.” An iPhone 14 Pro owner further down is harsher about the sensor he bought the phone for, calling it “complete garbage for anything smaller than a computer chair.”
Bench results agree. SuperfastMatt scanned an entire car with iPhone LiDAR and got data clean enough for airflow simulation, then pointed the same phone at an oil filter and got a blob.
Size gives you a cleaner rule than any spec sheet. One reviewer putting a desktop structured-light unit through both of its modes landed on roughly 50 mm as the ceiling for turntable mode and 200 mm for handheld.
Those numbers describe what the hardware is built for. What wins is a separate question. On genuinely small, well-textured objects a phone with macro often matches a budget scanner, because what a scanner really buys you is dimensional accuracy, and detail is something your camera already delivers.
So let accuracy drive the purchase and let size drive the technique. It also helps to know what a pocket 3D scanner actually feels like to use before you spend anything.
Which Free Scanning App to Use, and the Export Trap to Check First
Check what the free tier lets you export before you shoot a single frame. This is where free plans quietly fail people who intend to print.
| App | Free tier exports | Slicer-ready | Free tier cap |
|---|---|---|---|
| KIRI Engine | Unlimited | Yes | 150 photos, 2 GB per scan |
| Polycam | GLTF only | No, needs conversion | Limited captures |
| RealityScan | Yes | Yes | Paid above $1M revenue |
Polycam is the name that came up first in that Reddit thread. Its free tier exports GLTF and nothing else (checked 28 August 2026). GLTF is a rendering format.
Cura and Bambu Studio want STL or OBJ, so a free Polycam scan needs a conversion hop before it can be printed. The mesh formats arrive on the Basic plan at $150 a year.
KIRI Engine goes the other way. Its free tier covers unlimited scans and unlimited exports, capped at 150 photos and 2 GB per scan. One limit matters for exactly the objects that give beginners the most trouble: Featureless Object Scan, the mode built for smooth untextured parts, sits behind the Pro plan at $79.99 a year.
RealityScan, from Epic, is free on both iOS and Android and only asks for a subscription once you clear a million dollars in annual revenue. Between it and KIRI Engine, Android users have two complete routes, which matters because most phone-scanning guides quietly assume an iPhone.
Scaniverse, Luma AI, and Metascan cover similar ground if you want to shop around.
What You’ll Need
You need a turntable, something to hold the phone still, a plain background, diffuse light, and a pair of calipers. Most of that is already in your house.
- A turntable. A round wooden kitchen tray works fine, turned by hand.
- A tripod, or anything that holds the phone still. You rotate the object, not the camera.
- A plain background. A white wall or a sheet of paper behind the object helps the software cut it out.
- Diffuse light. A window out of direct sun, or a softbox. Hard shadows bake into the texture permanently, and no amount of editing lifts them out.
- Calipers. One measurement rescues the whole scan later.
A few optional items earn their keep on difficult surfaces. Matte scanning spray gives black and glossy parts something to reflect. Adhesive marker dots give a tracking-based scanner reference points to lock onto. A motorised turntable removes hand wobble, though the kitchen tray does the same job more slowly.


How to Make a 3D Scan of a Product: The Five-Step Walkthrough
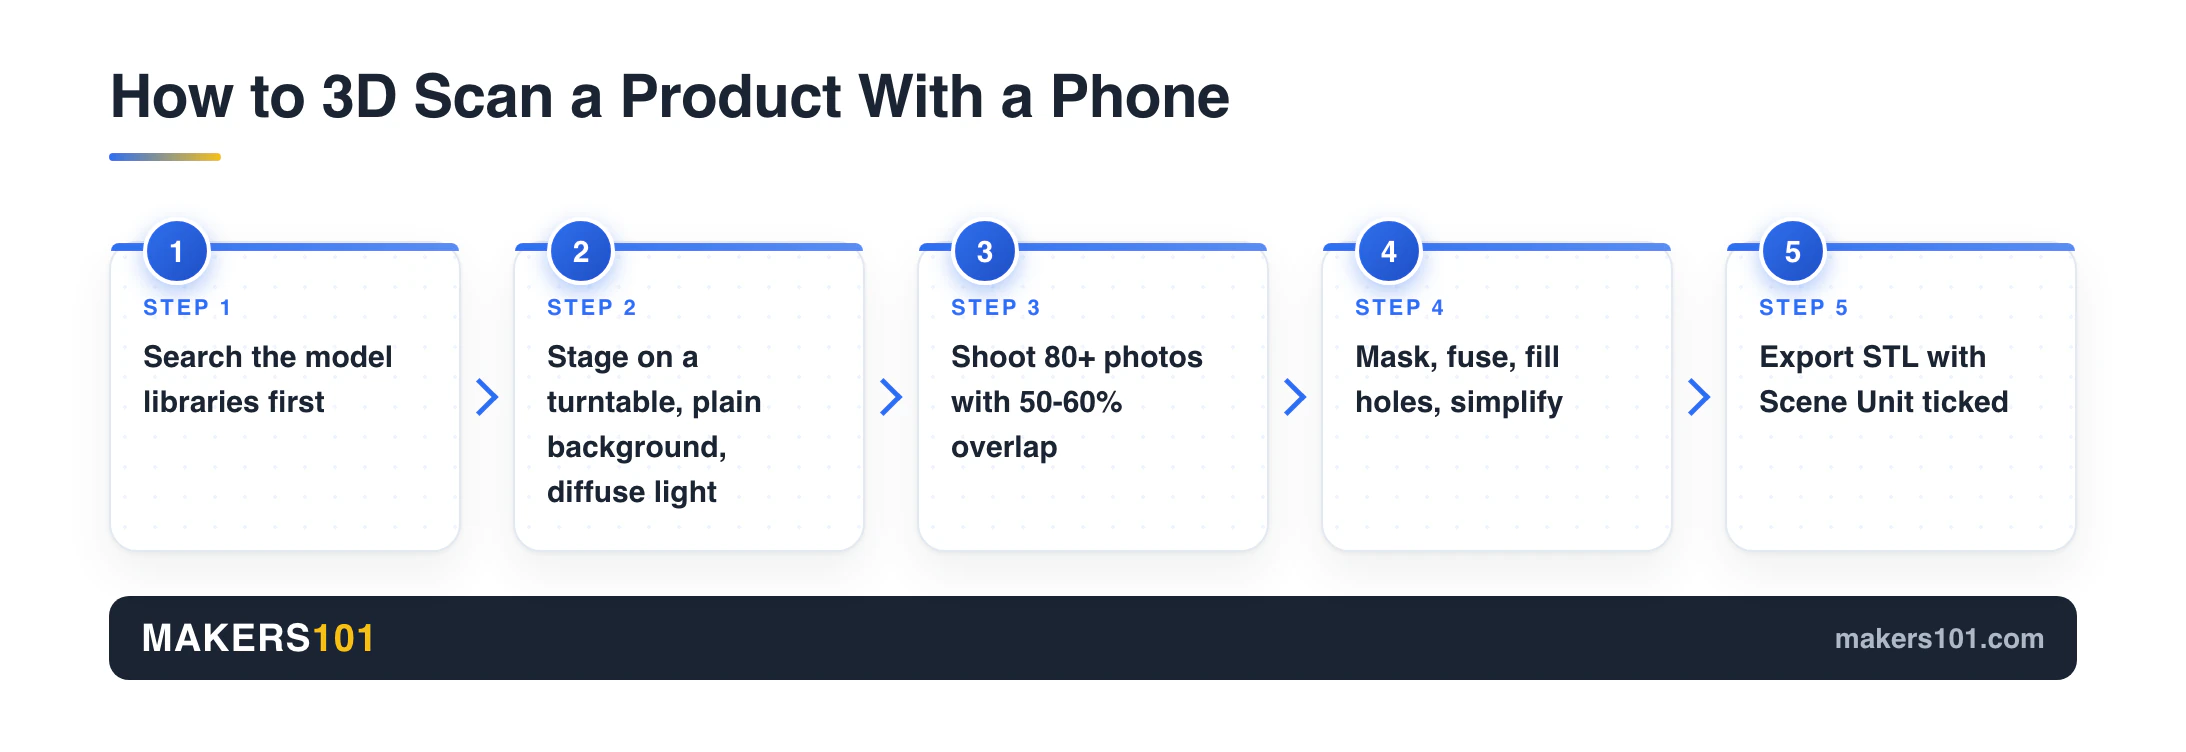
Step 1: Check whether the model already exists
The fastest scan is the one you never take. Spend two minutes searching the model libraries first, because commodity parts and popular accessories are often already up there. Our guide to where to download 3D models covers the sites worth checking.
Step 2: Stage the object
Set the object down on a flat surface in a colour that contrasts with it, with clearance to rotate a full 360 degrees. Light it evenly and keep it out of direct sun.
Before you take a single photo, spin the turntable through a few full rotations and watch the screen. If the object drifts out of frame at any point, reposition it now. Andrew Sink’s phone-scanning walkthrough puts this dry run ahead of shooting, and it saves you an entire wasted round.
Step 3: Shoot it
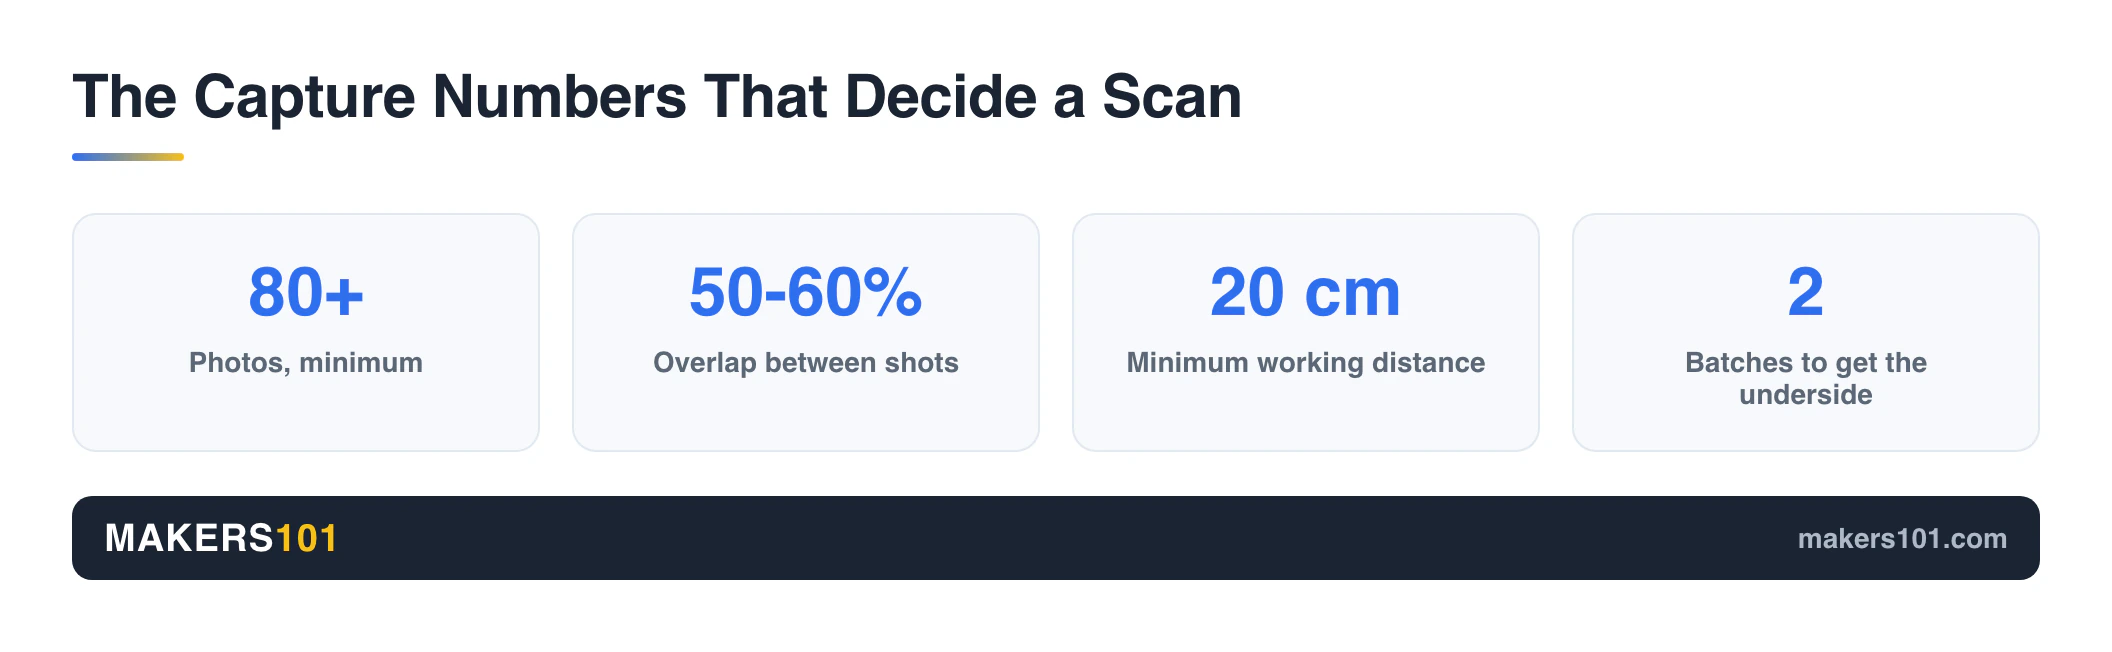
Overlap is the number that decides whether your scan resolves. Polycam’s own guidance sets the floor at 50 percent between consecutive photos. A RealityCapture tutorial pushes it to 50 or 60 percent. Prusa’s photogrammetry guide asks for 60 to 80 percent across 50 to 80 images.
Take at least 80 photos. Then add close-ups of the details you actually care about.
Stay 20 cm or further from the object, or switch macro mode on. Any closer and the surface goes soft.
Everything in the frame has to be in focus, background included. Polycam’s own worked failure is a scan that collapsed because macro mode at a short working distance threw the wooden table behind the object out of focus, and the algorithm could no longer line the shots up.
For the underside, shoot the top half, flip the object over, and shoot the rest. Take one deliberately black frame between the two batches so you can tell them apart afterwards. Flipping only works on rigid objects, because anything soft changes shape when you turn it over and will never align.
Step 4: Process and clean up
Switch on object masking if your app offers it. In Polycam it is the post-processing step that separates your product from the background.
If you shot in two batches, align them by picking three or four matching points on each. Then fuse the point clouds, fill the holes, delete the floating fragments, and confirm the result is watertight. A mesh with holes in it will not print.
Simplify the mesh before it goes anywhere near CAD. Raw scan output carries far more triangles than any modelling package wants to chew through.
Step 5: Get a file your slicer accepts
In Blender, convert everything to mesh so the modifiers get applied, then join it into a single object with Ctrl+J. Add a Remesh modifier in Voxel mode, voxel size 0.001, adaptability 0.5. That evens out polygon density across curves and flats.
Those values come from a character-model workflow. They hold up for most objects this size, but scale them up for anything large, or the remesh will take longer than the print.
Export to STL with Selection Only and Scene Unit both ticked. Skip Scene Unit and the model lands in your slicer at the wrong size, which is a quiet way to lose a good scan at the final step.
The Scale Problem Nobody Warns You About
Photogrammetry does not know how big your object is. The maths reconstructs shape from parallax, and shape carries no units. Your model comes out proportionally correct and dimensionally meaningless until you tell it otherwise.
How far off? SuperfastMatt measured phone photogrammetry at 2 to 3 percent of true size when he compared it against professional gear back in 2022. Treat that as an order of magnitude. On a 60 mm bracket, 2 percent is over a millimetre, which is the gap between a part that clips in and a part that goes in the bin.
Dedicated scanners sidestep this. Structured-light hardware measures real distances and hands you real millimetres, which is why reverse-engineering workflows lean on it. Pro blue-laser units go further. The new Creality Sermoon P1S claims 0.02 mm, though nobody has tested it independently yet.
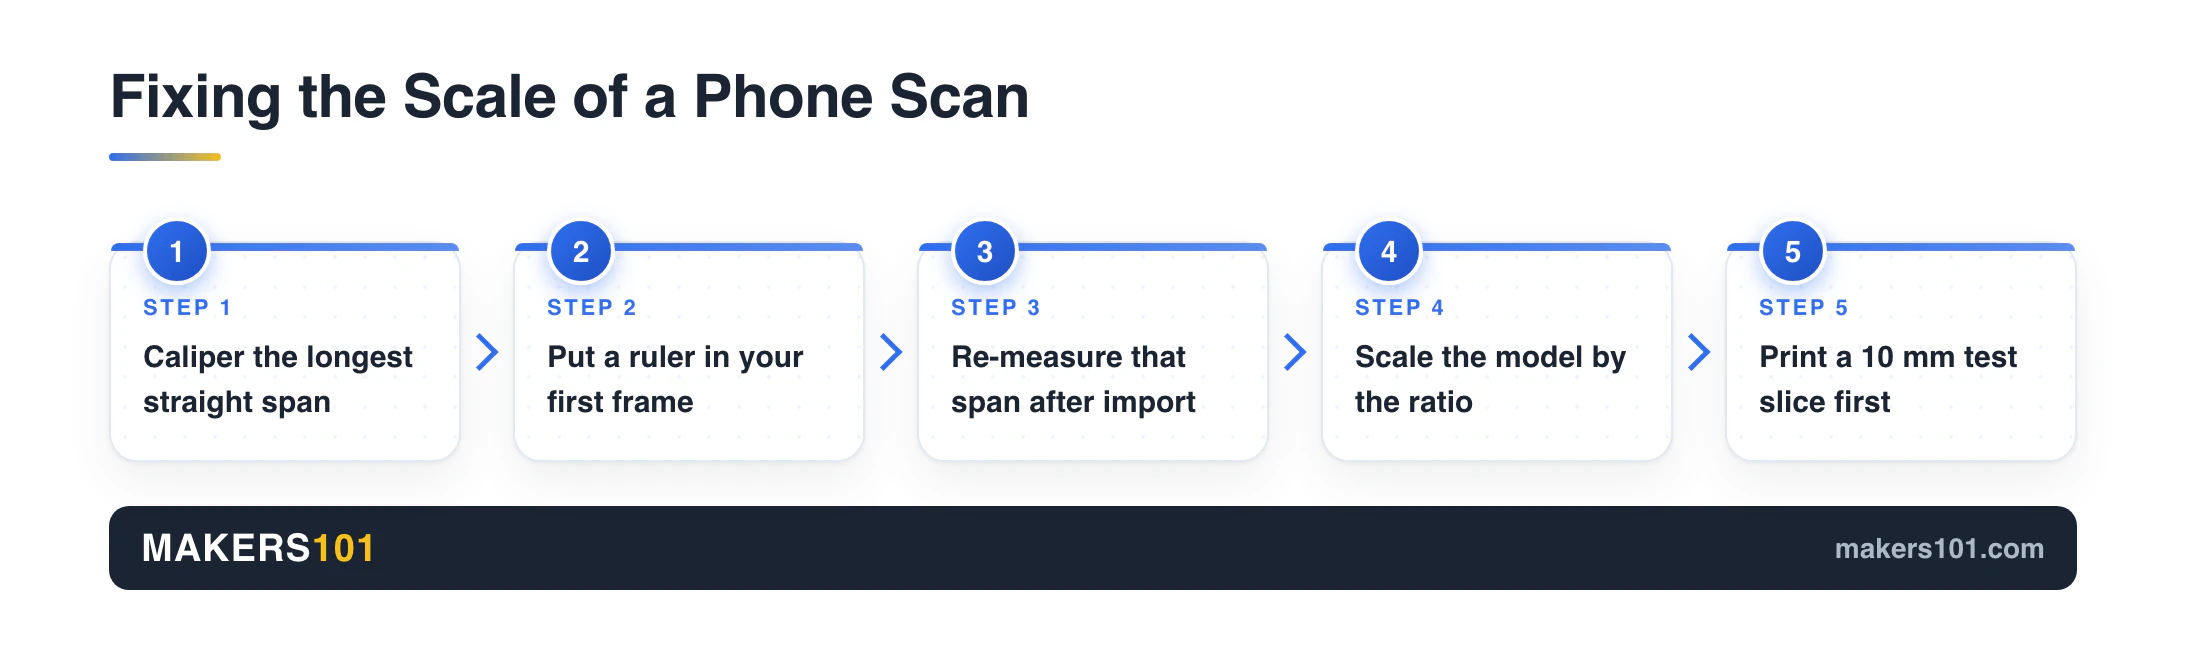
The fix costs you about a minute:
- Before scanning, measure the longest straight dimension on the object with calipers. Longer is better, because the error is a percentage of the span.
- Write the number down and get a ruler into your first frame.
- After import, measure that same span in Blender or your slicer, then scale the whole model by the ratio.
- Print a 10 mm test slice of the mating surface before you commit to the full part.
That fourth step is worth the ten minutes it costs. Run the numbers on what the reprint will actually cost before deciding whether a couple of failed parts justify buying real hardware. On a Bambu printer? Their first scanner is worth watching before you spend.
Objects That Will Fight You
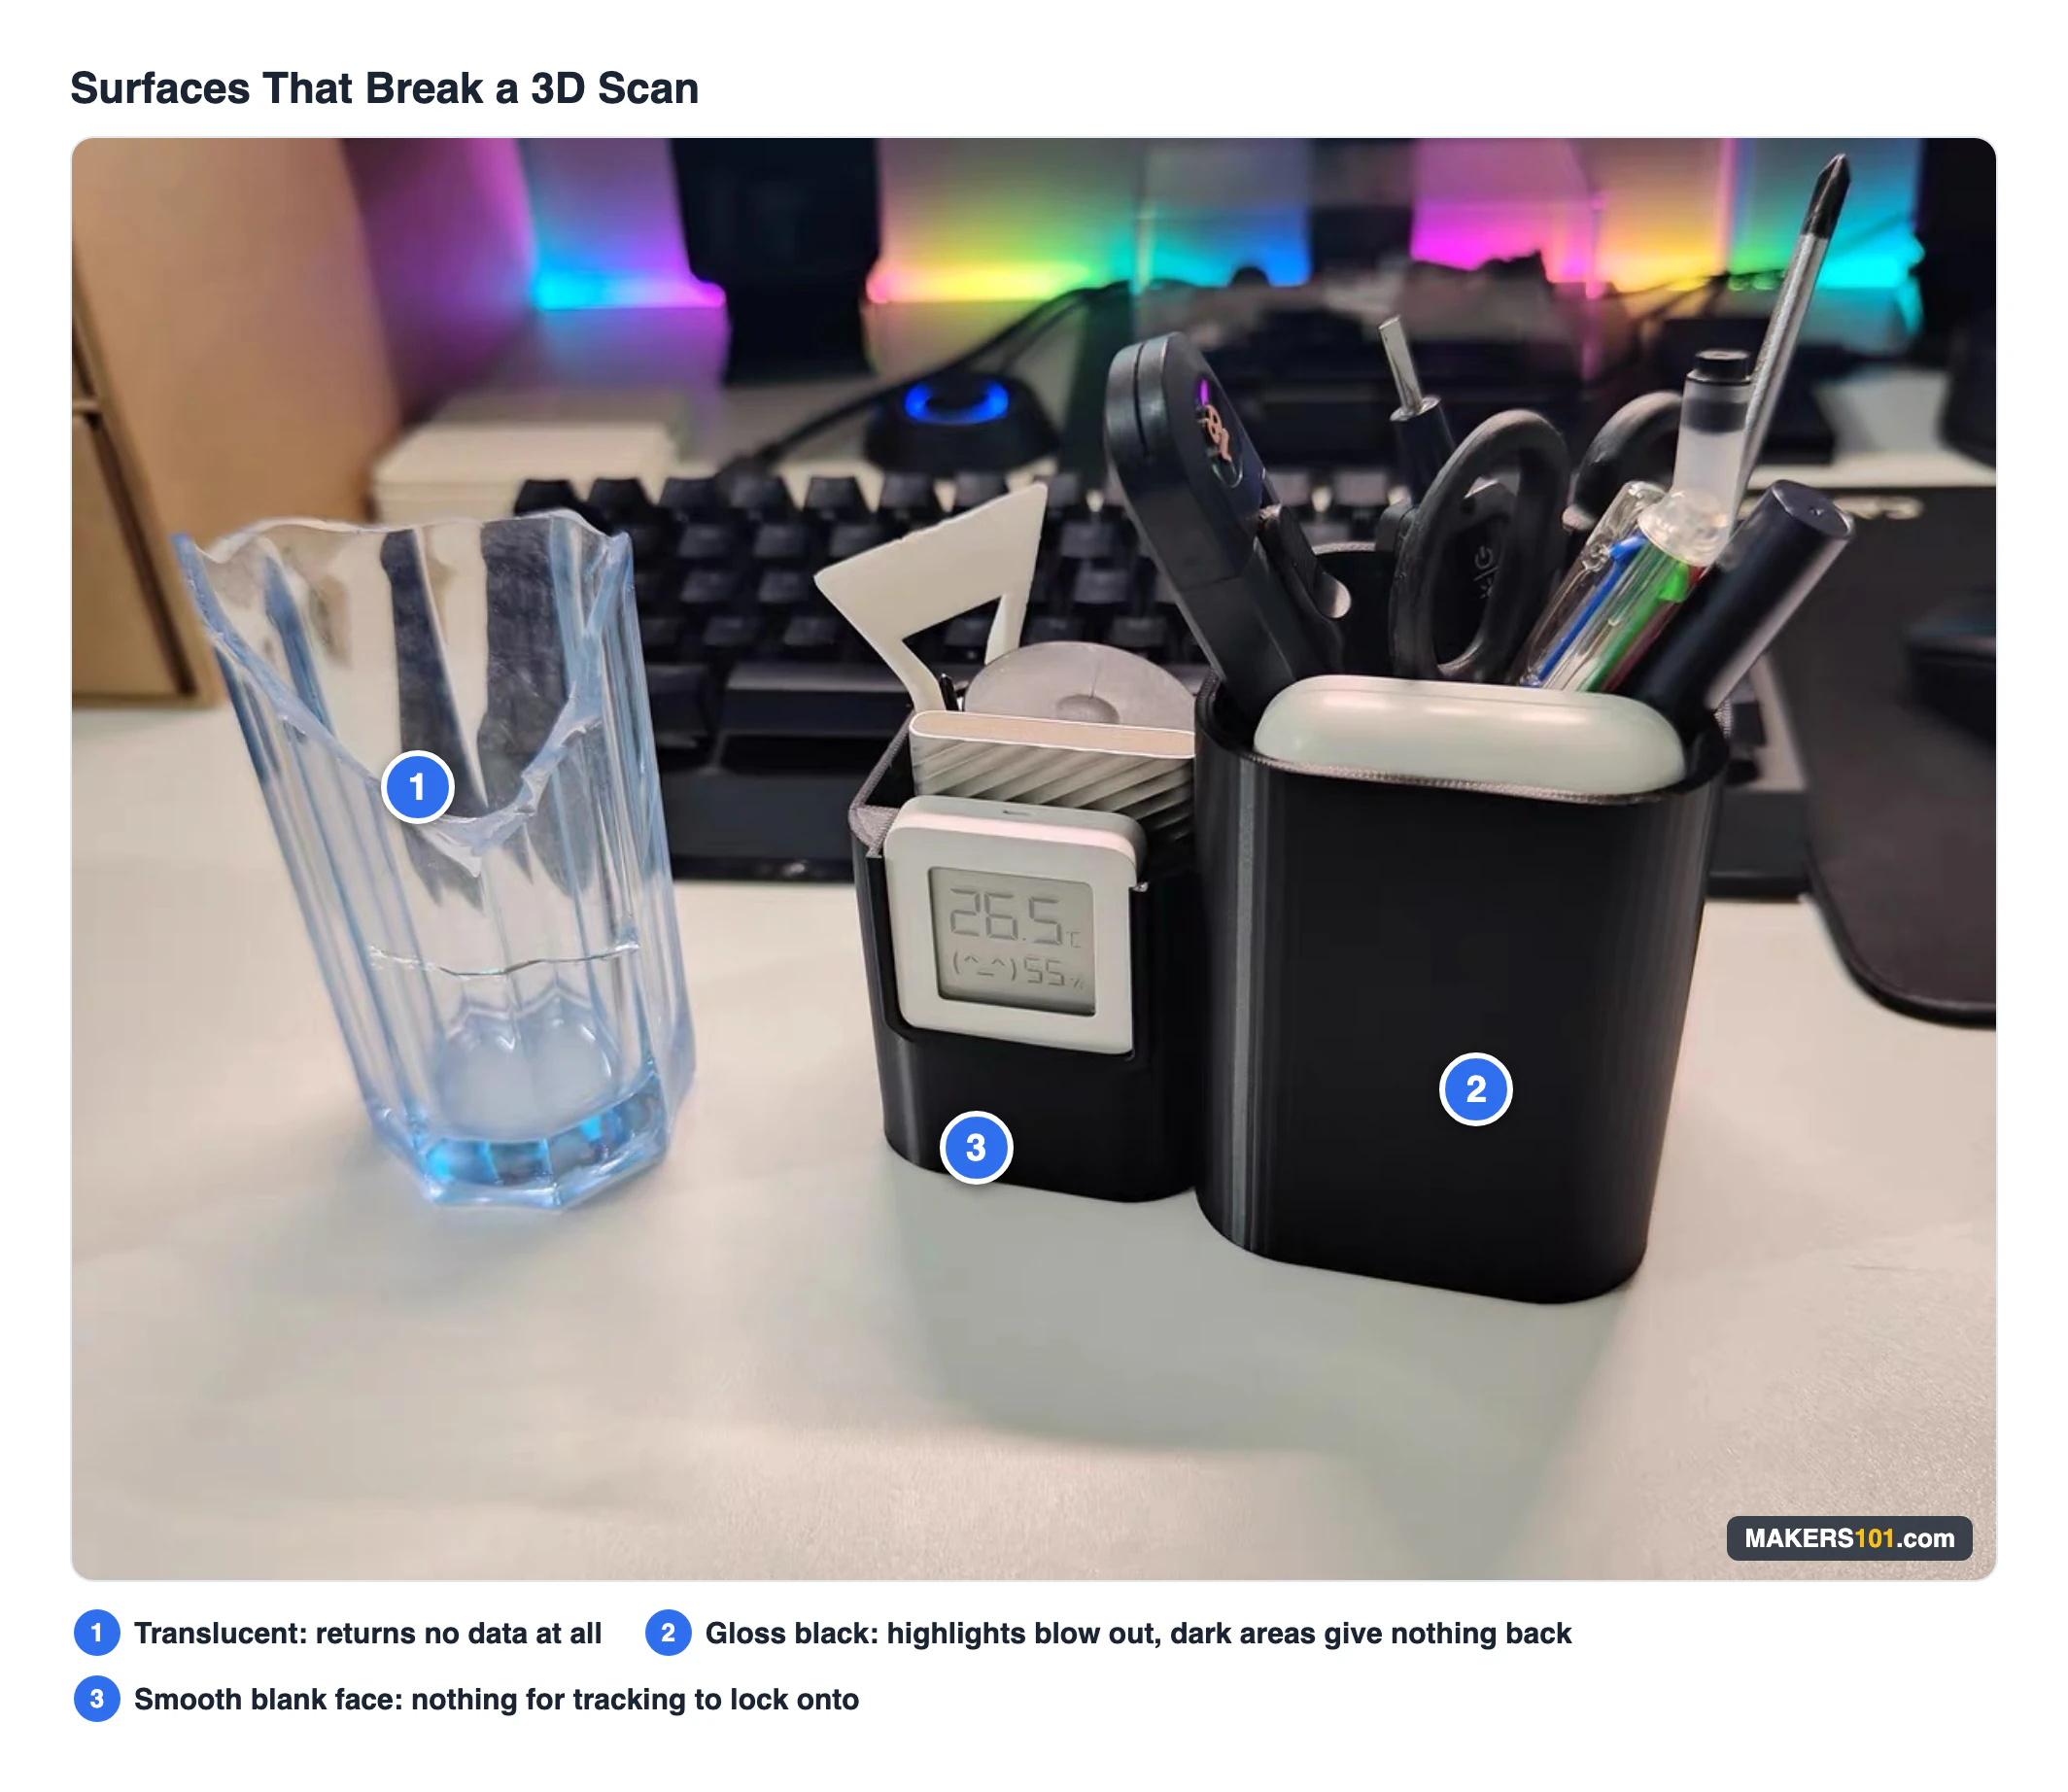
Four surface types break scans, and they break every method equally.
Black absorbs the projected pattern, so structured-light scanners get nothing back. Gloss blows out. Transparent parts return no data at all. One commenter in that thread puts it plainly: most scanners don’t handle black well, so dark items need spray.
Smooth featureless objects fail for a different reason, and this one catches people out. A scanner does not know where it is in space. It works out its own position by matching overlapping geometry between frames, which is called tracking.
Aim it at a blank curved surface and there is nothing to match against, so it drifts. One commenter in that Reddit thread explains the consequence neatly: scan around the edge of a circular pool with a drifty scanner and when you come back to where you started, it won’t line up.
The cheapest fix for this is an egg box. Charlie Chester scans a smooth plastic plug by cutting up an egg carton and arranging the pieces around the object, handing the scanner geometry to hold onto inside the frame. The carton never becomes part of your model. You delete it during cleanup.
If tracking does break mid-scan, check whether your software offers a rollback before you start over. At least one consumer scanner lets you step back to the last good frame instead of binning the session, and it is worth knowing whether yours does before you need it.
When a Free App Stops Being Enough
The rungs sit further apart than anyone tells you. These are the price anchors people quote each other in scanning forums.
| Tier | Price | What it buys |
|---|---|---|
| Phone photogrammetry | Free | Shape and texture, no true scale |
| Used consumer scanner | a few hundred, used | Real dimensions, small objects |
| Current pocket scanner | $500 to $1,000 | Better tracking, colour, software |
| Prosumer handheld | $1,000+ | Larger parts, fewer failures |
| Professional | $10,000+ | Black and gloss without drama |
A scanner will not teach you CAD. If modelling is the thing standing between you and the part you want, buying hardware relocates that problem instead of solving it. AI doesn’t fully solve it either. ChatGPT can now build parts in Fusion 360, but only from dimensions you can type.
SuperfastMatt, who has run both, priced the Einscan HX at about thirty times a consumer scanner like the Intel L515 or Revopoint POP. His verdict was that the gap does not justify itself for garage projects.
Budget for the computer as well. Processing large scans wants a strong GPU and plenty of memory, and it will crash on you. Some newer DLP-based units are gentler on the machine, so check the requirements before assuming you need a new PC. When you do reach this point, our pocket 3D scanner comparison covers the two models most people end up choosing between.
Is It Legal to 3D Scan a Product You Bought?
Scanning something you own for your own use sits in very different territory from selling copies of it. An object’s shape can be protected by design rights, its branding by trademark, and its decorative elements by copyright. Owning the physical item transfers none of those.
Replacing a broken part on something you already own is the safest case there is. Producing and selling replicas of someone else’s commercial product is the case that gets people letters. I am not your lawyer and the rules vary by country, so if selling is anywhere in your plan, start with what a commercial license to sell 3D prints actually requires.
Frequently Asked Questions
How do I 3D scan an object with my phone?
The short version of how to make a 3D scan of a product with a phone: install a photogrammetry app such as KIRI Engine or RealityScan, put the object on a turntable against a plain background in diffuse light, and take at least 80 photos with 50 percent or more overlap between consecutive shots. The app processes them in the cloud and returns a mesh. Flip the object and shoot a second batch to capture the underside.
Do I need an iPhone with LiDAR to scan a product?
No, and for small objects LiDAR actively works against you. LiDAR resolves rooms, furniture, and car bodies, but it lacks the resolution for anything the size of a mug or smaller. Photogrammetry uses the ordinary camera, works on any recent phone, and produces finer detail on small parts.
Can I 3D scan an object with Android?
Yes. Both of the free apps named above run on Android, and both export slicer-ready files without paying. Photogrammetry needs only a normal camera, so no special sensor is required.
How many photos do I need for a 3D scan?
Plan on 80 as a floor, with 50 to 80 percent overlap between consecutive shots. Published guidance ranges from 50 to 250 images depending on object complexity, and experienced users in community threads commonly shoot 100 or more. Extra photos cost nothing but processing time, and thin coverage is the most common reason a scan fails to resolve.
Why does my scan come out with holes or a warped shape?
Holes mean the camera never saw those surfaces, usually the underside or areas hidden behind an overhang. Warping usually traces back to tracking drift on featureless surfaces, or to shots that went out of focus. Fix it at capture time by adding overlap, adding texture around the object, and keeping the whole frame sharp. A mesh with holes is not watertight, so fill them during cleanup or your slicer will reject the file.
CERTAIN CONTENT THAT APPEARS ON THIS SITE COMES FROM AMAZON. THIS CONTENT IS PROVIDED ‘AS IS’ AND IS SUBJECT TO CHANGE OR REMOVAL AT ANY TIME.
Price details
Product prices and availability are accurate as of the date/time indicated and are subject to change. Any price and availability information displayed on Amazon.com at the time of purchase will apply to the purchase of this product.