
Heads up — some of the links below are affiliate links. If you buy through them, I earn a small commission (at no extra cost to you), which helps cover the gear I test. Thanks!
You printed the Cones of Calibration. Now you’re staring at a tray of tiny cones, and you still can’t tell if you passed.
That’s the part almost nobody explains. The official download tells you how to print the test. It says very little about how to read it, or why you keep failing even when you follow every step.
This guide fixes that. You’ll learn how to interpret each side of the test, how to run it start to finish, what it actually measures, and who to blame when it fails. By the end, calibration stops being a guessing game.
- It’s a free resin test from TableFlip Foundry that gives you a clear pass/fail instead of a “does this look right?” guess.
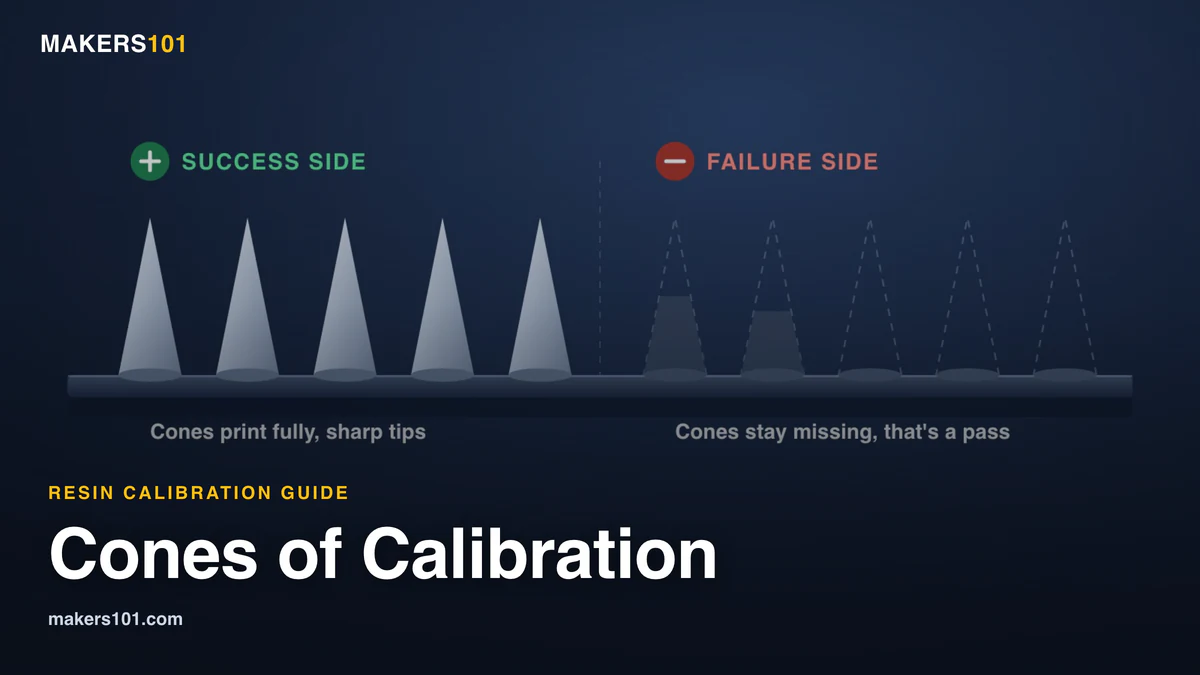
- Read it by two sides: on the plus-marked side the cones should form, and on the failure side they shouldn’t. Failure cones present means overexposed. Missing success cones means underexposed.
- It leans on support strength and resin quality, not just raw exposure. That’s why a cheap or old resin can fail it even at the “right” settings.
- Chasing perfect exposure is a trap. Nudge slightly toward overexposure for more reliable pre-supported prints.
- A failed test isn’t always your exposure. Resin, temperature, printer variance, and supports all move the result.
Table of Contents
- What the Cones of Calibration Actually Is
- What the Cones Really Test (And Why It Keeps Failing People)
- How to Read Your Cones Results
- How to Run the Test Step by Step
- Why “Perfect Exposure” Is the Wrong Goal
- Cones vs Other Exposure Tests: Which Should You Use?
- When the Test Fails but Your Settings Look Right
- Common Mistakes to Avoid
- Frequently Asked Questions
- The Bottom Line
What the Cones of Calibration Actually Is
The Cones of Calibration is a printable calibration model, made by TableFlip Foundry, that swaps guesswork for a countable pass/fail result. Instead of squinting at a flat tile and asking a Facebook group if it looks okay, you read cones that either printed or didn’t. New to resin altogether? Get what’s actually happening inside the printer straight first, then come back and calibrate. Resin slicers are their own lane. I separated Lychee and CHITUBOX from the FDM tools in this 3D slicer software guide.
That’s the whole reason it exists. Creator Ty built it to kill the “post a photo and hope someone confirms it” ritual that every beginner falls into. You should know, without a doubt, whether your settings are right.
The current V3 file is more than just cones. The download includes several tools on one plate:
- Cones of Calibration: the core exposure pass/fail test.
- Attunement Block: checks dimensional accuracy against a known size.
- Ale of Accuracy: a fit test where an ale piece should seat into a mug.
- Sword of Truth: a fine-detail test that slots into a monster skull.
- Visual Gap Test: a series of increasingly fine gaps.
- Puck the Adventurer: a free mini to validate your settings on a real model.
You don’t have to master every piece on day one. The cones are what most people come for, so that’s where we’ll spend the most time.
What the Cones Really Test (And Why It Keeps Failing People)
Here’s what most guides won’t tell you: the cones measure mechanical strength and resin quality as much as they measure exposure. They are not a pure XY-accuracy test.
This comes straight from the creator. In a long interview, Ty admitted the cones ended up reflecting a resin’s tensile strength more than its exposure window. A low-quality resin, the kind he nicknamed “Z Mud,” can pass a fine-detail test like AmeraLabs Town and still fail the cones. It simply isn’t strong enough to hold the thin cone tips together.
That single fact explains a lot of frustration. If you’ve been cranking exposure up and down with no luck, your resin may be the real problem, not your settings.
It also settles an old argument. Some resin printers want cone tests banned, calling them “just a support strength test.” They’re half right. The cones do lean on support strength. But for anyone printing pre-supported miniatures, support strength is exactly the thing you need to get right.
How to Read Your Cones Results
Read the test by its two labeled sides. The plus-marked success row should come out fully formed, while the failure row stays empty. When one side is full and the other is bare, you’ve found your exposure.
From there, the diagnosis is simple. Use this table.
| What you see | What it means | What to change |
|---|---|---|
| Failure-side cones appear | Overexposed | Lower exposure |
| Success-side cones missing | Underexposed | Raise exposure |
| Success full, failure empty | Dialed in | Lock it in (a hair over is fine) |
The test is sensitive on purpose. In one real run on an Anycubic grey resin, 1.7 seconds gave ten perfect success cones and five on the failure side. Drop to 1.6 and the success cones came out incomplete. Push to 1.8 and extra failure cones appeared. A tenth of a second flips the result, which is what makes the cones so easy to read.
So if you’re wondering “is mine a success?”, stop looking for perfection. One side full and the other empty is the target. If only three of five success cones printed, you’re still underexposed. Raise exposure and reprint.
How to Run the Test Step by Step
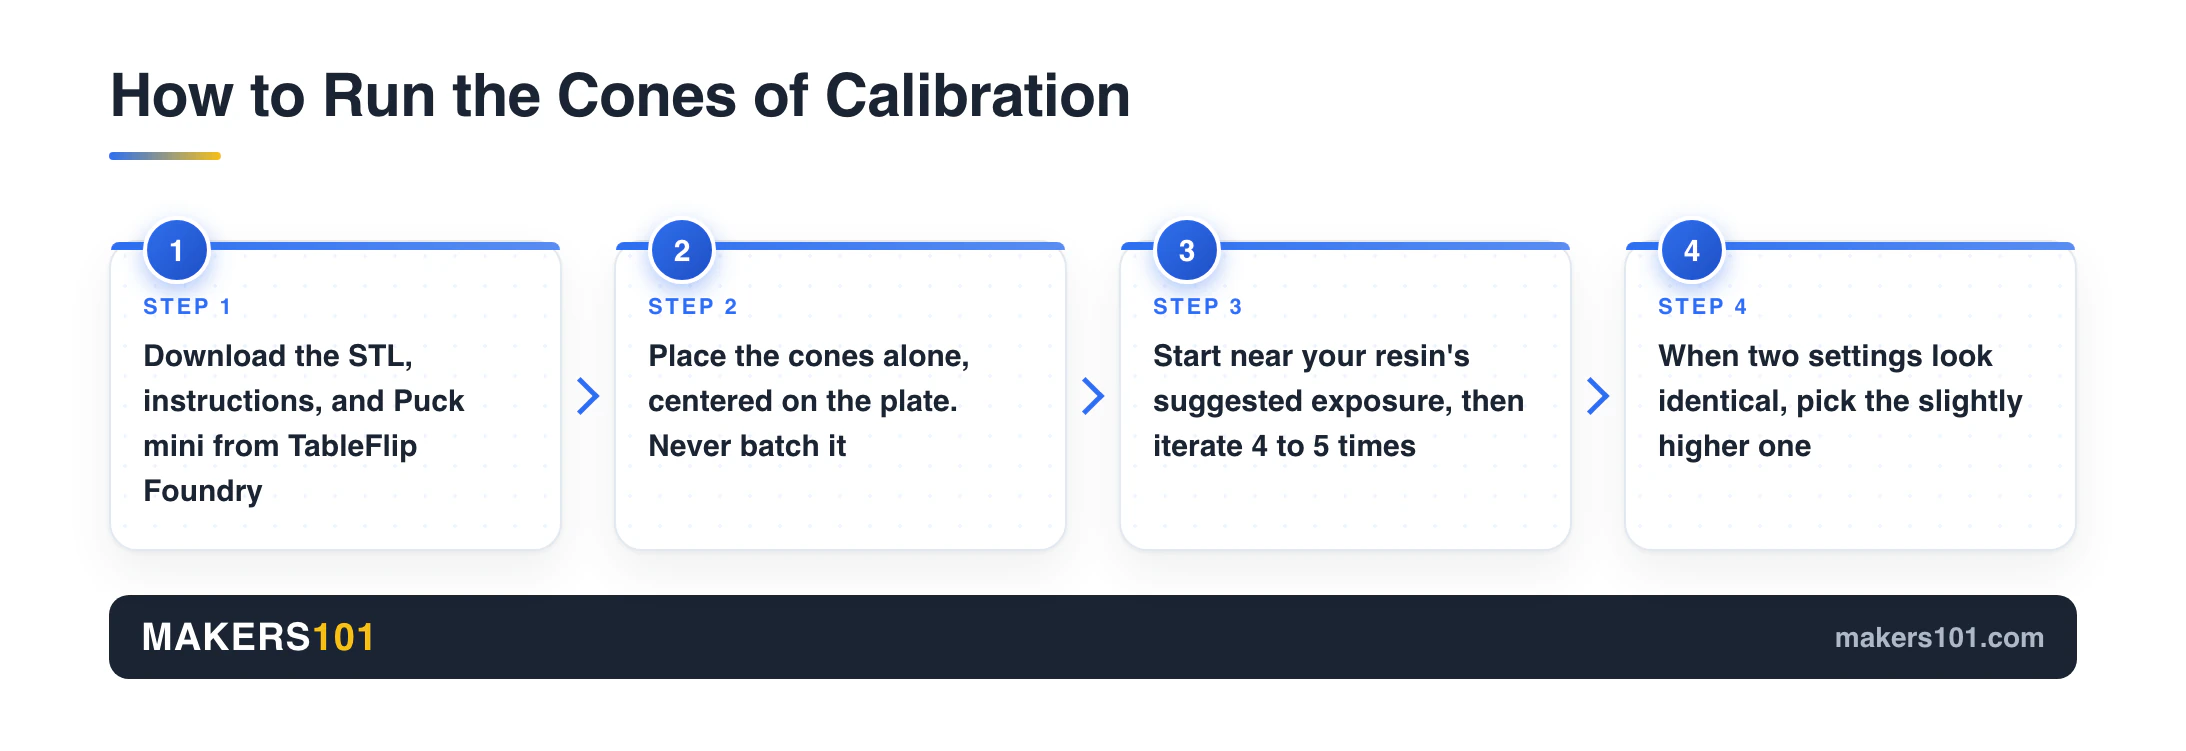
Running the test takes four moves, and most people get a good result within four or five prints.
What you’ll need:
- A resin printer and slicer you can set exposure on
- The Cones of Calibration STL from TableFlip Foundry
- A bottle of ABS-like resin (a common, forgiving starting point)
- Nitrile gloves and real ventilation
- A wash and cure station for finishing

- 【High Strength and Toughness】ELEGOO ABS-like resin 3.0 is engineered for high strength, impact resistance, and toughness. The printed models can…
- 【High Precision & Low Shrinkage】 With lower volume shrinkage, our ABS-like resin 3.0 ensures high precision in your 3D prints, resulting in…
- 【Good Fluidity for Rapid Prototyping】 Our ABS-like resin 3.0 is formulated with low viscosity to provide good fluidity for faster curing. Its…
- 【Strong Stability】 Our ABS-like resin 3.0 is engineered to maintain good stability, ensuring that the resin does not delaminate or separate over…
- 【Wide Compatibility】 ELEGOO ABS-like resin 3.0 is compatible with a wide range of LCD/DLP 3D printers available on the market using 405nm UV…


- 【Upgrade Protection Function】Sealed washing to prevent the volatilization of alcohol during the cleaning process . Fan-less curing mode makes it…
- 【Intelligent Curing and Washing】The front TFT screen can directly display the setting time and remaining time, and the operation is simple and…
- 【Flexible Washing Mode】The models can be placed in a cleaning basket to be cleaned separately, or mount the build plate with models on it and wash…
- 【Ideal Compatibility】Compatible with most of the LCD/DLP/SLA 3D printers like ELEGOO Mars, Mars Pro, Mars C, Photon, Photon s etc, which provides…
- 【Special Notes】The washing function is not quite suitable for 3D models printed with water washable resin, which is better to be washed with…
Step 1: Download the files. Grab the STL, the “tome of understanding” instructions, and the free Puck mini from TableFlip Foundry.
Step 2: Place it alone. Set the cones model by itself, centered on the build plate. Never batch it with other prints. Other models on the plate can pull light and skew your result.
Step 3: Iterate. Start near your resin’s suggested exposure. Read the result against the table above, adjust up or down, and reprint. Four or five rounds usually lands it.
Step 4: Pick the higher value. When two nearby settings look almost identical, choose the slightly higher one. In one walkthrough on an ABS-like grey, the printer went 2.5s (too low), 4s (too high), then settled between 3.1 and 3.2 seconds. Those two were nearly identical, so 3.2 won for a bit more reliability. Worth knowing that ABS-like and standard resin need different exposure in the first place, so recalibrate when you swap bottles.
Once you’re close, you’re done. There’s no prize for finding 3.15 seconds.
Why “Perfect Exposure” Is the Wrong Goal
Chasing perfect XY exposure actually makes pre-supported prints fail more often, because accuracy is not the same as strength. A layer that’s exposed for razor-sharp detail can be too brittle to survive the peel forces of every layer.
The fix is counterintuitive. Nudge your exposure slightly up. You lose a sliver of fine detail and gain a large jump in reliability. On a real model, a print that succeeds at 99% accuracy beats a “perfect” print that tears off its supports halfway up.
That’s the Goldilocks zone the cones point you toward. Success cones hold, failure cones fall away, and your actual minis stop failing. As one resin veteran put it, stop chasing perfection and start chasing results.
And don’t over-tune. The difference between 1.69 and 1.71 seconds is invisible in a finished, painted model. Get it “pretty good” and move on.
Cones vs Other Exposure Tests: Which Should You Use?
The cones aren’t your only option, but for pre-supported miniatures they give the most direct answer. It helps to know where they sit among the alternatives.
Exposure tests fall into three families:
- Flat tests (XP2, Frozen XP Finder): fast and cheap, but subjective. Good only for finding a rough range. XP2 in particular needs a magnifier and burn-in layers disabled to read well.
- Hybrid tests (Starship): angled pillars that mimic real supports, with better instructions.
- Volumetric tests (Cones, AmeraLabs Town): built for pre-supported minis and easy to read.
Here’s the practical trade-off between the two you’ll actually reach for.
| Test | Time / resin | Measures | Best for |
|---|---|---|---|
| Flat (XP2 / Frozen) | ~10–12 min · ~1.66 ml | XY accuracy | Rough range-finding |
| Cones of Calibration | ~40 min · ~2.7 ml | Support strength + exposure | Pre-supported minis |
The smart workflow uses both. Run a fast flat test to get into the ballpark, then confirm with the cones. You can print four flat tests in the time it takes to run one cone test, so use the quick one to narrow down and the cones to verify.
When the Test Fails but Your Settings Look Right
Sometimes the cones keep failing no matter how you tune exposure, and the cause isn’t exposure at all. Work through these before you blame your settings.
- Resin quality or age. A weak or expired resin fails a strength test even at correct exposure. If a fresh, quality resin passes where your current bottle can’t, the resin was the problem.
- Printer-to-printer variance. Two identical Sonic Mini 4K units needed exposure roughly a second apart because of UV output differences. Your printer’s “right” number is its own.
- Temperature. A swing of about 10°F can push a working setting into failure. Cold garages wreck consistency.
- Uneven UV. Some newer COB light sources cure unevenly across the plate, so edges or corners fail while the center prints.
- Model geometry and supports. Even a perfectly calibrated printer will fail a mini with a bad overhang or a hollowed section. In one case, a calibrated Tyranid model still misprinted purely from an unsupported internal overhang. That’s a support problem, not a calibration one.
If the mug, ale, or sword fuses to its pre-supports and snaps when you remove it, that’s the same story. Look at supports and orientation, not exposure.
Common Mistakes to Avoid
A few habits quietly sabotage the test. Skip them:
- Batching the cones with other models. It interferes with the result. Print it alone, every time.
- Copying a community profile. Shared Lychee profiles feel like a shortcut, but they hide why the settings work. Printers and temperatures differ, so a borrowed number often fails on your machine. Calibrate your own.
- Over-tuning by hundredths of a second. You can’t see it in the final print.
- Skipping safety. Resin is toxic. Ty developed a lasting allergic reaction from resin and IPA contact. Wear gloves and ventilate, and remember carbon filters mask smell but don’t remove VOCs. Most of that contact happens at the wash bench, so it pays to get washing resin prints safely sorted early.
Frequently Asked Questions
Do you post-cure the Cones of Calibration? Don’t post-cure the test if you’re judging dimensional accuracy, since curing shifts dimensions slightly. This creates a real paradox: your finished minis do get cured, so their final size changes too. The practical answer is to calibrate for a strong, successful print first, then account for a small cure-related size shift on parts where exact dimensions matter.
My success cones won’t print. How much should I raise exposure? Raise in small steps and reprint. On many small printers that’s roughly a quarter-second at a time, then re-read against the table. If only some success cones form, you’re still underexposed. Keep nudging up until the success side fills in and the failure side stays bare.
Where do I download the STL, and what changed in V3? The files come from TableFlip Foundry’s site. V3 bundles the cones with the Attunement Block, Ale of Accuracy, Sword of Truth, Visual Gap Test, and the Puck validation mini. Earlier versions (v1, v2) were simpler and focused mainly on the cones themselves.
Is my calibration successful if only 3 of 5 success cones printed? No, that’s underexposed. A good result fills the success side and leaves the failure side empty. Bump your exposure up and reprint until both sides read cleanly.
The Bottom Line
The Cones of Calibration works because it turns a fuzzy judgment call into a countable result. Read the two sides, adjust with the table, and stop when success is full and failure is empty.
Just remember what it’s really testing. You’re chasing a strong, reliable print, not a lab-perfect one. Get your resin right, respect your printer’s own numbers, and don’t post-cure your way into confusion. Chase results, not perfection, and your minis will thank you.