
Heads up — some of the links below are affiliate links. If you buy through them, I earn a small commission (at no extra cost to you), which helps cover the gear I test. Thanks!
- Filament grinding is what you get when the drive gear keeps turning while the filament sits still. The teeth shave a flat notch into the plastic, and the gear then has nothing left to grip.
- Cut the chewed section off before you change any settings. A notched piece won’t feed properly no matter what you adjust.
- Diagnose by when the grinding starts. Grinding on load, grinding on retraction-heavy models, and grinding only on prints over an hour each point somewhere different.
- Don’t reach for the tension screw first. CNC Kitchen’s flow testing across five extruders found that once the gear bites, extra tension buys you nothing and can make flow worse.
- Grinding is a symptom. Something in front of the extruder stopped the filament, and that’s what you’re hunting.
Your extruder is clicking. You pop the idler open and there it is: a flat, chewed notch in the filament, with a dusting of plastic shavings around the gear teeth.
One of the top-ranking guides on this problem opens by telling you to adjust the extruder tension. Bench data from five different extruders says that’s rarely where the problem lives.
Filament grinding is a symptom. The gear only chews because the filament ahead of it stopped moving. So this guide starts where you actually are: stop the damage, work out where it started, then fix that.
Table of Contents
- Cut Back to Clean Filament First
- Diagnose It in 60 Seconds
- What Filament Grinding Actually Is (and What It Isn’t)
- Slicer Settings That Cause Extruder Grinding
- Mechanical Causes: Clogs, PTFE Tubes, and Worn Gears
- Heat Creep: Why Only Long Prints Grind
- Extruder Tension: Why Tightening It Usually Isn’t the Fix
- If You Have a Bambu AMS, Check the Feed Path Too
- Upgrades and Tools That Actually Prevent Grinding
- How to Keep It From Coming Back
- Frequently Asked Questions
Cut Back to Clean Filament First
Before you touch a single setting, get rid of the damaged filament. The notch is shallower than the rest of the strand, so the gear can never grip it properly. Every reload attempt just polishes that flat spot.
1. Unload the filament from the extruder. 2. Find where the chewed section ends and clean, round filament begins. 3. Cut past that point with flush cutters. Leave a blunt, square end, because a long taper slides right past the gear teeth. 4. Look at the drive gear teeth. If they’re packed with compressed plastic, brush them clean. 5. Clear any loose shavings out of the feed path before you reload.
Steps four and five are the ones people skip, and that’s why stripped filament keeps coming back a print or two later. One Bambu owner described cutting back to smooth filament, running a successful print, then finding the strand chewed up again on the next job. Another snipped off the rough section and had it grind again immediately on the next load. Cutting is first aid. The blockage is still in there. Go find it.
Diagnose It in 60 Seconds
When the grinding starts tells you more than what the damage looks like. Grinding at load means debris in the path, grinding on retraction-heavy models means your retraction settings, and grinding only on long prints means heat creep.
| When it starts | Most likely cause | Where to go |
|---|---|---|
| On load or filament swap, before printing | Debris in the feed path or gear area | Cut back and clear, below |
| Only on retraction-heavy models | Retraction distance or speed too aggressive | Slicer settings |
| Only on prints over an hour, short ones fine | Heat creep | Heat creep section |
| Suddenly, after months of normal use | PTFE tube, worn gear, or drifting thermistor | Mechanical causes |
| Right after switching filament or colour | Temperature mismatch, moisture, or old brittle filament | Slicer settings |
| Fine when slow, grinds when fast | Flow demand beyond what the hotend can melt | Slicer settings |
The extrude test. Heat the nozzle to your normal print temperature and push 50mm or so through by hand. A strand that drops straight down means the path is clear. A strand that curls off to one side points to a partial clog. Angus at Maker’s Muse uses this as his standard clog check.
The feel test. Release the idler and push filament through with your fingers. It should slide with light, even resistance. Anything gritty, notchy, or suddenly stiff tells you where the obstruction sits before you take anything apart.
Treat your printer’s error message as a hint. It reports what a sensor noticed, which is not always the same as what went wrong. One Anycubic Kobra owner spent his time chasing a persistent “filament clog” warning that kept firing during prints that ran perfectly well.
I hit this on my Creality SparkX i7 Color Combo while printing Creality Hyper PLA. My first instinct was a jam. So I checked the nozzle for a clog, then checked whether the spool had cross-wound and pinned itself. Neither one. Both of those are the first things anyone checks, and both were fine.
The actual culprit was shredded filament left inside the extruder by the grinding itself. Two things surprised me about it. The chewed zone on the strand was tiny, about 5mm of flattened plastic, and I still cut back roughly 15cm (6 inches) to be certain I was past it. And clearing the debris meant opening the extruder up and brushing it out of the gear teeth. BCN3D lists cleaning the gears as a closing tip at the end of its guide. On my machine that closing tip was the entire fix.
Budget about half an hour if you end up going that far in.
What Filament Grinding Actually Is (and What It Isn’t)
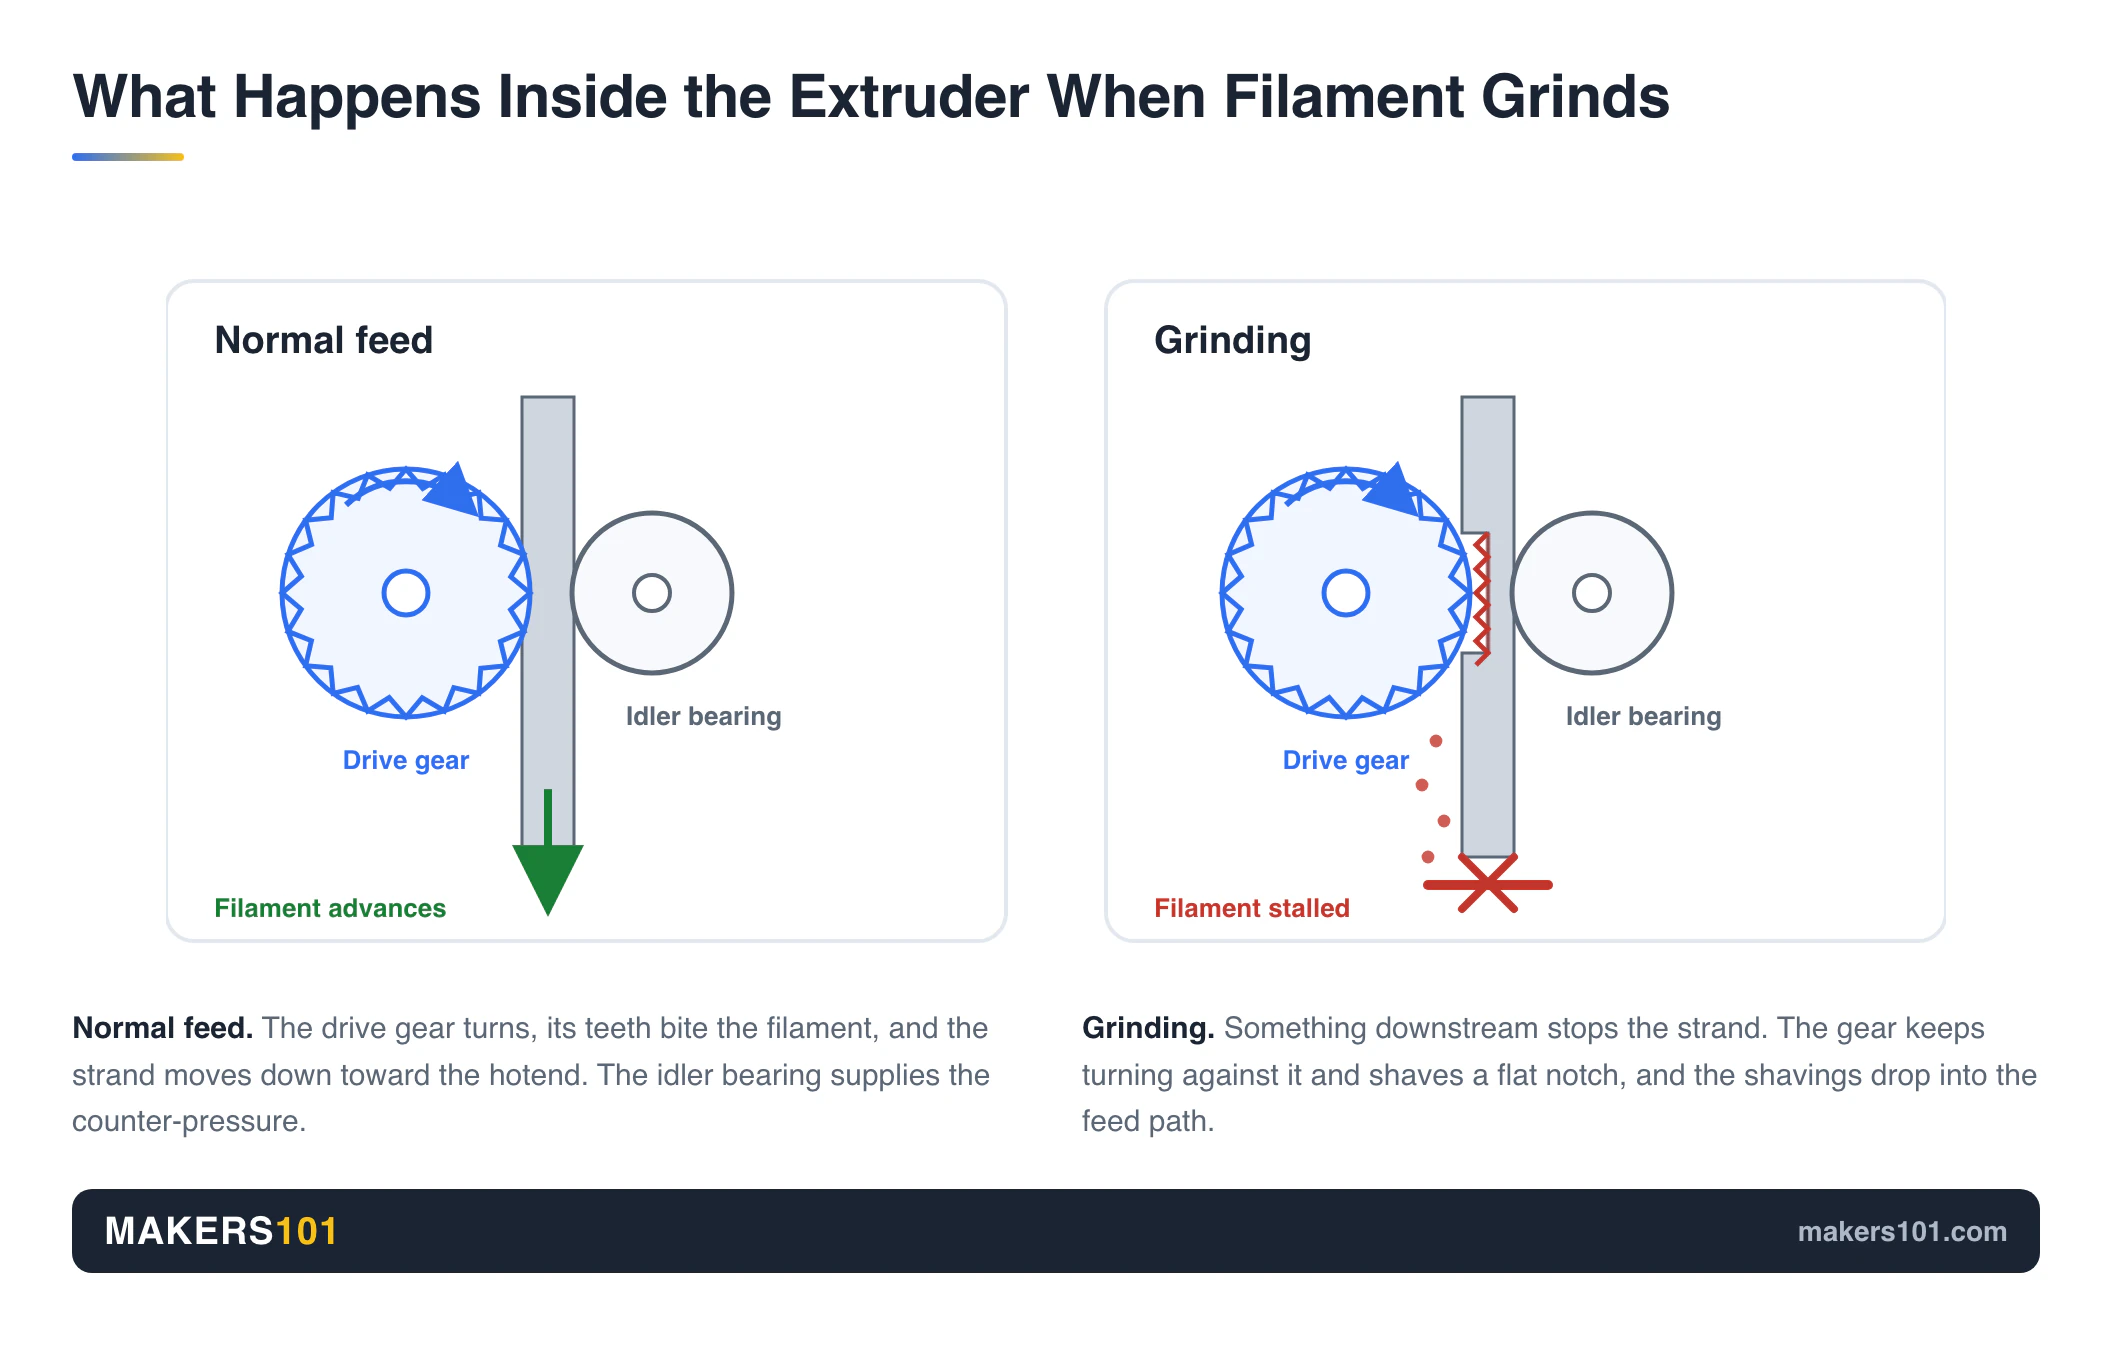
Filament grinding happens when your extruder motor spins on against a strand that has stopped dead. The drive gear teeth cut a flat spot into the plastic. That flat spot sits lower than the round surface around it, so the gear loses its bite for good.
The shavings then drop into the feed path, where they can block things all over again. One Bambu Lab A1 owner found the exact piece his gears had sliced off wedged into the filament sensor opening. The printer threw an AMS load error that pointed at the extruder gears, one step down the path from where the fragment actually sat. He still expected to strip the whole machine down, and the actual fix took two screws.
The damage pattern tells you something too. As Simplify3D describes the mechanism, a single-gear extruder sandwiches the filament against a bearing. Everything the gear does lands on that one contact patch. An owner printing wood-filled PLA watched it dig a hole into the side of the filament until nothing could push through at all.
Three different extruder failures get called “grinding,” and each needs a different response.
| Failure mode | What you see | What causes it | What to do |
|---|---|---|---|
| Grinding | Flat notch in the filament, plastic dust near the gear | Filament blocked, gear keeps turning | Cut the notch off, then hunt the blockage |
| Skipping | Rhythmic clicking, filament mostly intact | Motor can’t overcome the resistance | Same hunt, but the print often recovers |
| Buckling | Soft filament bends and coils above the gear | Flexible filament collapsing under push force | Lower the tension |
Stefan at CNC Kitchen puts the trade-off between the first two plainly: “In most cases, you want a motor that skips before it grinds the filament.” A skipping motor can pick up where it left off. A ground notch only gets worse.
Your extruder layout changes the odds. Bowden setups push filament down a long tube with friction points all along the way. Tube walls. Couplers. Every tight bend in the path. Resistance that a direct drive extruder shrugs off as a few skipped steps can turn into full grinding on a Bowden machine.
A grinding noise isn’t always a filament problem. If the sound travels with the moving bed or gantry, and the filament looks fine, you’re chasing a mechanical rub instead. Check for a dry rod, a failing bearing, or a fan blade catching something. Wet filament makes a different sound again: a popping or crackling as trapped moisture flashes to steam at the nozzle.
Slicer Settings That Cause Extruder Grinding
Three settings do most of the damage: retraction, nozzle temperature, and print speed. They’re also the cheapest things to test, so start here when the timing points this way.
Retraction distance and speed
BCN3D puts a hard ceiling on it: keep retraction distance at or below 7mm. Past that, you’re pulling molten plastic up into the cold zone where it can swell and stick.
Speed matters as much as distance, and it gets far less attention than the distance number. MakerBuildIt makes the point directly for Bambu machines: retract too fast and the gear tears at the filament instead of moving it. Retract too slowly and stringing comes back. On Bambu Lab machines, 1 to 2mm is usually enough, and PETG generally wants a more aggressive setting than PLA.
One Ender 3 owner on r/FixMyPrint hit this exact pattern. His model called for constant retraction, the extruder chewed away throughout, and moving the spool closer to soften the feed angle still left him asking for a real fix. Simplify3D suggests halving retraction speed as a diagnostic. If the grinding stops, that was it. Our print settings finder gives you a starting point for whatever material you’re running.
Nozzle temperature (and the thermistor nobody checks)
Filament that isn’t fully molten needs more push force than the extruder can supply. Raise the nozzle 5 to 10°C at a time and watch what happens.
There’s a failure mode hiding behind that test. A thermistor can drift as it ages, and a drifting one tends to read low at higher temperatures, so your display reports the number you asked for while the real nozzle sits below it. The Prusa forum’s test for this is clean: raise the setpoint 10 to 20°C. If the grinding stops, the thermistor is your culprit and wants replacing. If a temperature bump fixes your problem but the number you need keeps climbing week after week, replace the thermistor.
Print speed and flow
Push more plastic per second than the hotend can melt and the filament backs up. Halve your print speed as a test. If the grinding disappears, you’ve hit a flow ceiling and no amount of tension will help.
Resist the urge to patch it with the flow multiplier. One LulzBot owner dropped flow from 100% to 95% and got very little out of it. Low E-steps and low flow also produce nearly identical under-extrusion symptoms, so you can’t tell them apart by eye. Calibrate E-steps instead. As Mayhem Smiley frames it, the job is making a commanded length actually get delivered. Mark 100mm of filament above the extruder, ask for 100mm, and measure what really went in.
Mechanical Causes: Clogs, PTFE Tubes, and Worn Gears
When your settings check out, the blockage is physical, and it’s almost always one of three parts: the nozzle, the PTFE tube, or the drive gear itself.
A partial clog you can’t see
A partial clog is harder to spot than a full one. Plastic still comes out. There just isn’t enough of it. Use the extrude test above: a strand that curls instead of falling straight is your tell.
Some materials load the dice. Glow-in-the-dark filament carries phosphorescent particles that are abrasive and prone to packing. One P1S owner traced a no-extrusion fault to a fragment lodged in the hotend after an overnight glow-in-the-dark print. Clearing it took two screws and a pair of cutters, with the printer powered down and fully cooled first. Our guide to cleaning a clogged nozzle covers cold pulls and when a nozzle is past saving.
PTFE tube damage
PTFE degrades at high temperatures, and around 250°C is where it starts to carbonise and lose its slippery inner surface. PETG lives near that line. Tubes can also shift or shorten in the coupler over time, and once a gap opens between the tube and the nozzle, molten plastic seeps in and under-extrusion turns into grinding.
This is the classic “worked fine for months, then suddenly didn’t” failure. One Prusa MINI owner worked through his settings, then the tension, then a round of cold pulls. A bad PTFE tube was behind all of it, documented in a separate Prusa forum thread from the thermistor one above. It’s one of the cheapest parts in the machine.
Drive gear wear and packed dust
Brass drive gears wear down, and abrasive filaments speed that up considerably. Carbon fibre and glow-in-the-dark are the usual suspects. Angus at Maker’s Muse gives a simple inspection cue: plastic dust collecting around the gear means it’s wearing.
Worn teeth are only half of it. After a grinding episode the teeth also pack solid with compressed plastic, which leaves a smooth gear that can’t bite even though it looks fine. Brush them out with a stiff brush or a pick before you write the gear off.
Heat Creep: Why Only Long Prints Grind
If short prints succeed and anything over an hour fails, stop looking for a mechanical fault. That timing signature points at heat creep, and a LulzBot TAZ 6 thread works through the whole diagnosis in one place. Heat travels up from the hotend and softens filament in the cold zone before it reaches the melt chamber, and the softened plastic swells, grips the walls, and stops dead while the gear keeps turning.
Cooling degrades over a long print in ways that are easy to miss. The heatsink fan draws in air that’s already been warmed by the bed, so it gets less effective the longer a job runs. Stray filament strands can wind around the fan shaft and slow it without ever stopping it outright. Plenty of machines ship with sleeve-bearing fans that die early, so a fan that spins isn’t automatically a fan that works.
Enclosures complicate this. An enclosure that helps ABS raises ambient temperature enough to hurt PLA. The owner in that thread finally got an 8-hour PLA print to finish by aiming an ordinary desk fan at the extruder. It’s a crude test that tells you a lot for zero money.
Heat creep produces its own clicking, sometimes called the click of death, and it responds to different fixes. Repasting the heatbreak or fitting a better one addresses heat creep. Neither will do a thing for a drifting thermistor.
Extruder Tension: Why Tightening It Usually Isn’t the Fix
Tension has a floor and a ceiling, and most people only know about the floor. Too little and the gear can’t bite, which does cause grinding. Too much crushes the filament and drags your flow rate down. Aim for the window between them.
The data comes from CNC Kitchen, which ran flow tests across the full tension range on five extruders.
| Extruder | What the flow tests showed | Takeaway |
|---|---|---|
| Prusa MK3S | Lowest setting under-extruded above 8 mm³/s; every setting above that performed identically | A floor exists, then it plateaus |
| Bondtech LGX | Fixed gear gaps. Widest setting won; tighter gaps deformed the filament and cut performance | Tighter actively hurt |
| Stock Ender 3 | Performed better with less tension; removing the cap improved it again | Backwards from the usual advice |
| E3D Hemera / OmniaDrop | Consistent once past the bite threshold | Plateau again |
| Prusa with TPU | Buckling at 9 mm³/s regardless of tension; lowest setting edged ahead | Lower is the safer default for flex |
Low tension also works as a safety valve. It caps the maximum force the extruder can apply, so flexible filament grinds before it buckles and wraps itself around the gear. A ground strand is much easier to recover from than a bird’s nest.
Three moves cover it:
- Set it once, properly. BCN3D’s method is repeatable: screw the thumbscrew all the way in, then back it off one full turn.
- Read the tooth marks. Extrude some filament and look at the gear imprint. Barely visible means add tension. Badly flattened means back off.
- Stop fine-tuning. A quarter turn either way rarely changes anything. Stefan’s own advice is to try tension in both directions and find the window, rather than assuming tighter is better.
Those tests ran on PLA only, and other materials may behave differently. Stefan also estimates that 95% of extrusion problems start after the extruder, in the hotend and the path beyond it. That figure comes from his own experience, so treat it as a rule of thumb.
If You Have a Bambu AMS, Check the Feed Path Too
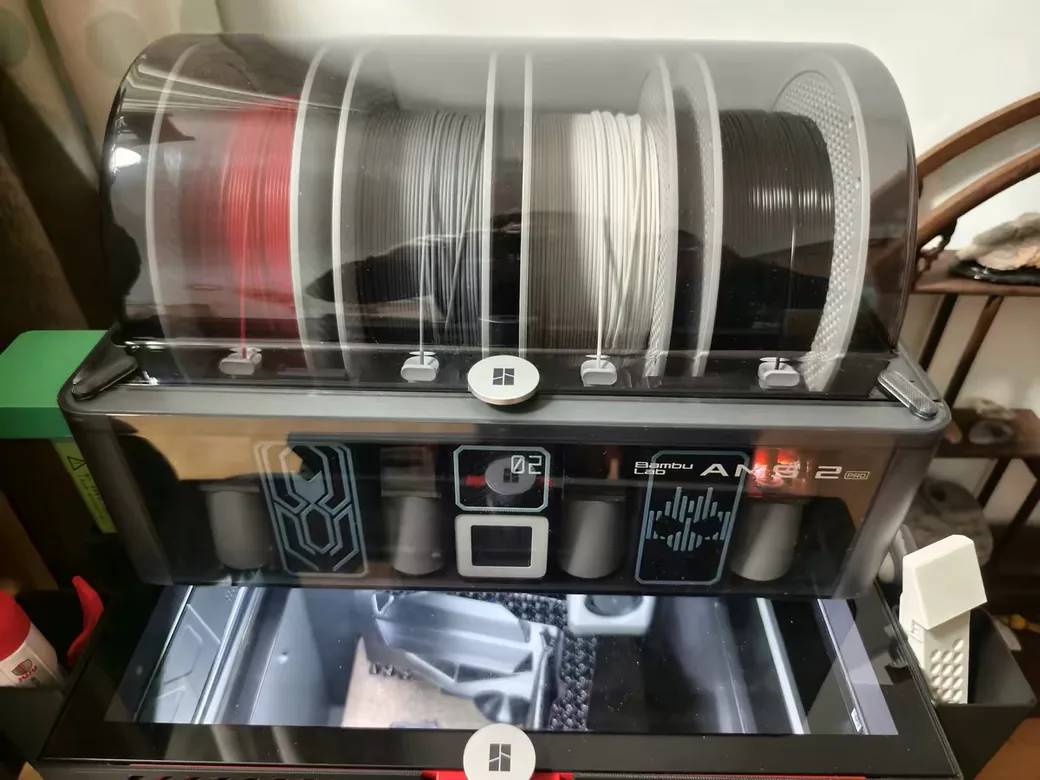
Multi-material feeders add a long, curved filament path with more places to catch, and published troubleshooting guides haven’t caught up. The published guides for this problem predate the current wave of multi-material feeders, and not one of the top search results mentions an AMS at all. Owner reports are a different story.
Grinding on unload. Filament retracting back into the AMS at the end of a print tangles on the spool, and the next load grinds against the resistance. One P1S owner hit this with a third-party quick-swap spool, and the following print failed to load on tangled, worn filament.
Grinding on swap. Mid-print filament changes catch and grind, and trimming the damaged end often isn’t enough on its own. One new P1S owner trimmed the chewed end back and watched it chew again the moment he reloaded.
Debris in the gear area. Shavings from an earlier grind wedge near the filament sensor, and the printer reports an AMS load or unload failure. The error names the AMS, but the fragment you need to reach sits up at the extruder end of the path.
For that last one, a Bambu A1 owner documented a fix that doesn’t require dismantling the machine. Release the AMS tube with a plastic pry tool. Remove the two Allen screws holding the filament sensor, then lift the sensor carefully, because there’s a ribbon cable behind it that won’t survive rough handling. With the sensor out of the way, push a blunt, squarely cut length of filament down through the opening to drive the trapped fragment out.
Don’t assume the AMS is guilty by default. That P1S owner with the same clicking symptom found his fragment sitting in the hotend, nowhere near the feeder. And if the unit is brand new and nothing helps, stop and open a support ticket. One owner running roughly 20 AMS units posted a new AMS 2 Pro that was chewing filament badly enough to stain his finished prints in the lighter colours, and Bambu replaced both the unit and the ruined filament. Taking it apart first would have complicated that. If you’re weighing up feeder options more broadly, we compared the Bambu Lab AMS alternatives across printers and budgets.
Upgrades and Tools That Actually Prevent Grinding
On a stock single-gear extruder, one gear pressing filament against a bearing is your entire grip. Dual-gear extruders drive both sides through meshed gears, which spreads the load and holds on far better with wood-filled or flexible materials. The Ender 3 owner who kept digging holes in wood filament solved it this way and stopped having the problem.
If you go that route on an Ender 3, buy the kit with the motor included. The machine shipped with two different motor shaft sizes, and skipping the guesswork is cheap: checking a common dual-gear kit in August 2026, the version bundled with a Nema 17 stepper runs about $6 more than the bare extruder. We ranked this against other 3D printer upgrades that are worth it if you’re deciding where to spend first.
Running abrasive materials regularly? A hardened nozzle is the standard fix. Treat the drive gear as a wear part with a limited life.
Keep these within reach of the printer:
- Flush cutters, for square cuts on damaged filament
- A nozzle cleaning needle set
- Allen keys sized for your extruder and hotend
- A plastic pry tool for tube couplers and clips
- A spare PTFE tube, treated as a consumable

- GREAT VALUE: sharp quality tweezers and 10pcs of 0.40mm nozzle cleaning needles packed in one safe container!
- Anti-Static, Non-Magnetic CURVED PRECISION TWEEZERS; 3D printing tweezers great for nozzle maintenance and cleaning excess support material
- 10 pcs of 0.40mm diameter FLEXIBLE stainless steel needles; Ideal for gentle maintenance of your nozzles and hard to reach places like the feed gears
- HANDY, SAFE and STYLISH container; All of the items come in a neat plastic tube with a screw lid to keep them safely together
- Long-lasting kit for SEVERAL PURPOSES; Remove excess plastic and clear jams with high precision, also great for general maintenance of the heatsink…
How to Keep It From Coming Back
Most repeat grinding traces back to maintenance that never got scheduled.
Dry any filament that’s been sitting out. Moisture causes bubbling, spitting, and stringing, and a cheap food dehydrator brings most spools back. Retire any old spool that has gone brittle. It will keep fighting you. Our guide on how to dry and store filament covers targets and storage that actually holds.
Inspect the drive gear every few abrasive spools and treat plastic dust as your early warning. On any machine that regularly runs PETG or hotter, put the PTFE tube on a replacement schedule, because waiting for it to fail costs you a print. Keep the run from spool to extruder as straight as you can, since a spool that binds or feeds at a steep angle adds resistance for free.
Leave the flow multiplier alone as a quality fix. Tuning flow to hit a target wall thickness can weaken the part, which trades a visible problem for an invisible one. If you’re still building good habits, our list of common beginner 3D printing mistakes covers the ones that do the most damage.
One safety note before you start pulling things apart. Power down and let the hotend cool completely, lift ribbon cables gently, and check your warranty terms before any modification beyond consumables.
Frequently Asked Questions
What is filament grinding?
Filament grinding is when the extruder drive gear carries on turning after the filament stalls, cutting a flat notch into it. You’ll usually see plastic shavings near the gear and a chewed section on the strand itself. The gear can’t grip that flat spot, so extrusion drops off or stops completely.
Why is my 3D printer grinding?
Something has stopped the filament from moving forward while the extruder motor keeps pushing. The blockage is usually a partial nozzle clog, over-aggressive retraction, a nozzle running too cool, heat creep on longer prints, or debris left in the feed path from an earlier grind. Work out when the grinding starts and that narrows it down fast.
Why is my 3D printer making a grinding noise?
Find the source first. A grinding or clicking noise at the extruder, with visible damage on the filament, is filament grinding. A grinding noise that follows the gantry or bed motion is mechanical, and your filament will look untouched. Those need completely different fixes, so identify where the sound lives before changing any settings.
Why is my filament making a popping sound?
Popping or crackling at the nozzle means moisture. Water absorbed into the filament flashes to steam at printing temperature and bursts out of the melt. Dry the spool for several hours and store it with desiccant afterwards. Wet filament can contribute to grinding by making extrusion erratic, but the popping itself is a moisture problem.
Can I still use filament that has been ground down?
Yes, once you’ve removed the damaged part. The gear will keep slipping on that flat spot forever, so cut back until the strand is fully round again and finish with a square end. Sweep any loose plastic debris out before you reload. Then feed it as normal.
Why does my filament keep grinding mid-print?
Grinding that only shows up on longer prints, while short ones finish fine, usually means heat creep. Heat climbs the hotend and softens the strand too early, and soft filament swells and sticks. Check the heatsink fan. It should spin at full speed and be clear of debris. Grinding tied to retraction-heavy sections instead points at your retraction settings.
Does tightening the extruder tension fix filament grinding?
Sometimes, but it’s rarely the answer. Tension that’s genuinely too low will cause grinding, so a quick check is worth it. Beyond that point, flow testing on five different extruders showed no benefit from extra tension, and too much of it crushes the filament and reduces flow. A stock Ender 3 extruder actually performed better with the tension backed off. Set the thumbscrew to a sensible baseline, then go looking for the blockage downstream.
Why is no filament coming out of the nozzle at all?
No extrusion at all points to a full blockage or a broken feed, which is a step beyond grinding. Check that filament is still present and gripped in the extruder, then look for a complete clog, or a broken-off piece sitting inside the hotend. Grinding leaves you with weak, intermittent extrusion, because some plastic still gets through. A total stop means nothing moved at all.