
I earn a commission if you buy through links on this page, at no extra cost to you. As an Amazon Associate, I earn from qualifying purchases.
Print by object is a Bambu Studio setting that finishes one model on the plate before it starts the next one. By layer is still the default. Every object on the plate rises together, layer by layer.
I reach for it on a batch of small parts, or when colors change from part to part. You’ll want it too if you’d rather lose one object than a whole plate.
Space is the tradeoff. The toolhead needs room around finished parts. Two height limits matter, and they are not the same on every machine: the height to the lower gantry rod, and the height to the lid (or the printer’s printable height). You can’t pack the plate the way you would in a by-layer job.
Tall parts or a tight layout? Stay with print by layer. Same if a multi-color object still needs a prime tower. Bambu Studio blocks the tower in this mode.
Table of Contents
- Print by object vs by layer: what changes
- When to use print by object instead of by layer
- Height and clearance limits for P2S, P1S, A1 and A1 mini
- How to turn on print by object in Bambu Studio
- How to change the print order in Bambu Studio
- Spacing objects and using auto arrange
- Print by object with the AMS and different colors
- Print by object not working? Common errors and fixes
- Print by object FAQ
Print by object vs by layer: what changes
On a plate with more than one object, print by object builds them one by one. Travel between models drops, so you usually get less stringing and oozing. If one model fails, it usually doesn’t affect the others.
A crash can still spread. So can a peeled first layer, or a neighbor that gets knocked over.
Layer height and wall settings stay put. So does your filament profile. Switching the print sequence doesn’t retune those for you.
When to use print by object instead of by layer
I wanted the slicer’s own numbers. So I built one plate in Bambu Studio 2.9.1.70: a P2S profile with a 0.4 mm nozzle, the Textured PEI plate, PLA Basic, 0.20mm Standard, and six 20 mm cubes in two rows of three.
Then I sliced it five ways. Nothing here was printed. Every figure is a slicer estimate.
| Plate (slicer estimate) | Total time | Filament changes | Flush and tower | Total filament |
|---|---|---|---|---|
| One color, by layer | 42m3s | 0 | none | 21.75 g |
| One color, by object | 59m19s | 0 | none | 21.75 g |
| Two colors, by layer | 3h33m | 100 | 54.18 g flush, 5.13 g tower | 81.06 g |
| Two colors, by object | 1h6m | 4 | 2.17 g flush, no tower | 23.92 g |
| Two colors, by object, white first | 1h1m | 1 | 0.24 g flush, no tower | 21.99 g |
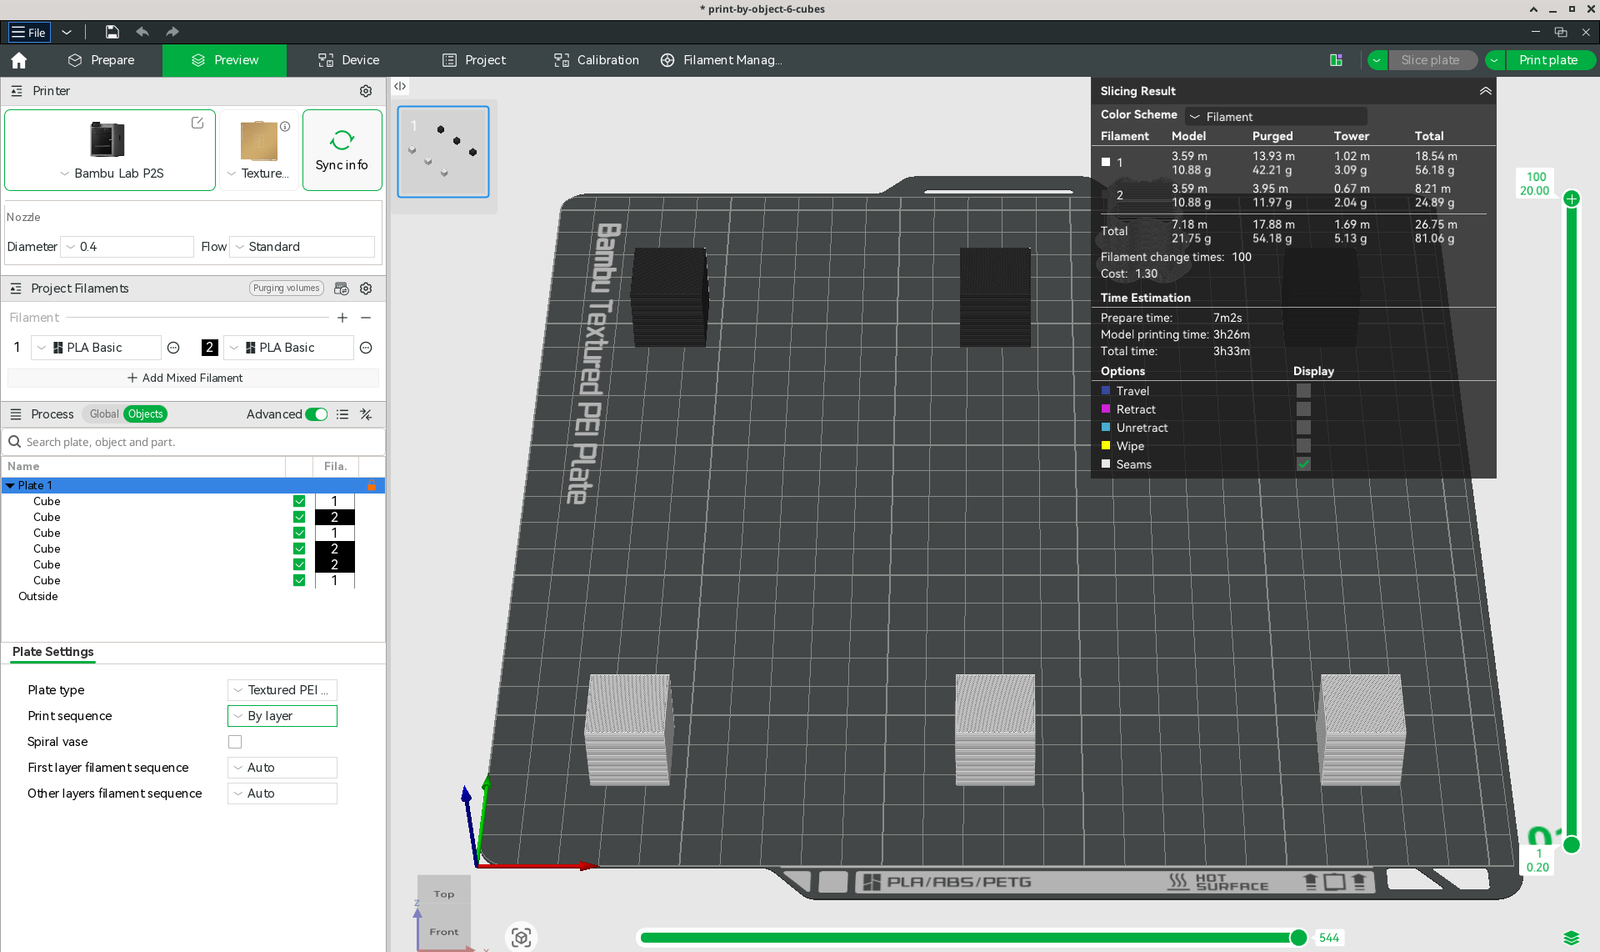
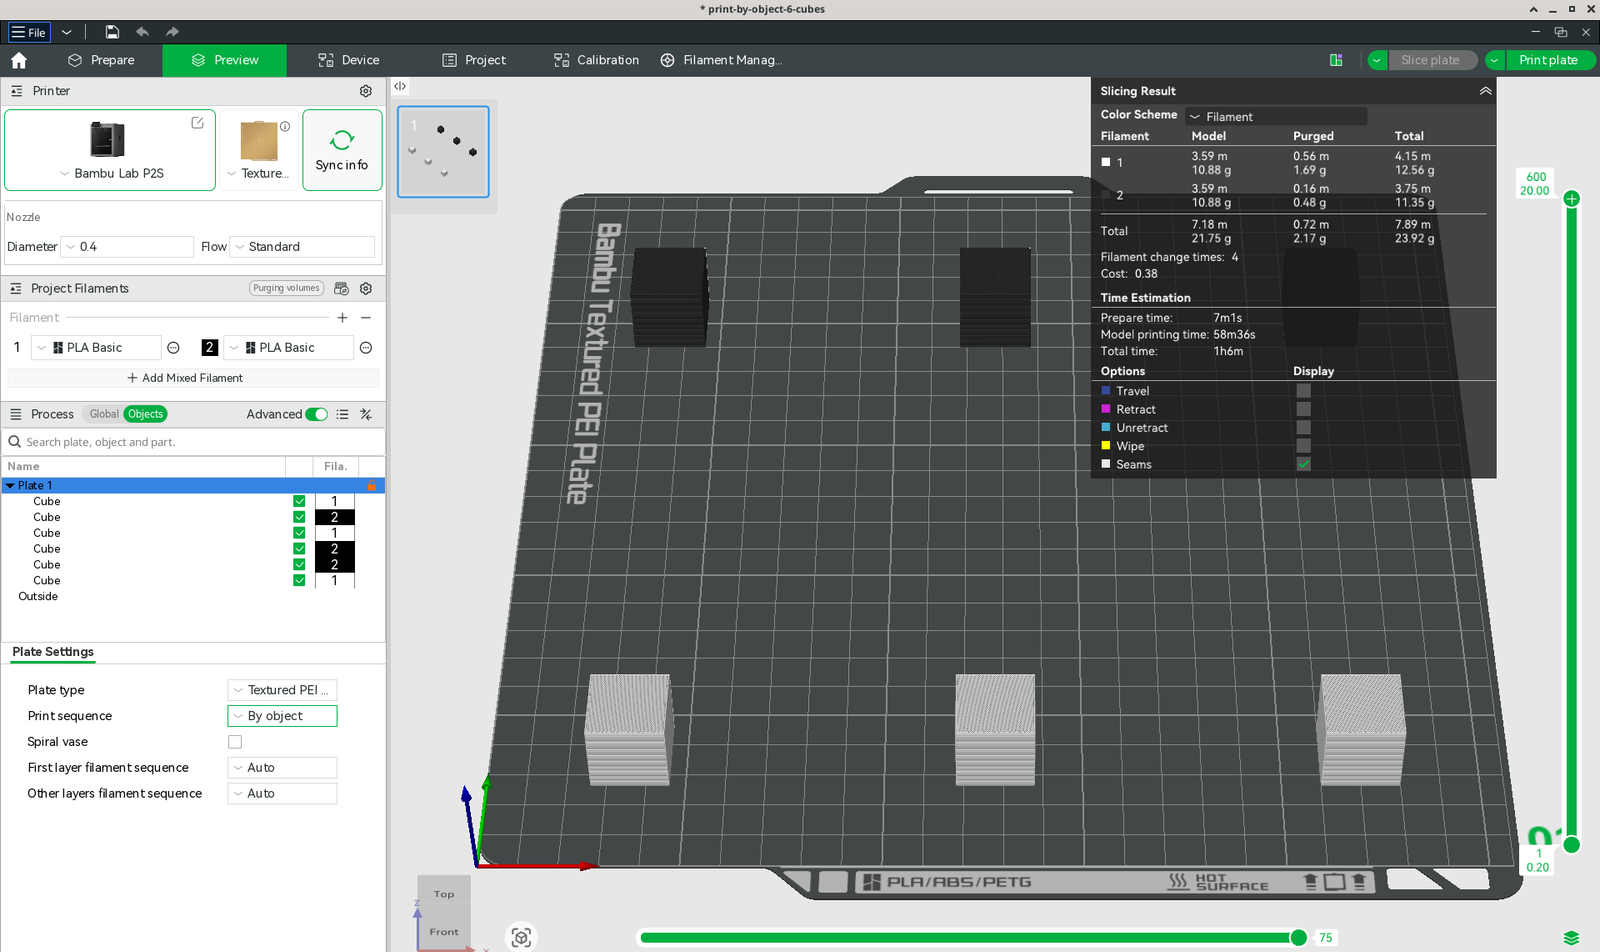
One color first. By object came out slower. Same 21.75 g, about 17 extra minutes.
So on a plain single-color batch, I don’t switch for speed. I switch so one bad cube doesn’t drag the rest of the plate down with it.
Two colors flip the picture. By layer, both colors sit on every layer. So the toolhead swaps filament on every single one. That’s 100 changes.
By object, it finishes a whole cube before it touches the next color. Four changes.
The flush dropped from 54.18 g to 2.17 g. The 5.13 g prime tower was gone.
Total filament went from 81.06 g to 23.92 g. Time? 3h33m down to 1h6m.
Look at the order Bambu Studio picked, though: white, black, white, black, black, white. So I grouped the colors and sliced again, white cubes first.
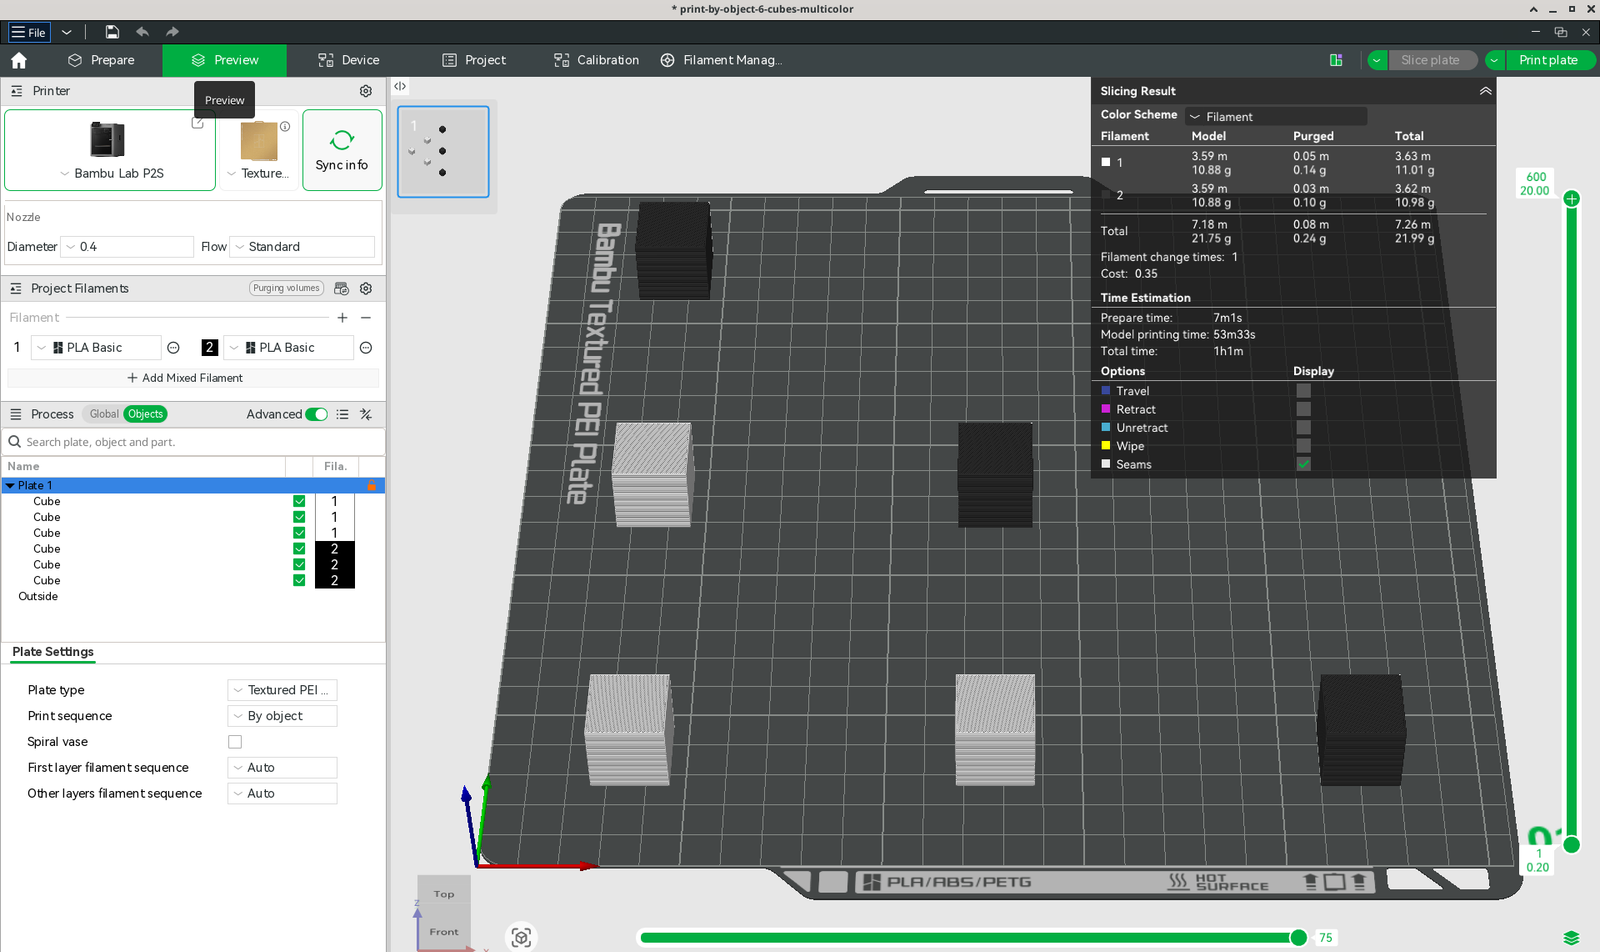
One change. Flush fell to 0.24 g, total to 21.99 g, time to 1h1m. That’s the slicer estimate for this plate, and your plate will land somewhere else. Still, sort by color and the swaps mostly disappear.
Where it pays off: batches of small parts, parts that differ in color, and long jobs where one failure would hurt. Where by layer still wins: tall parts, big parts that eat the plate once you add clearance, and a single multi-color object that needs a prime tower to keep its surfaces clean.
Height and clearance limits for P2S, P1S, A1 and A1 mini
Every printer preset carries its own limits. Open Printer settings, switch on Advanced, and look under Basic information for the Extruder Clearance group. Printable height sits in the same tab, under Printable space.
Here’s what the stock 0.4 mm presets show in Bambu Studio 2.9.1.70. All values are in mm.
| Printer (0.4 mm preset) | Max Radius | Height to rod | Height to lid | Printable height |
|---|---|---|---|---|
| P2S | 72 | 32.5 | 141.5 | 256 |
| P1S | 68 | 34 | 90 | 250 |
| A1 | 73 | 25 | 256 | 256 |
| A1 mini | 73 | 25 | 180 | 180 |
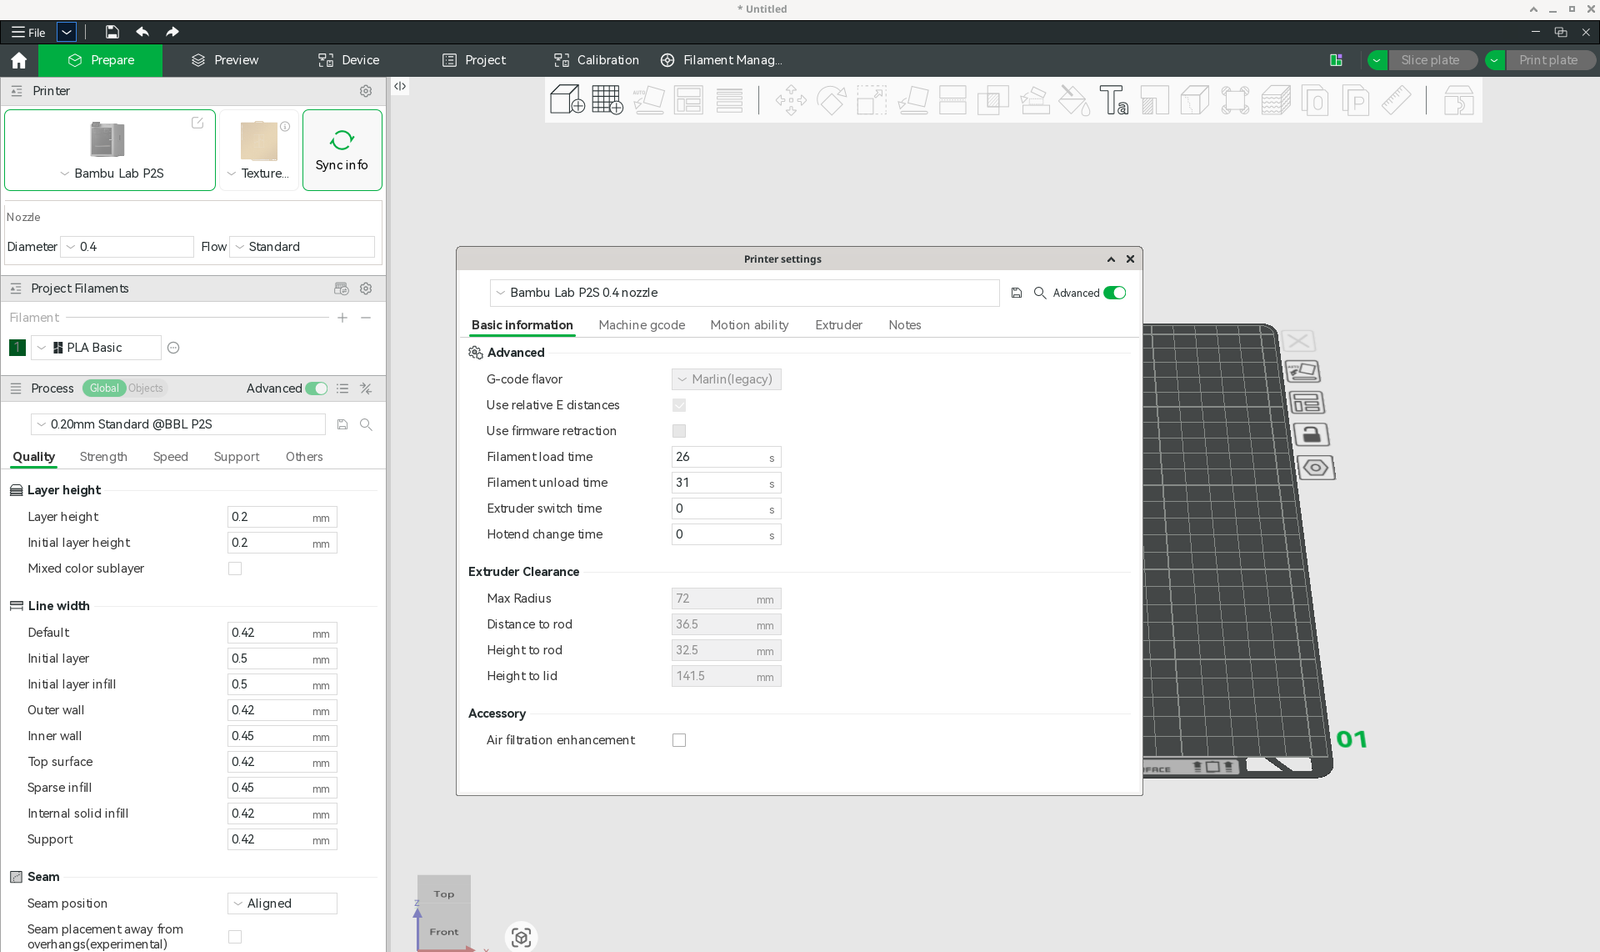
The same group also lists Distance to rod: 36.5 mm on the P2S, 33 on the P1S, and 56.5 on both A1 models. Bambu’s print-by-object page doesn’t explain that one. So I won’t guess.
Height to rod is the number that bites. On the A1 and A1 mini it’s 25 mm. About an inch.
Anything taller has to print last in its front-to-back lane, or get a lane of its own. The P2S and P1S give you a little more room, 32.5 and 34 mm. Weighing those two? My P2S vs P1S comparison covers the rest, and the Bambu Lab P2S review goes deeper on the newer one.
The P1S preset caps printable height at 250 mm, a little under its 256 mm build volume. That’s on purpose. Bambu Studio fences the toolhead out of a few areas on the P1 and X1 machines for things like cutting and Z hop (print volume limitations).
On an A1, the last part on the plate can use the full 256 mm. Everything before it still lives under the rod limit, so a tall batch takes some planning.
How to turn on print by object in Bambu Studio
The screenshots come from Bambu Studio 2.9.1.70 on Linux, so the window frame looks a bit different on Windows or a Mac.
Turn it on for the whole project
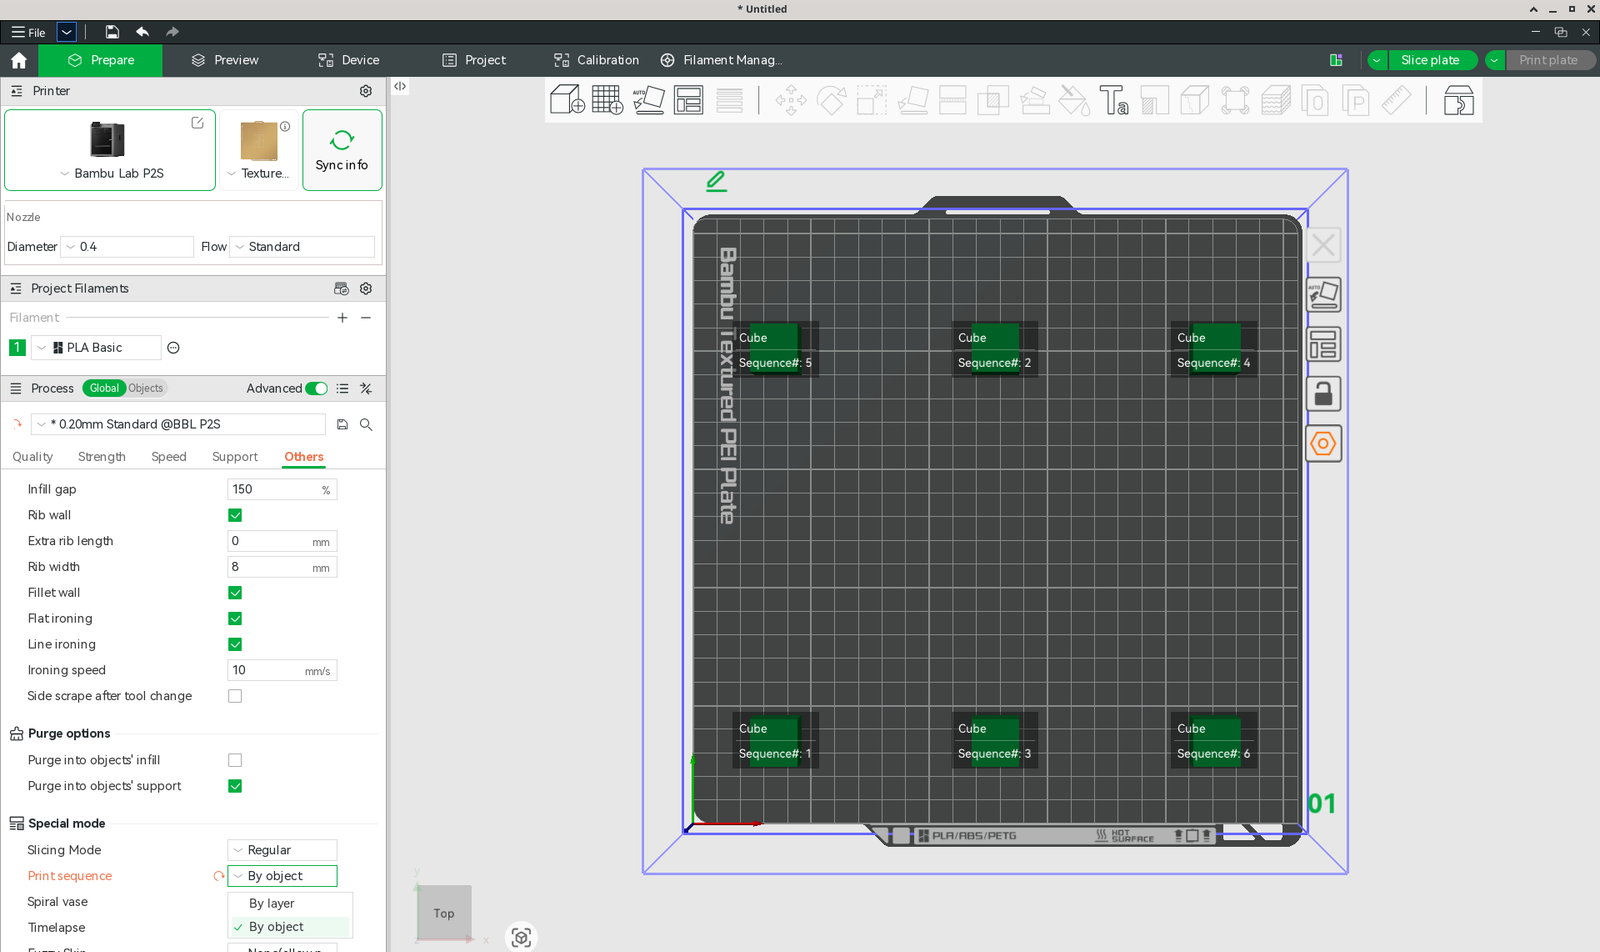
In the Process panel, click Global, then open the Others tab. Scroll down to Special mode and set Print sequence to By object.
Turn it on for one plate only
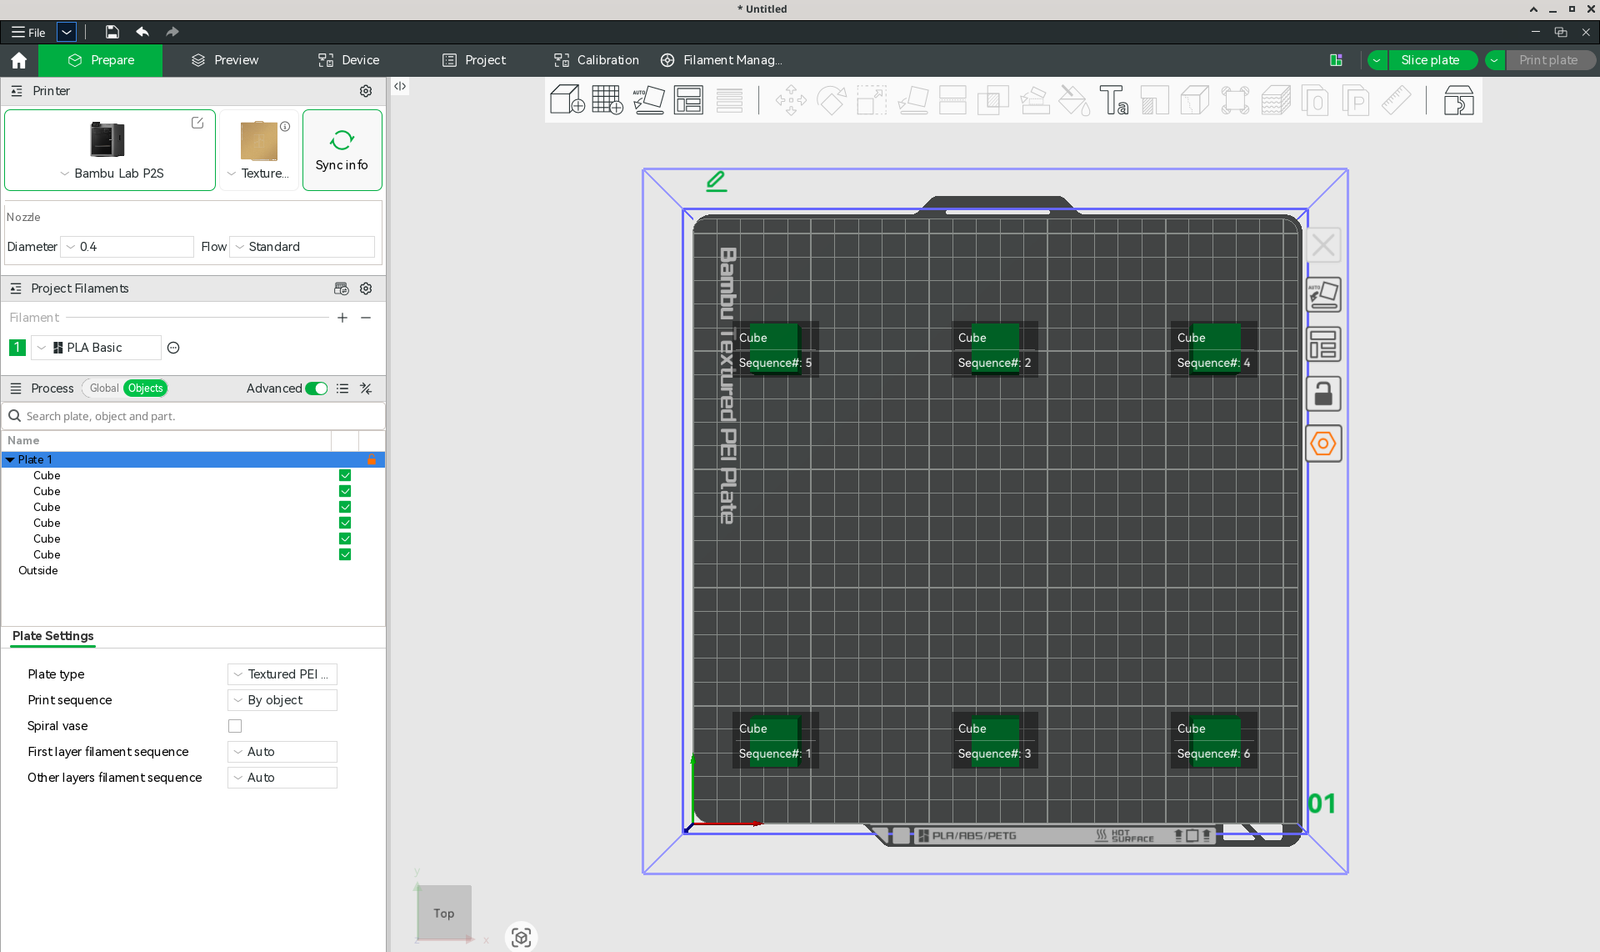
Click the plate name (Plate 1) at the top of the Objects list. Plate Settings opens underneath, with its own Print sequence menu. Two choices: By layer and By object. Handy when one plate holds tall parts and the next holds small ones.
How to change the print order in Bambu Studio
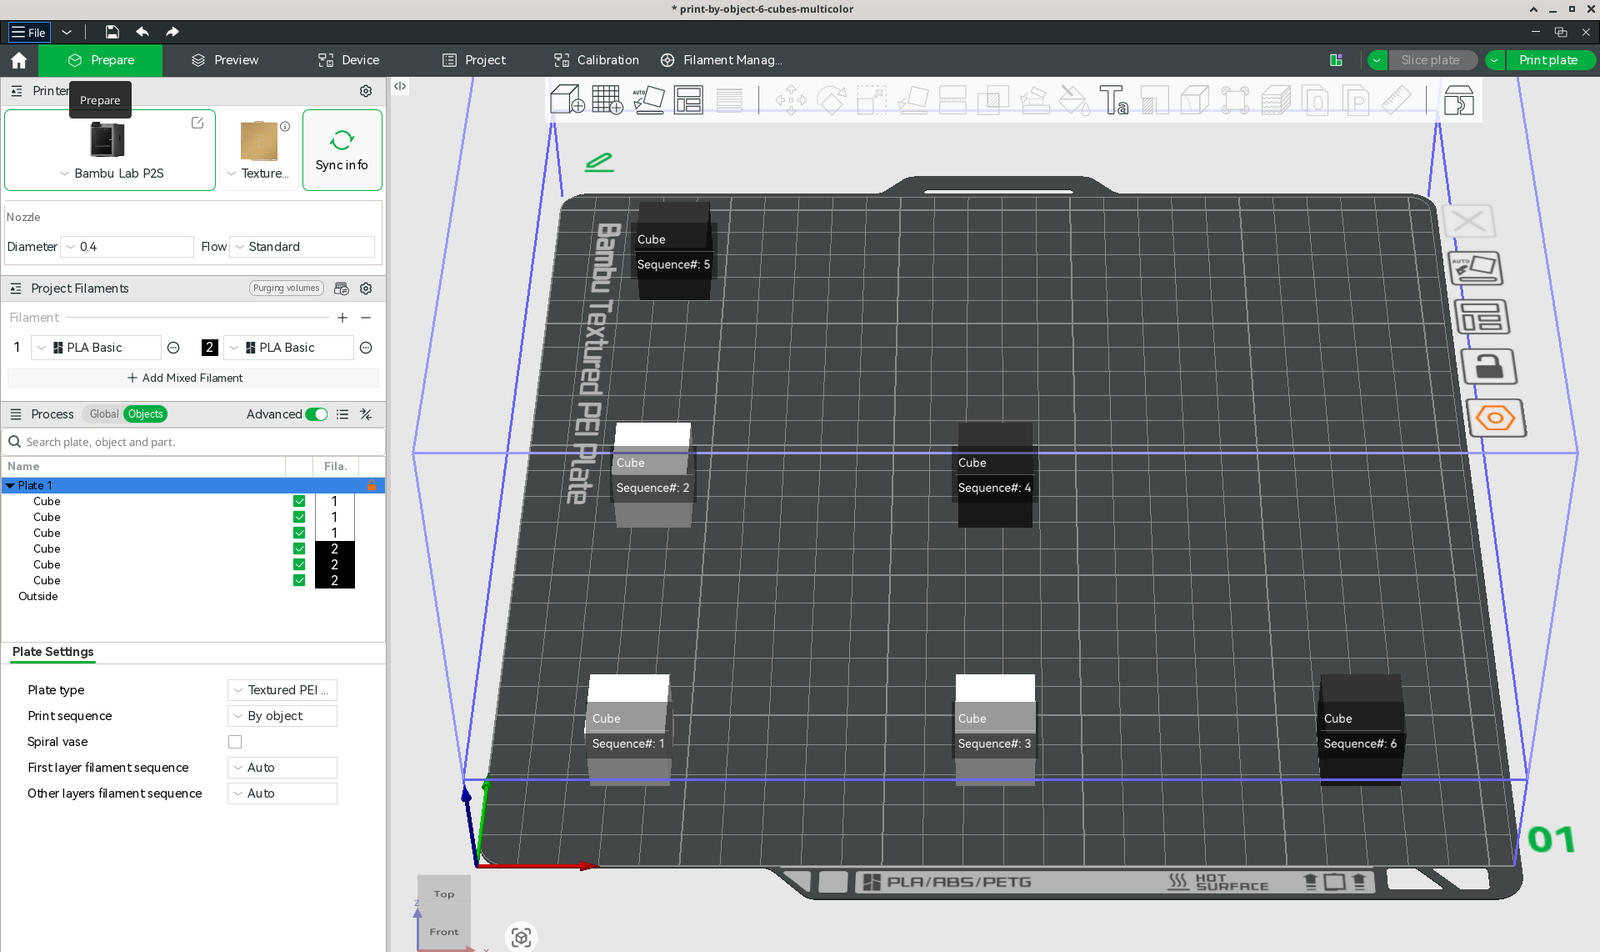
Each object gets a Sequence# label on the plate. No labels? Turn them on under View > Show Labels by Object.
Objects print in the order of the Objects list, top to bottom. Bambu Studio also uses that order for its collision check when you slice, so a failed check can sometimes be fixed just by changing it.
Changing it was the fiddly part for me. In Bambu Studio 2.9.1, dragging rows in the list didn’t move anything, and clicking the labels didn’t either.
What worked: right-click Plate 1 in the Objects list and pick Arrange. On my color test it regrouped the list as white, white, white, black, black, black. It also moves the cubes around the plate, so check the layout and the labels again afterward.
Spacing objects and using auto arrange
The nozzle is tiny, but the whole toolhead has to clear finished parts. Bambu Studio wants the XY gap larger than the clearance radius around the toolhead. Drag an object and a circle appears, expanded by half that radius.
On the P2S preset that’s 72 mm between parts, so each circle reaches 36 mm out. Circles overlap? Move the parts.
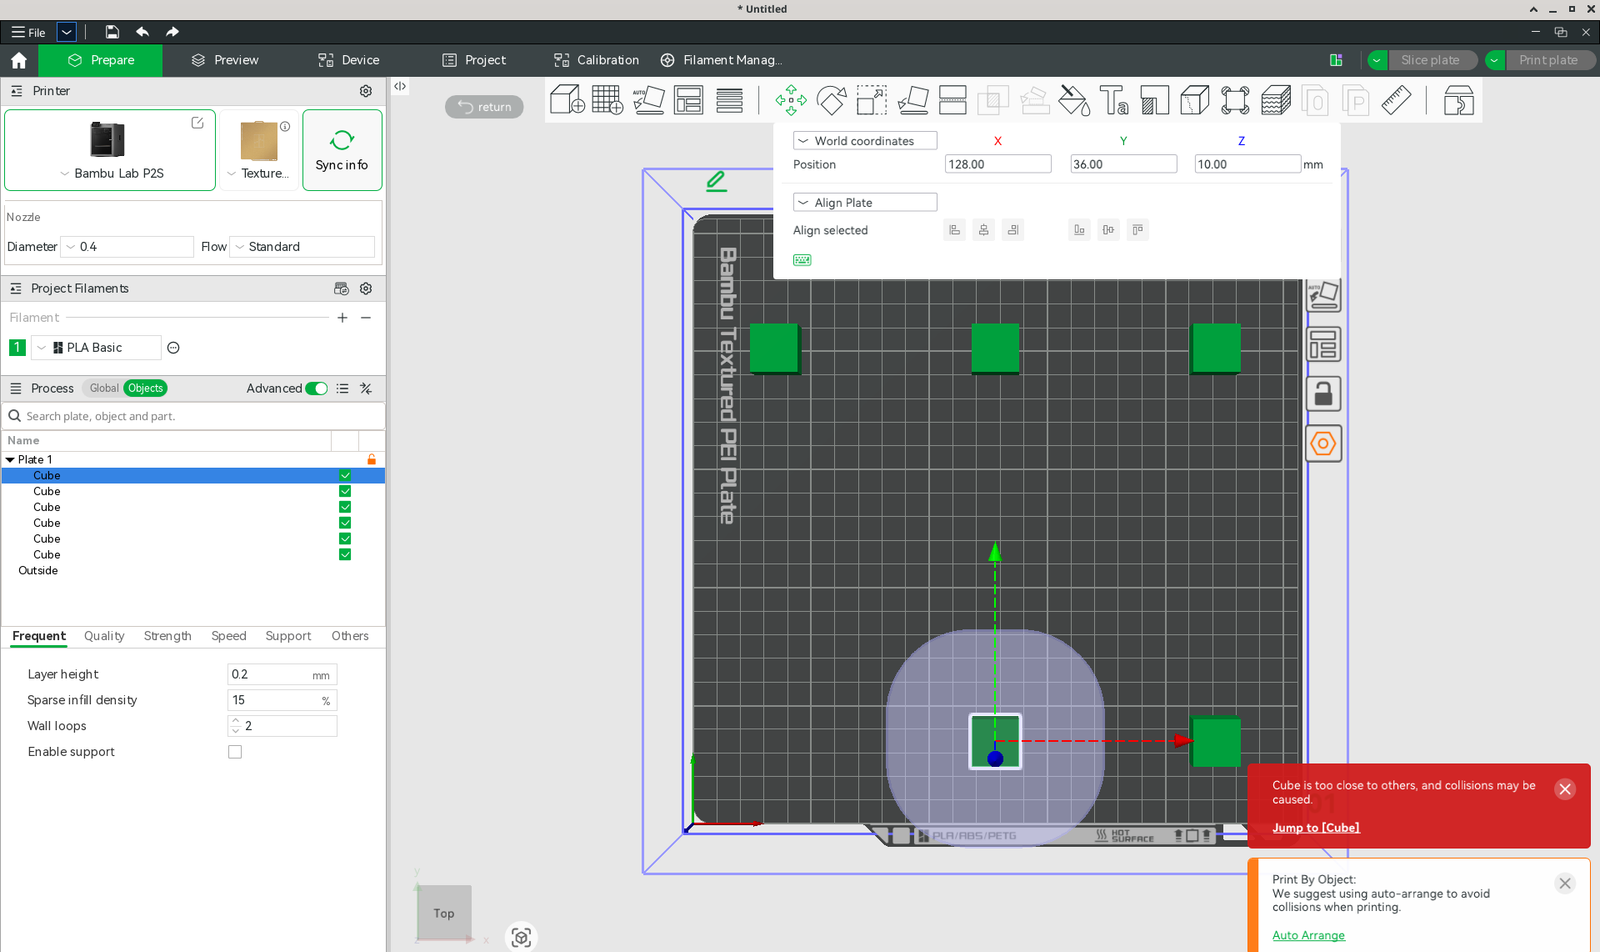
When you switch modes, a prompt in the lower-right corner suggests auto-arrange. Try it as a starting point. Then check the circles and the order yourself.
Height is about the Y direction, front to back on the plate. If two objects share that span, the earlier ones must stay under the height-to-rod value. Park them side by side with no Y overlap, or print an object last in that group, and it can go up to the height-to-lid value or the printable height, whichever the preset uses. The last object on the whole plate only has to stay under the printable height.
So put the tallest part last in the Objects list.
From 2.5.3, each object can have its own skirt. If you turn that on, leave extra skirt distance beyond the clearance boundary so the skirt itself doesn’t clip a part you already finished.
Don’t loosen those clearance values just to squeeze more parts onto the plate. The toolhead or the cables can hit a finished part.
Print by object with the AMS and different colors
Filament assignment works as usual. You still pick a filament for each object in the list.
The prime tower is what changes. Bambu Studio can’t build one in by-object mode, because the tower can only grow upward, in step with the plate. The odd part is the checkbox.
In 2.9.1.70, Prime tower still shows ticked after you pick By object. Not grayed out either. Slice anyway and the tower is missing from the preview and from the slicing summary.
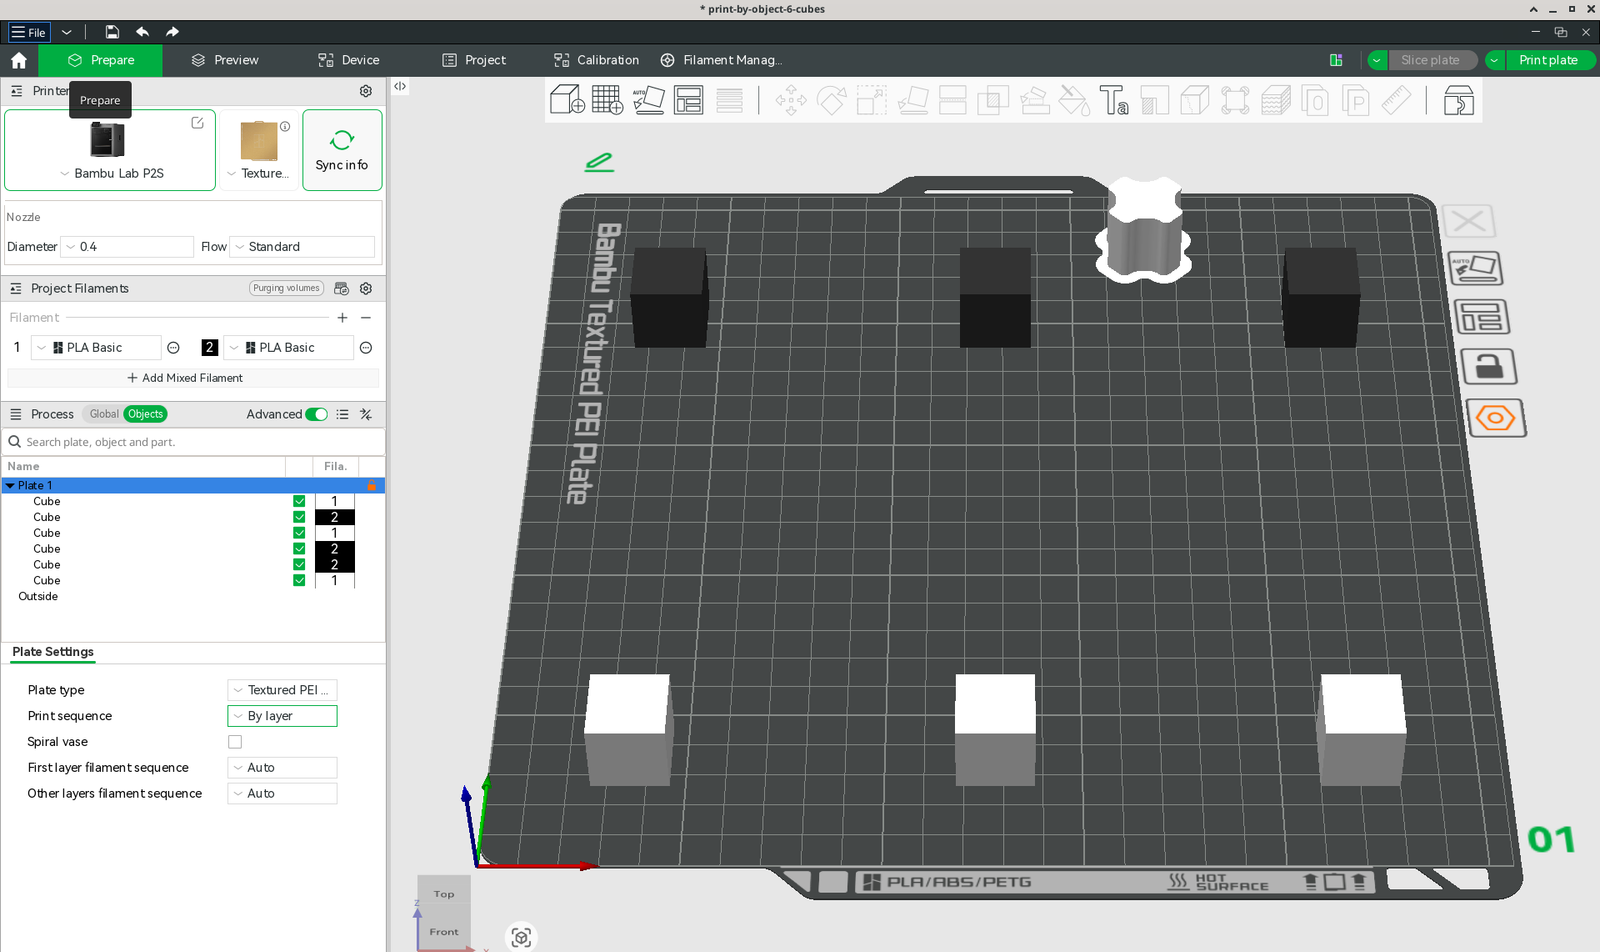
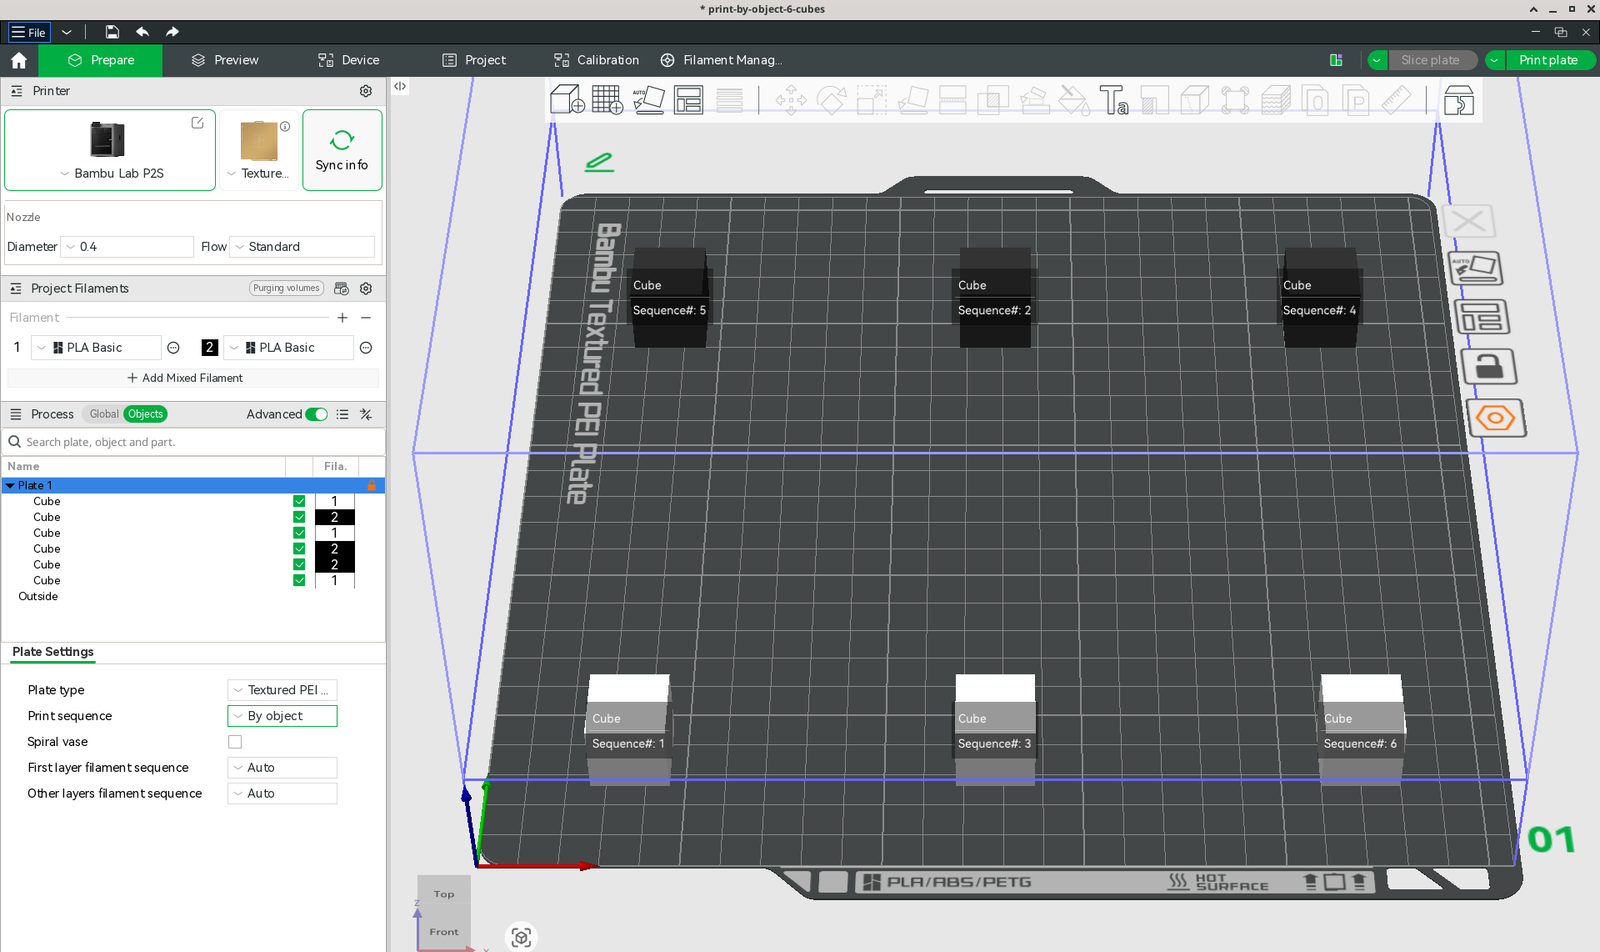
There’s a knock-on effect. Purge into objects’ support only works when the prime tower is on. No tower here, so I wouldn’t expect that setting to do much. Check the Purged column after you slice.
What I can’t tell you yet is how the surfaces look. With no tower, the first layers after a color change may carry a little of the old color. The per-object skirt from 2.5.3 is meant to catch some of that first messy extrusion. I don’t have printed parts to judge it, so I’m not calling it either way.
The flush that’s left still ends up as purge waste. If the pile is getting out of hand, here’s what to do with AMS purge waste.
Print by object not working? Common errors and fixes
“Cube is too close to others, and collisions may be caused.” Move the parts until the clearance circles no longer overlap. They can look fine and still fail. The radius has to clear the whole toolhead.
A height collision is often just the print order. Move the tall part to the end, or shift the layout so the parts no longer share a front-to-back span. The first object in an overlapping pair has to stay below the height-to-rod limit. Once a part is last, printable height is the cap.
Missing sequence labels? They live in the View menu, same as above. Older help pages still list an outdated shortcut, so the menu is the safer bet. You can hide the labels again from there.
The prime tower will vanish when you switch to print by object, even with the box still ticked. That’s expected.
If one part fails mid-print, the others usually keep going. Not always. A second object that won’t stick is often a dirty plate or a first-layer problem. On a P2S, start with my first layer not sticking fixes.
Use a current Bambu Studio release. Older versions had collision-detection and filament-change bugs in this mode that later updates already fixed.
Before you slice, read the clearance values for your printer and leave the tallest object until the end of the sequence. Then look at the preview. If the path looks tight, it is. Fix the layout first.
Print by object FAQ
Does print by object save filament on a Bambu printer?
On a single-color plate, maybe not at all. My six-cube P2S plate showed 21.75 g in print by object and by layer alike. On a two-color plate, Bambu Studio estimated 23.92 g by object against 81.06 g by layer, almost all of it flush and tower. Trust the numbers your own slice shows.
How tall can you print by object on a Bambu A1 or A1 mini?
Both the A1 and A1 mini presets set height to rod at 25 mm, so earlier parts that share a front-to-back span with later ones have to stay under that. The final object gets the full printable height, 256 on the A1 and 180 on the mini, in mm. Print the tall one last, or place it so its Y range doesn’t cross the earlier parts. If you’re still choosing a printer, here’s whether the A1 mini is worth it for beginners.
Can I use print by object in Bambu Studio with the AMS?
Yes, you can still assign filaments per object. You just can’t get a prime tower in this mode.
Why did my prime tower disappear when I switched to by object?
Bambu Studio won’t build it in this mode. The tower has to rise in one Z direction with the whole plate. The checkbox may still look ticked. The slice won’t have a tower.
Is print by object the same as “sequential printing” in other slicers?
Same idea. Different names, different clearance rules. This article follows Bambu Studio’s rules.