
layer_height as settable_per_mesh: false. That single flag is why it never shows up in Per Model Settings.If you came here after hunting through every panel in the Quality menu, here is the short version. You can’t do it, and it isn’t your fault for missing the setting.
You have probably already tried three things. Modify settings for overlaps never lists layer height. Splitting the model into two objects changes nothing. ChangeAtZ has no layer height field at all.
That setting doesn’t exist. The closest feature requests have been sitting in Cura’s issue tracker since 2020, and the one that came nearest was closed as not planned.
So this guide gives you the reason, which is visible in Cura’s own source code, plus the three routes that do work, ranked by how much effort they cost you. It also covers what Cura will happily change at a specific Z, because that list is longer than most people realize.
Table of Contents
- The Short Answer: You Can’t Change Layer Height at Z in Cura
- Why the Four Obvious Fixes All Dead-End
- Route 1 (Easiest): Adaptive Layers Probably Solves Your Real Problem
- Route 2 (5 Minutes): Use a Slicer With a Height Range Modifier
- Route 3 (Advanced): Slice Twice and Splice the G-code
- What Cura Can Change at a Specific Z
- How Thin Can You Actually Ask For?
- FAQ
The Short Answer: You Can’t Change Layer Height at Z in Cura
Cura 5.13 has no native way to switch layer height at a specific Z height or layer number. One print, one layer height, all the way up.
Two people who would know have said as much. Here is ahoeben, also known as fieldOfView, who writes many of the plugins Cura users end up installing, answering the question directly:
“Cura does not have functionality to let you do that easily. You would have to mix gcode files manually.”
And a forum moderator, answering a thread that asked this exact question: “There’s currently no way in Cura to do this.”
Notice what ahoeben leaves open. Mixing G-code by hand is Route 3 below, and it does work. What Cura lacks is a setting that does it for you.
You can check this yourself without taking anyone’s word for it. Cura ships a file called fdmprinter.def.json that defines every setting in the slicer. I pulled it from the repository and read the layer_height entry:
"settable_per_mesh": false
"settable_per_extruder": false
Those two flags decide whether a setting can apply to one object instead of the whole plate. Both are false. In Cura 5.13, layer height is one global value for everything on the build plate.
People have asked. Issue #7488, “Custom layer height in per model settings,” has been open since April 2020. #9873, “Make Adaptive Layers a per-layer setting,” was opened in 2021 and closed as not planned in 2023. Neither has produced a feature.
Part of that is geometry. ahoeben, in the same thread, pointed out that Cura cannot print one part of a layer at one height and another part half a layer higher, because the next layer would collide with what was already printed. That rules out giving two objects on one plate their own layer heights.
Stacking two layer heights in sequence up a single model is a softer problem. Cura just never built it. One plate gets one Z ladder.
At a Glance: Which Slicers Can Do This
| Slicer | Layer height at a set Z | Pause or filament change at a layer | Speed, temp, flow at a Z |
|---|---|---|---|
| UltiMaker Cura 5.13 | No | Yes | Yes (ChangeAtZ) |
| PrusaSlicer | Yes (Height range modifier) | Yes | Yes |
| Orca Slicer | Yes (Height range modifier) | Yes | Yes |
| Bambu Studio 2.01 | Yes (Height range modifier) | Yes | Yes |
| Simplify3D | Yes | Yes | Yes |
Why the Four Obvious Fixes All Dead-End
Four things look like they should work. Each one fails for a different reason, and none of those reasons is a setting you can go fix.
Adaptive Layers varies height by slope, not by height
Adaptive Layers reads the slope of your model’s surface and thins the layers where that surface is shallow. It doesn’t have any concept of “start at 5mm.” Even its Topography Size setting, which sounds like a height threshold, measures horizontal distance between the edges of adjacent layers.
That mismatch produces a very common complaint. One user reported: “I have tried to use the adaptive layers function but it just uses the same layer height for the whole print.” On a model with vertical walls, that is precisely what it does, because there is no slope to respond to.
Years after shipping, it is still filed under Experimental.
Per Model Settings doesn’t list Layer Height
Only settings marked settable_per_mesh: true appear in Per Model Settings, which is the same panel you reach through Modify settings for overlaps. Layer height is marked false, so no amount of scrolling will surface it there.
One neighbouring setting does make the list, which is where some of the confusion starts:
| Cura setting | settable_per_mesh | What that means for you |
|---|---|---|
layer_height (Layer Height) | false | Never appears in Per Model Settings |
layer_height_0 (Initial Layer Height) | false | Also one value for the whole plate |
infill_sparse_thickness (Infill Layer Thickness) | true | Can be set per object, affects infill only |
Infill Layer Thickness gets to be per-object because it stacks in exact multiples of your real layer height. The nozzle still walks the same Z ladder. It just skips some rungs while filling.
Splitting the model into two objects changes nothing
Layer height is a property of the build plate. Objects don’t get their own. Two objects sitting on the same plate still share one Z ladder, so they get identical layers.
A Reddit user who tried it wrote: “tried splitting the piece into two separate models (still won’t allow you to set two different layer heights??)”. The double question mark is doing a lot of work in that sentence.
ChangeAtZ edits finished G-code
ChangeAtZ runs after slicing, on the G-code text. By then the XY contours and extrusion values have already been calculated against fixed Z planes. The script has no model left to re-slice, so it can only rewrite numbers that are already in the file.
GregValiant, a regular expert on the Ultimaker forum, drew the line when someone asked for extra top layers partway up a model: “‘Add top layers’ at some midpoint of the model is not an option. Like most things they must be present in the model.”
Layer height sits in the same category. It is decided at slice time and baked in.
The plugin that does not exist
One dead end comes with an AI assist. A Reddit user reported that ChatGPT told them a “Height Range Modifier” plugin was available for Cura, and that they “cannot find it for the life of me.”
They couldn’t find it because it isn’t there. Cura’s Marketplace doesn’t carry it. The feature name is real, and it belongs to a different family of slicers, which is covered further down.
Slicers pull this kind of trick more often than you would think. OrcaSlicer quietly clamps Ender 3 acceleration settings to a ceiling most owners never see.
Route 1 (Easiest): Adaptive Layers Probably Solves Your Real Problem
Most people who want a mid-print layer height switch are after the same outcome. Fine layers where the detail is, fast layers everywhere else. Adaptive Layers gives you that, and the time savings are larger than the setting’s Experimental label suggests.
In Cura itself, one tester sliced a chess piece with the stock profile and got 532 layers in 4 hours. Switching on Adaptive Layers brought that down to 482 layers and 3 hours 32 minutes, with a visibly smoother curve on the piece. The finish improved and the print got shorter.
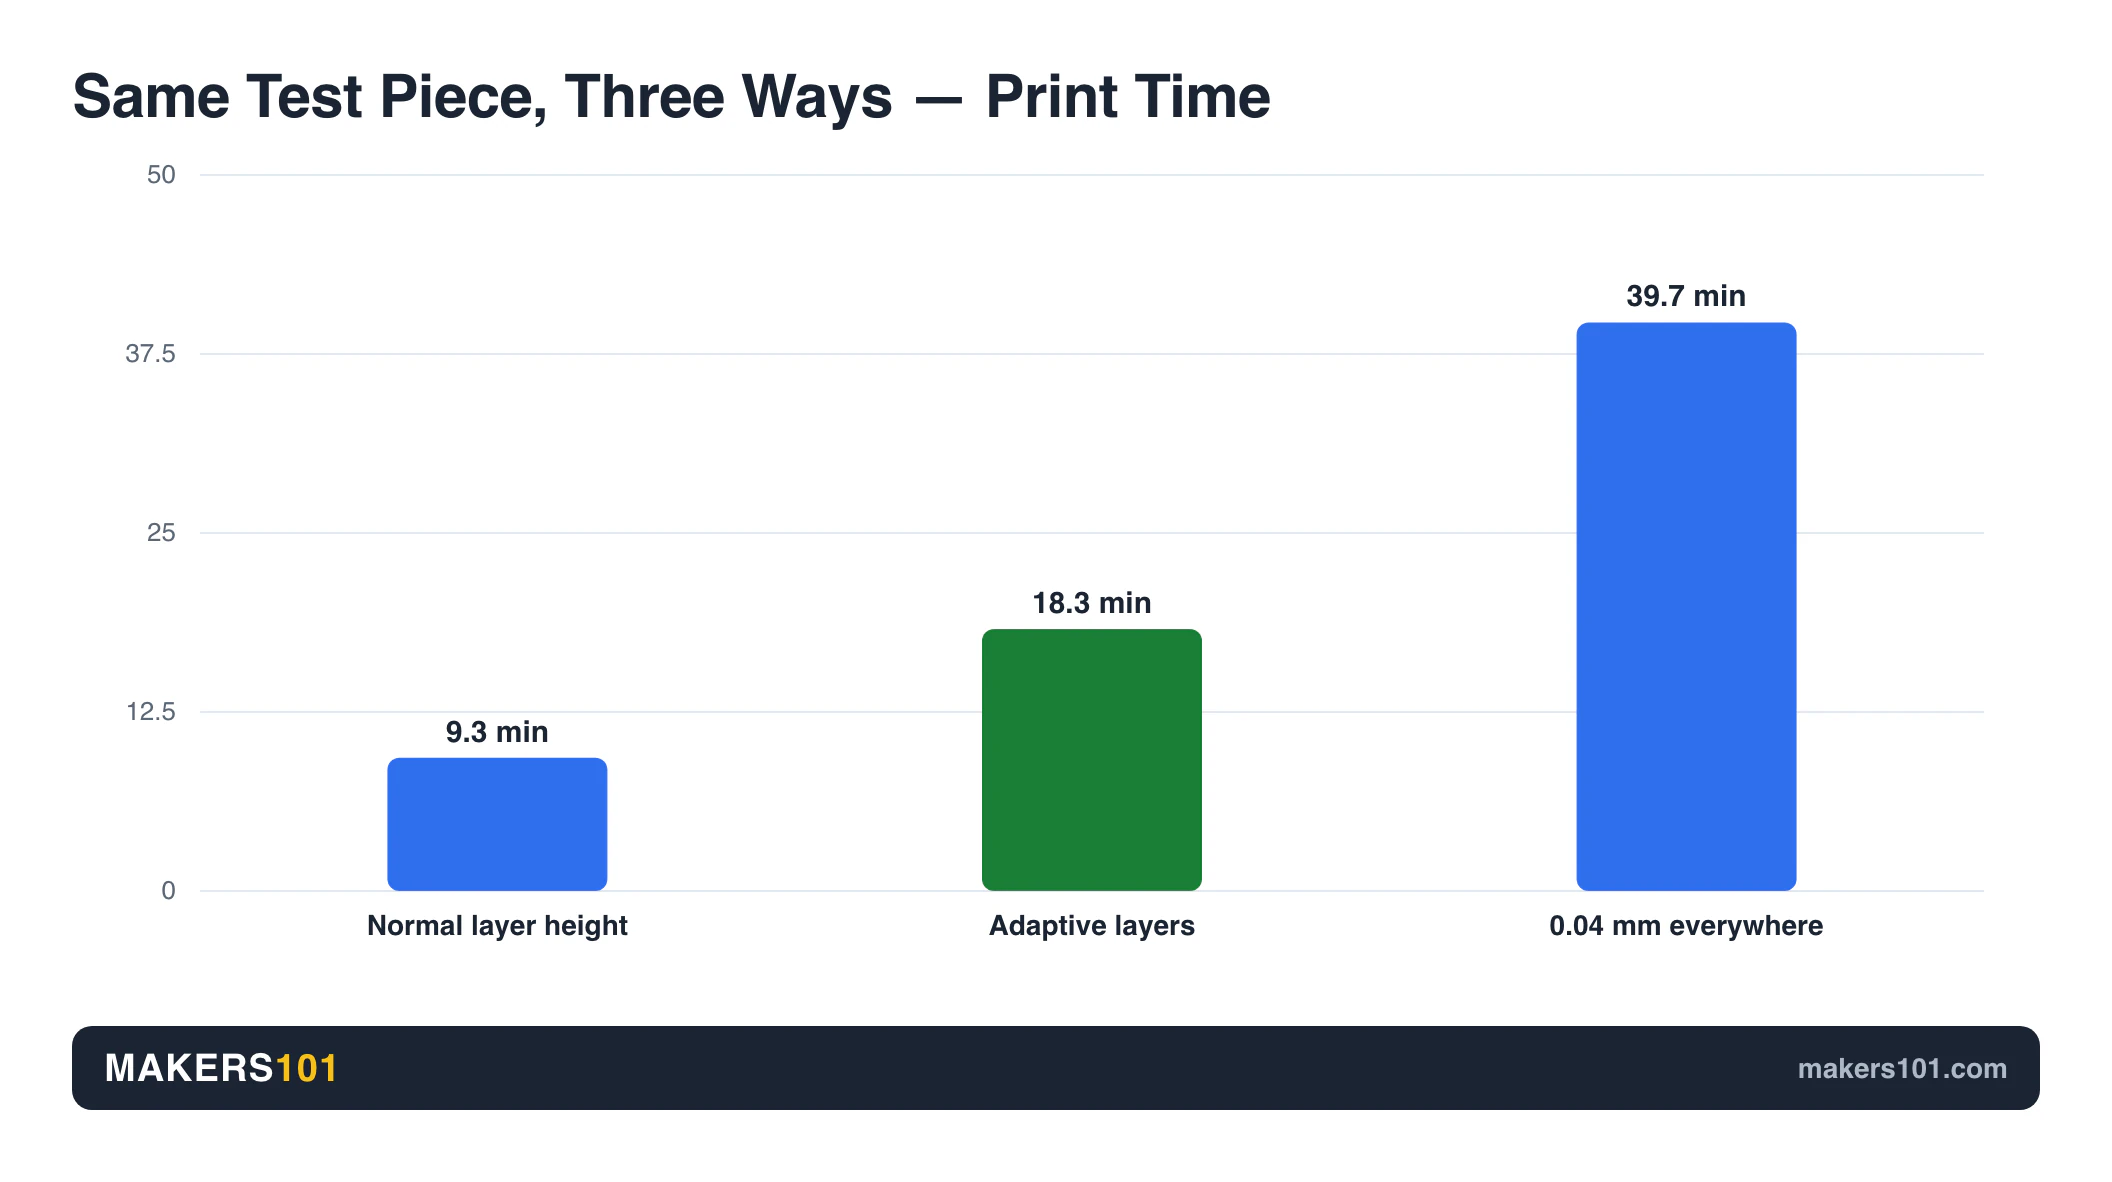
The same pattern holds outside Cura. Teaching Tech ran a test piece three ways using the adaptive layer height found in PrusaSlicer and OrcaSlicer, which thins layers on the same slope-driven logic.
A normal layer height took 9 minutes 20 seconds. Forced down to 0.04mm across the whole model it took 39 minutes 43 seconds. Adaptive layers reached a comparable finish in 18 minutes 15 seconds.
That is most of the quality for a quarter of the penalty.
You turn it on under Print Settings, Experimental, Use Adaptive Layers.
The default values everyone quotes are wrong
Here is something worth getting right, because guides copy each other on it. Cura’s base definition file sets Adaptive Layers Maximum Variation to 0.1, Variation Step Size to 0.01, and Topography Size to 0.2. The 0.04 figures you see in screenshots and tutorials come from printer profile overrides.
So check your own values before copying anyone’s numbers. Your profile may already be overriding them.
Pushing those numbers harder can also backfire. In the chess piece run above, dropping Topography Size from 0.2 to 0.1 pushed the print back up to 3 hours 49 minutes and 524 layers, which gave back most of the saving.
When Adaptive Layers is the wrong call
It punishes models that have a lot of surface variation. In a Bambu Studio and Orca walkthrough, one viewer reported a helmet going from 32 hours on fixed layers to 4.5 days once variable layer height was switched on, because the algorithm found slope almost everywhere and kept thinning. That test was not run in Cura, and Cura’s implementation differs in the details. The mechanism is the same one Cura’s Adaptive Layers uses, so treat it as a risk to check rather than a measured Cura result.
- Boxy, geometric parts gain close to nothing, since there is no shallow slope to smooth.
- Functional parts that need consistent layer bonding are better off at a fixed height.
- In the Bambu Studio and Orca versions of the feature, organic tree supports are ruled out, and a prime tower forces every object on the plate to share one setting. Check what your own slicer restricts before committing a long print.
If you’re really chasing surface finish, it helps to know how much of the quality gain actually comes from layer height versus everything else you could adjust.
Route 2 (5 Minutes): Use a Slicer With a Height Range Modifier
If you genuinely need a specific layer height across a specific band of Z, the fastest fix is a slicer that treats this as a normal feature. Several do, and they all inherit it from the same lineage.
PrusaSlicer calls it exactly what you have been searching for. Right-click the object, choose Height range modifier, then set the lower and upper Z of the band. That range gets its own layer height field. Clicking the plus sign adds more ranges, so you can stack several transitions up a single model.
Orca Slicer carries the same feature across, and it is usually the softest landing for a Cura user. The settings vocabulary is close enough that your existing profiles translate without much relearning.
Slicers in this family also tend to give you a manual mode that Cura has no answer to. On the vertical bar beside the model you draw layer height directly onto the part: left-click thins the layers under the cursor, right-click thickens them. The model then recolours by layer height so you can read what you did at a glance, with thicker layers at one end of the scale and thinner at the other.
One setting in that panel is easy to miss. Smooth has to be switched on explicitly, otherwise the height change jumps between bands instead of easing across them. A Keep min option forces the thinnest layers at the very top and bottom of the model, which is what saves a pointed tip from going blocky.
Bambu Studio 2.01 also ships a Height range modifier. One forum user described the path as right-clicking the object and adding multiple ranges from there.
Simplify3D has done this for years. One Ultimaker forum regular said he keeps it around specifically for this job, despite preferring Cura for everything else.
Two limits carry over with the feature. Variable layer height does not play well with organic supports, and on the Bambu side one user reported it “does not work with multi object items.” Check your specific case before you trust it with a long job.
The real cost of this route is not the feature. It is rebuilding your profiles in a new slicer. For a one-off model that is hard to justify, and Route 3 may be the cheaper trade. If you keep hitting this need, the move pays for itself quickly, and it is worth reading up on which slicer fits your printer before you switch.
Route 3 (Advanced): Slice Twice and Splice the G-code
This one works inside Cura, and it costs you an afternoon with a text editor. The moderator who documented the procedure attached his own warning to it: “Do this at your own risk if you don’t completely know what you’re doing.”
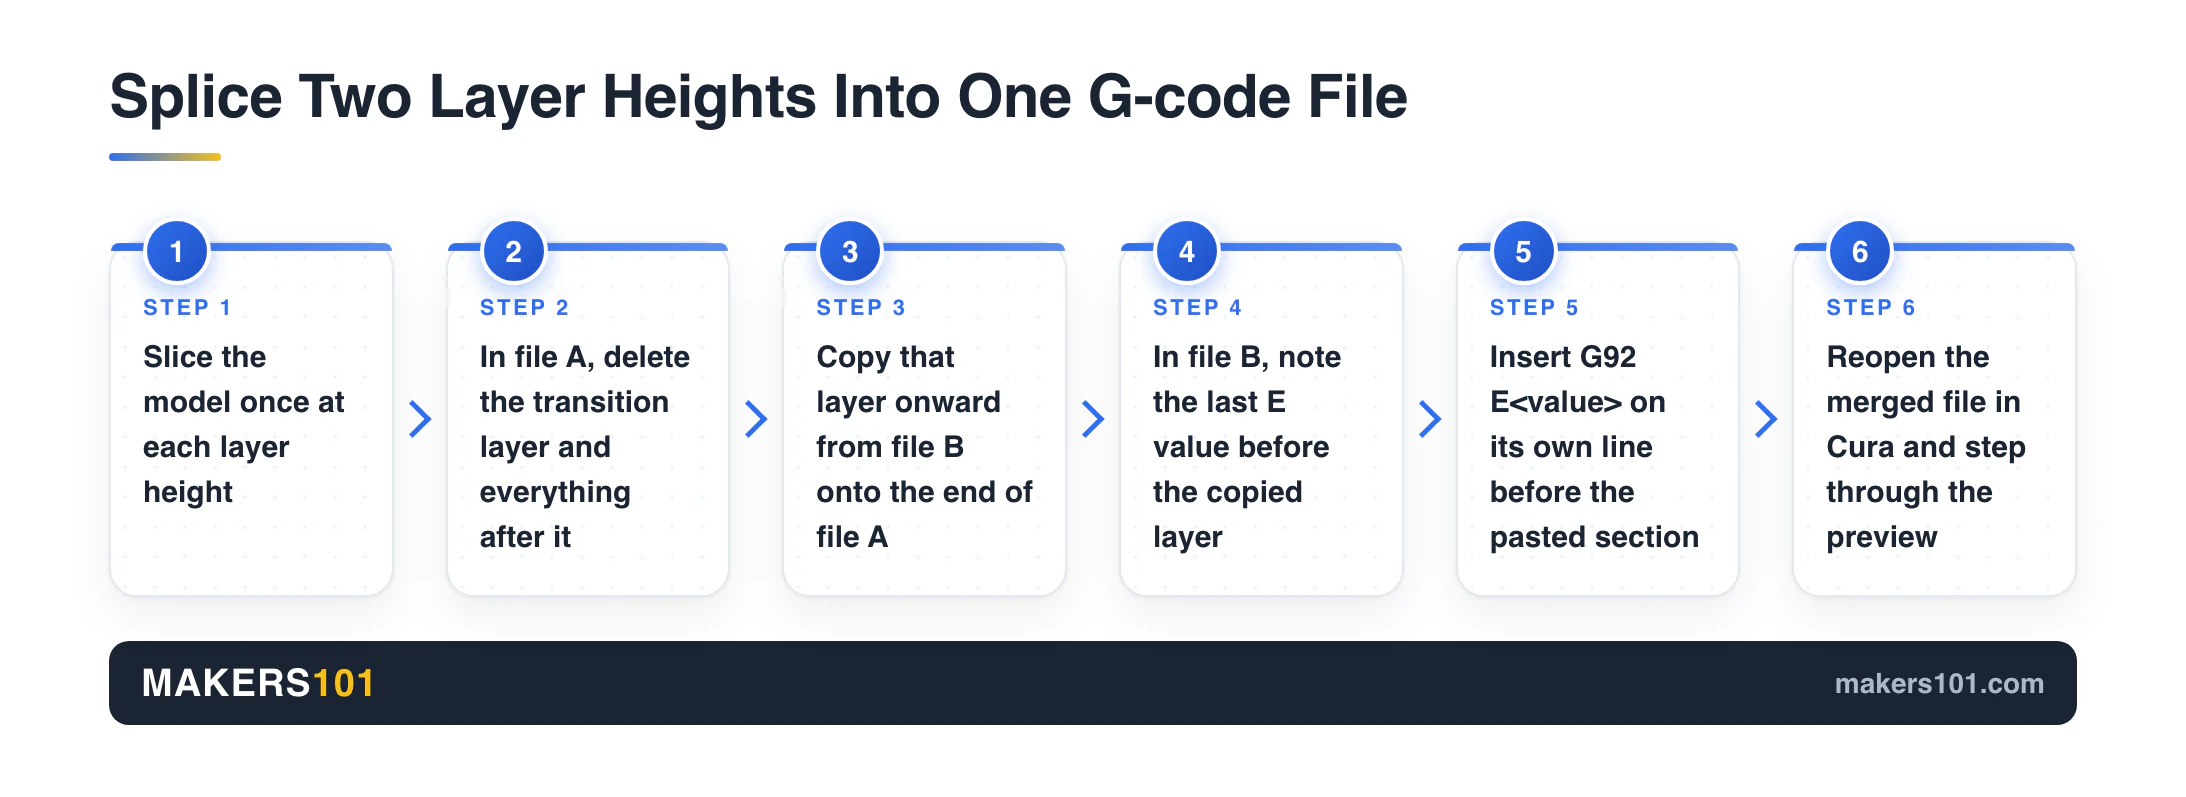
The idea is simple. Slice the same model once for each height you need, then stitch the useful section out of each file into one.
- Slice the model separately at each layer height you need.
- Open the G-code file for the height you are starting from.
- Find the start of the layer that comes after your transition height. Cura writes
;LAYERcomments into the file, so search for those. Layer numbers will mislead you here. - Delete that layer and everything after it.
- Open the G-code for the next layer height, find the layer at your transition height, and copy it plus everything after it onto the end of the first file.
- Back in the second file, find the first line before the layer you copied that starts with
G0orG1and carries anEvalue. Note the number after theE. - In your combined file, insert
G92 E<that number>on its own line immediately before the pasted section. - Repeat steps 3 through 7 for each additional layer height.
Why step 7 is the one people skip
Each sliced file counts extrusion from zero. Your first file might end at E184.2, while the pasted section starts back down around E3.1 because that is where the second slice was at the same point.
Without a reset, the printer reads that drop and behaves accordingly. G92 E rewrites the extruder’s idea of where it is, without moving anything, so the second section extrudes from the right baseline. Skip it and the print either starves or floods right at the seam.
Your transition height has to exist in both files
You can’t switch at any height you like. The transition has to land on a layer boundary that both slices actually produce.
Take the case that starts most of these forum threads: 0.2mm up to z=0.7, then 0.12mm above it. Those two ladders only line up every 0.6mm, so z=0.7 is not available in both files. You would have to move the transition to 0.6mm or 1.2mm. Your initial layer height shifts both ladders as well, so read the real Z values straight out of the ;LAYER comments.
Generated supports and tree supports break the splice, because their geometry is computed for one continuous slice. Regular supports may survive it. Either way, open the finished file back in Cura and step through the preview before you send it to the printer.
What Cura Can Change at a Specific Z
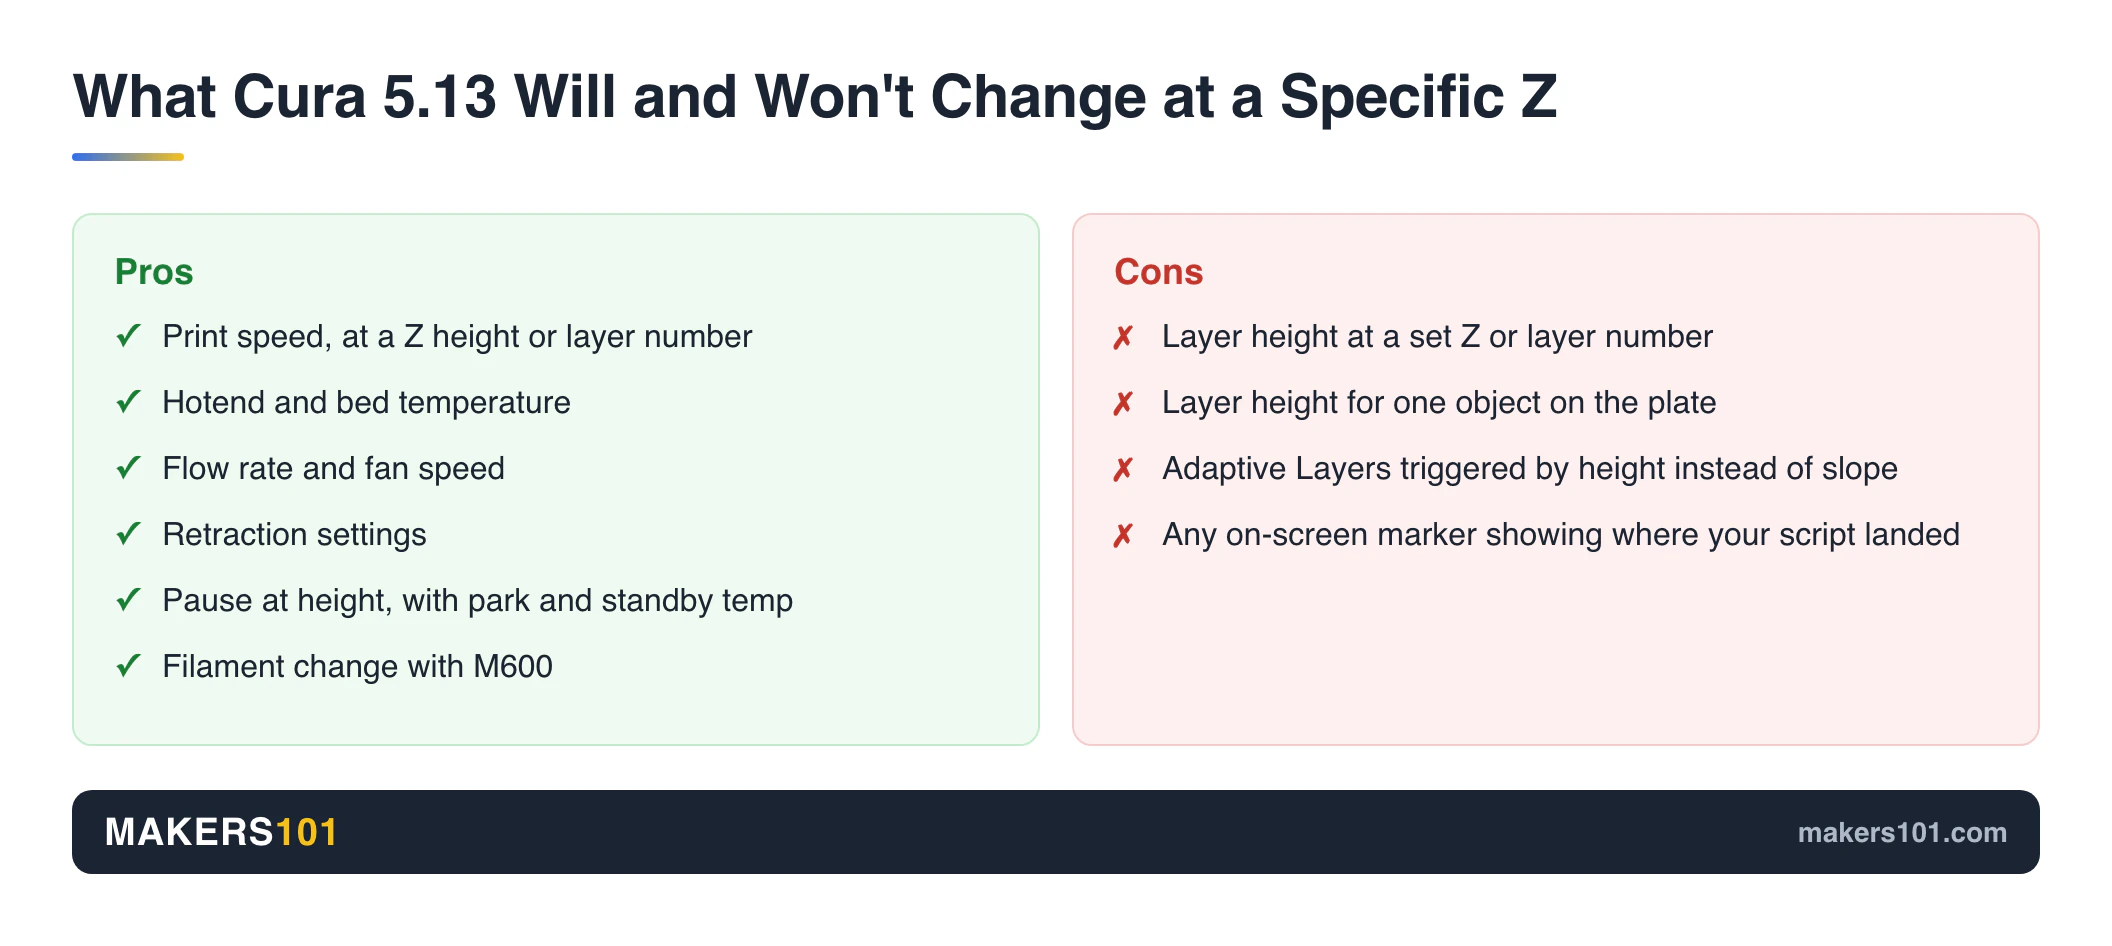
Layer height is off the table. Almost everything else about how a layer prints is not, and the list surprises people who gave up early.
ChangeAtZ lives under Extensions, Post Processing, Modify G-Code. It exposes 31 parameters, covering print speed, flow rate, hotend and bed temperature, fan speed, and retraction. Point it at a Z height or a layer number and it rewrites those values from that point up.
To apply a change across a band of layers and then undo it, add two instances of the script. GregValiant described the pattern on the forum: set the first one to change the value at your target layer with “Target + subsequent layers,” then set the second to put it back five layers later using the same option. Your new value applies for exactly those five layers.
Pause at Height handles the other common request. Set the trigger to Layer Number, enter the layer, tick Park Print Head, and give it a standby temperature. In the custom G-code box you can add M300 for a beep when it pauses and G4 S120 to hold for two minutes while you swap filament. Filament Change does something similar with an M600. For comparison, PrusaSlicer’s pause emits M601 and can put a custom message on the printer’s own screen, which is handy when the pause comes hours into a print and you have forgotten why you set it.
The off-by-one that catches everyone
Cura counts layers from zero. Enter 70 in a post-processing script and it takes effect after layer 69 in the G-code.
Bambu Studio and PrusaSlicer both display their layer sliders starting at 1. Anyone arriving from those slicers will be one layer off on the first try, every time.
Cura doesn’t give you any visual confirmation either. After you add a post-processing script, nothing in the interface marks where it landed, so verifying means opening the G-code and reading it. Bambu Studio and PrusaSlicer highlight the affected layer on the slider. Budget a minute to check your work manually here.
Once you have the Z-specific changes sorted, the 3DPKit Print Settings Finder is a quick way to sanity-check the baseline speeds and temperatures you are changing from.
How Thin Can You Actually Ask For?
Before planning any of this, check that your target layer height is actually on offer. Bambu Studio’s variable layer height tool, for one, allows 0.08mm to 0.28mm on a 0.4mm nozzle. Slicers and nozzles differ, so read the limits your own setup gives you. If your target sits well outside that range, a nozzle change is the more honest fix.
Inside that window, the cost curve is steep. One tester printed the same bust at three heights on that same nozzle:
| Layer height | Print time | Result |
|---|---|---|
| 0.2mm | 5.5 hours | Top surfaces visibly rough |
| 0.12mm | 9 hours 27 min | Clothing and face detail good |
| 0.08mm | ~12 hours | Excellent detail, rated the sweet spot |
Going finer than the nozzle wants can also work against you. In the same set of tests, a 0.2mm nozzle at that finest setting ran 23 hours and introduced under-extrusion defects, so the extra sharpness came with new problems attached.
For scale, a human hair is around 0.12mm thick. The finest layer that nozzle will give you is less than half of that. Past a certain point you are paying hours for a difference your eye struggles to find, which is worth weighing against matching your nozzle to the layer height you want instead.
FAQ
Short answers to the questions that come up once you know Cura cannot do this natively.
Can Cura do variable layer height?
Yes, through Adaptive Layers, but not the way most people mean it. Cura varies layer height automatically based on the slope of the model surface. You can’t tell it to use a particular height between two Z values.
How do I change layer height at Z in Cura for just part of a print?
You can’t. Cura has no per-section version of that control. Layer height sits at the top of Print Settings under Quality, and whatever you set there applies to the entire build plate for the whole print. There’s no per-object or per-height version of that field, so a partial change has to come from another slicer or from splicing G-code.
Can a 0.4 mm nozzle print at 0.1 mm layer height?
Yes. In Bambu Studio, the range on a 0.4mm nozzle runs 0.08mm to 0.28mm, and 0.1mm sits comfortably inside that. Expect the print to take roughly twice as long as the same model at 0.2mm.
Does changing layer height at a specific layer work in Orca Slicer or Bambu Studio?
Yes. Both include a Height range modifier, reached by right-clicking the object, and both let you add several ranges to one model. Organic supports rule it out, and at least one Bambu Studio user has reported it failing on multi-object plates.
What is the difference between layer height and Z offset in Cura?
Layer height is the thickness of each printed layer. Z offset shifts the entire print up or down relative to the bed, which is a first-layer adhesion adjustment. Changing Z offset won’t touch how thick your layers are.
Why does my Cura pause happen one layer off?
Cura numbers layers from zero, so entering 70 triggers the pause after layer 69. Slicers like Bambu Studio and PrusaSlicer number theirs from one. Add one to the layer number you see in another slicer’s preview.